Tabbles Manual (EN)
Note: We just lanched Tabbles version 4, and we're updating the manual as we speak. If you're lost please drop us a line at info-at-tabbles.net
Tabbles© is a way to find files, emails, and Internet bookmarks, when you don’t remember where they are, but only what they are about. Tabbles allows you to combine tags with a few mouse clicks, immediately finding the file, regardlessly of what folder or disk it is stored on. It even tells you what drive you need to connect, in case the file is archived on a disconnected drive.
For a more detailed introduction, see the feature list, the quick intro, and the long intro.
Also do not miss our basic training videos and our how-to videos
Contents
- 1 Intro: why Tabbles?
- 2 What's new in Tabbles 4
- 3 Setting up Tabbles 4
- 3.1 Using Tabbles Local (runs on Microsoft SQL Server LocalDb)
- 3.2 Using Tabbles Cloud
- 3.3 Using Tabbles Lan (i.e. your own Microsoft SQL Server)
- 3.3.1 Install Sql Server
- 3.3.2 Create the Tabbles database
- 3.3.3 Create the first Tabbles user
- 3.3.4 Configuring SQL Server Express for use in a network
- 3.3.5 Add groups and users
- 3.3.6 Import Users from Active Directory
- 3.3.7 Deploy Tabbles on a Windows Network using Group Policies
- 3.3.8 Assign keys to users in batch
- 3.4 Tabbles 4: importing database from Tabbles 3
- 3.5 Tabbles 4: importing database from Tabbles 2
- 4 What can you do with Tabbles?
- 5 Basic operations I: the GUI creating tabbles
- 6 Basic operations II: tagging files/folders/urls
- 7 Basic operations III – browsing and combining
- 7.1 How to search for files: the Combine and Subtract functions
- 7.2 Opening a tag
- 7.3 File sorting
- 7.4 The Combine function and Horizontal browsing
- 7.5 Performing a combination
- 7.6 The Subtract function: filtering out files from a combination
- 7.7 Father and children tabbles: nesting tabbles
- 7.8 How to link files, folders and URLs to several tabbles at the same time (this time from the File window).
- 8 Basic operations IV: file management
- 9 File previews
- 10 Auto-tagging rules and the One-click tagging
- 11 Folder Synchronization
- 12 Tag sharing
- 13 Advanced functions
- 14 The Tabbles database
- 15 Misc howto's
Intro: why Tabbles?
This chapter is an introduction to the philosophy behind Tabbles: if things sound complicated right now, keep reading: soon your doubts will be cleared.
The contrast between how we think of our objects and how we organize them
We are used to storing our files into folders and then sub-folders and sub-sub-folders. This forces us to a hierarchical (vertical) grouping (categorization) where each group has to be contained into other groups and sealed off from each other.
Objects in real life are stored in the same way: you store your socks in the left drawer of your closet. After all, a real-world object cannot be in two places at once.
In the same fashion you are used to store and organize your files on your hard-disk: “ you save the documents related to the product “A” inside the folder “A” as a subfolder of the folder “Manufacturer Alpha” as a subfolder of the folder “British manufacturers”. There are 2 main issues concerning this way of organizing files:
- Our brain works in a different way: you remember things based on their characteristics as “that product is red, spherical, heavy and has three holes to stick the fingers into it”. You will most likely remember all of those characteristics, rather than its physical location, or the name or the manufacturer.
- What if you want to instantly find all the documents related to all the products? It won’t be that easy.
The limits of keyword-based searches
Many software packages (including modern operative systems) allow users to perform keyword based searches.
While keyword based searches can be pretty efficient if you remember the name of the file, they are less efficient if you only remember a keyword: the more common the keyword is in the data you are searching (the hard-disk of your pc or your office’s local network), the less efficient will the search software be.
Tabbles helps you find files according to the characteristics of the file as you (or someone else) assigned them. These characteristics can be virtually unlimited; also, the search can be refined while you are looking for the file.
Furthermore, keyword searching does not work when you’re looking for files which do not contain text (as images, videos, graphic files, 3D files, archives, proprietary file formats).
Tabbles helps you categorize all sort of files and allows you to efficiently find them based on the way you think of them. The rest of the manual will explain the idea better.
What's new in Tabbles 4
Here is a list of the main new features added in Tabbles 4:
- The whole database logic was rewritten, bringing a major improvement in performances.
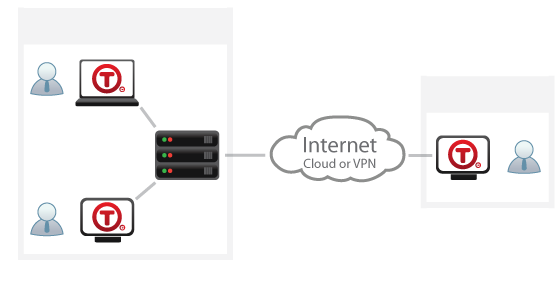
- Fast tag sharing with hundreds of machines. We are now using Sql Server for storing our tagging data. This allows collaborative tagging, and the sharing of tagged files, across large enterprise networks. It scales to handle hundreds of interconnected machines and users. Also, now, when you tag something, your collaborators instantly see the new tagged files, and can change the tags applied by someone else (provided they have permission to do so).
- Tabbles is compatible with Sql Server 2008 or above. Sql Express (the free version) works just fine.
- Outlook integration: you can now tag Outlook emails with Tabbles, and search among emails by combining tags with a few mouse click, via Tabbles’ easy to use interface. (As of Aug 18 2014, the Outlook plugin is still in beta)
- Archiving: You can tag files on removable drives (DVDs, USB drives, network drives) and then detach or eject the drives (i.e. archive them). The files will still be found by Tabbles when you make searches. And when you try to actually open the file, Tabbles will tell you what drive you need to connect (or which disk you need to insert) in order to open the file. So now there is no limit to the size of your tagged file archive.
- Explorer integration: finally, if you move or rename a file with the Windows File Explorer, the tags are not lost.
- Explorer integration, part II: in File Explorer, you see an overlay icon (a small ball) beside tagged files.
- Metadata: tags are now also written inside office documents, as metadata. This is useful in order not to lose tags when a document is sent via email, modified by a collaborator, and sent back via email.
- User management: the Tabbles administrator has a control panel in which he can create users and determine whether they can tag, untag, share tags, and so on. This can be specified at the user level or at the tag level. He can also specify what tags are available to users, and enforce a consistent tag structure and policies across the whole enterprise.
- Active directory integration: the administrator is not forced to create his users manually, but he can import users from an existing active directory environment. He can also import a subset of the AD users, with an easy to use GUI.
- Tabbles Cloud: this is an experimental feature, not meant for daily use. It is a version of Tabbles which spares you from having to install Sql Server, and runs on our remote server. This is slower than Tabbles normal, so please consider this only as a demo of Tabbles, which is easy for you to try. In the future, we plan on making the Tabbles Cloud option faster.
For more details on the features, please refer to our feature list.
Setting up Tabbles 4
- Tabbles 4 requires the .NET framework 4.5 (this is installed automatically by the installer).
- Unless you want to use Tabbles Cloud or the pre-installed Microsoft SQL Express LocalDB, you will need to install Microsoft SQL Server 2008 or above. The free version, called "Express", works just fine.
- Tabbles requires Windows Vista, 7, 8, 8.1 or above. You can use it on Windows XP but you lose some important features, like Explorer integration.
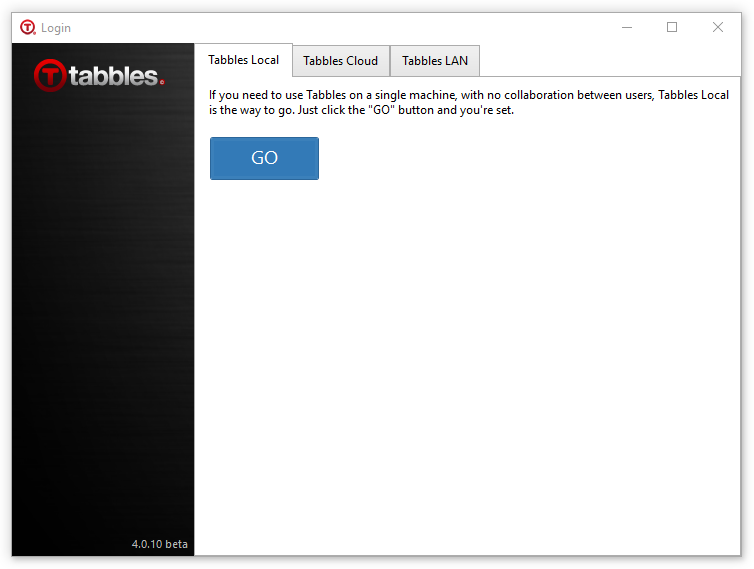
Using Tabbles Local (runs on Microsoft SQL Server LocalDb)
All you have to do is pressing the GO button. No setup needed.
Change LocalDb database location for Tabbles Local
If you want to move the LocalDb database, you need to do the following:
- You should have used Tabbles in LocalDb at least once so: install Tabbles, start it, and press "GO". Tabbles will now create the LocalDb Database in the default location.
- Then log out: File > Log out and after close Tabbles (close the window)
- Open a command prompt (cmd.exe) and execute the two following command lines, the result should be as in the screenshot below:
C:\Program Files\Microsoft SQL Server\120\Tools\Binn\SqlLocalDB.exe stop TabblesLocalDb4
C:\Program Files\Microsoft SQL Server\120\Tools\Binn\SqlLocalDB.exe delete TabblesLocalDb4

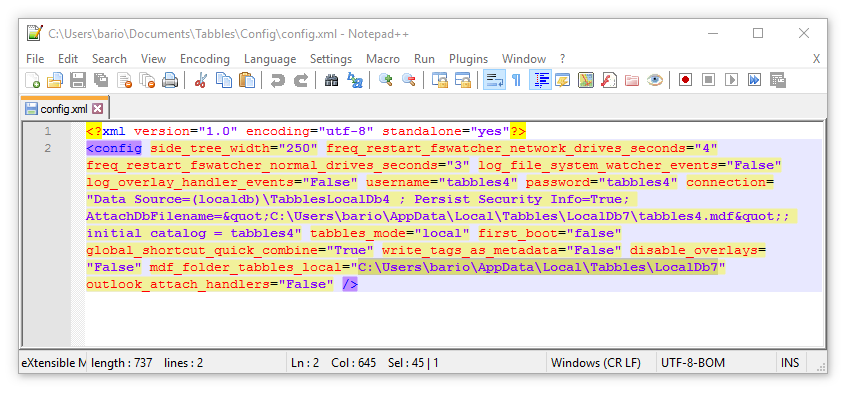
- If you want to keep your current database, you need to copy all the files in the current database folder C:\Users\%username%\AppData\Local\Tabbles\LocalDb to wherever you want the database to be from now on.
- Open C:\Users\%username%\Documents\Tabbles\Config\Config.xml and modify mdf_folder_tabbles_local=" WRITE THE NEW PATH HERE " as you see in the screenshot below and save the file.
- Launch Tabbles, press "GO" and enjoy :)
Note: using a LocalDb database on a shared drive and try to share tagging, is a bad a idea. Install Microsoft SQL Server Express instead.
Fix "Error initializing LocalDB" - sql exception. Number = 4060
In some cases, LocalDB hangs, you'll get an error message like this:

And in the log window/file you'll read something like this:
Cannot login. Sql Exception =


                    -------------------- Level 0 -------------


                   Exception type = System.Data.SqlClient.SqlException


                    hresult = -2146232060


                    sql exception. Number = 4060, state = 1


- LineNumber = 65536


Message = Cannot open database "tabbles4" requested by the login. The login failed.

Login failed for user...
When this happens we need to manually stop and delete the LocalDB instance, you do it so:
- If you have been using Tabbles for a while, backup your Tabbles database, it will be most likely in %UserProfile%\AppData\Local\Tabbles\LocalDb (backup the whole folder).
- Open a cmd prompt
- Run those two commands:
"C:\Program Files\Microsoft SQL Server\120\Tools\Binn\SqlLocalDB.exe" stop TabblesLocalDb4"C:\Program Files\Microsoft SQL Server\120\Tools\Binn\SqlLocalDB.exe" delete TabblesLocalDb4Using Tabbles Cloud
This means that your tags (not the files themselves) will be hosted in our own database hosted online. This option won’t be lightening fast (we’re using a basic hosted database plan at the moment, plus there is the internet between you and the database) but it’s still pretty usable.
You will first need to register an account, which is straightforward: click on "Create user" in the bottom right of the Login window and register on our website. The registration page will send you an email, so check your spambox!
Using Tabbles Lan (i.e. your own Microsoft SQL Server)
This will provide the best user experience and control on your data.
Install Sql Server
To install Sql Server and configure it correctly for usage with Tabbles, refer to our how-to video.
If you do not have Sql Server, you can download the free version (called Express) as shown in the video.
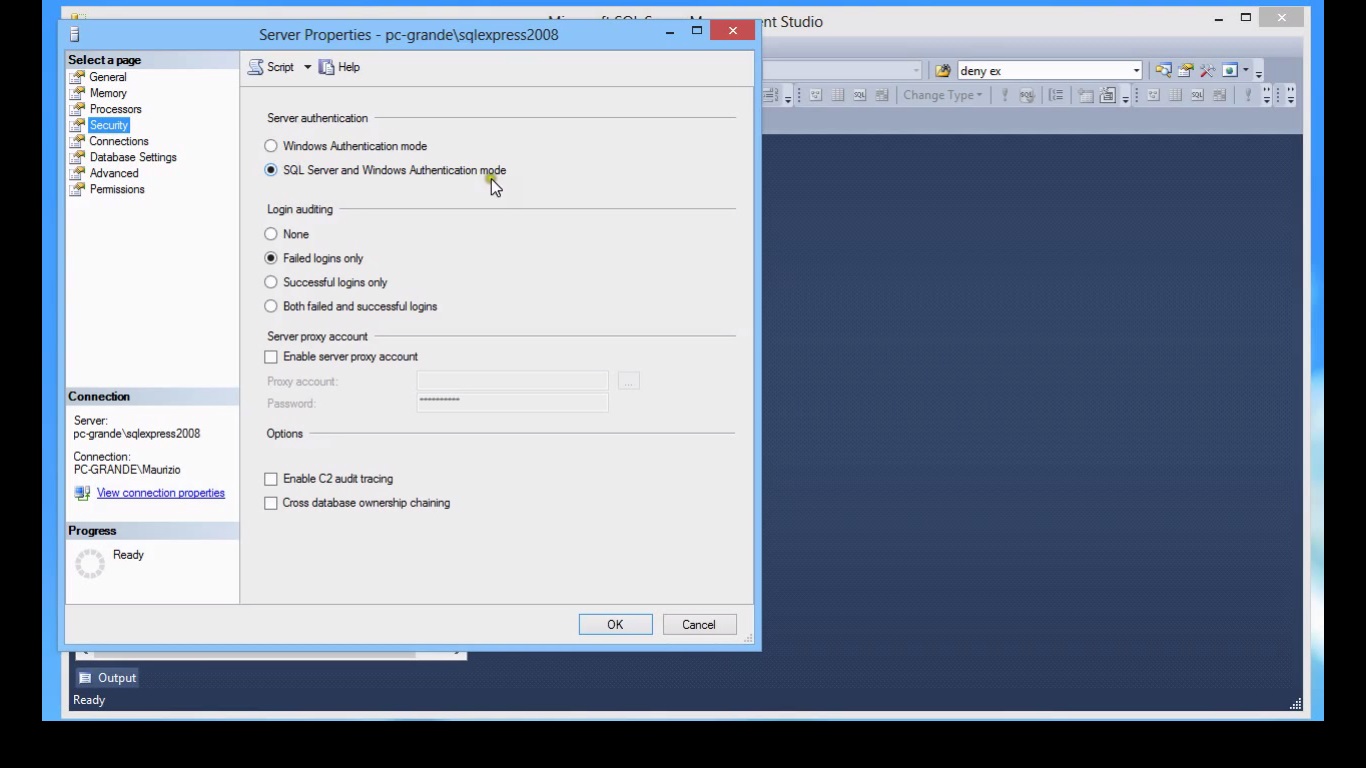
Please note that you need to enable Sql Server Authentication mode. This can be done during install (as in the video above), or later, with Sql Server Management Studio, as in the following picture:
Create the Tabbles database
For this step as well, please refer to our how-to video.
For a textual explanation, read on. You will see this dialog:
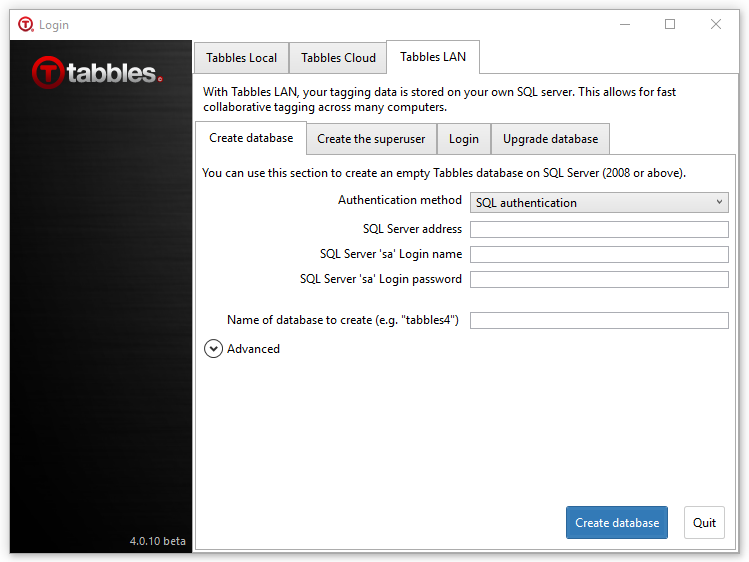
You need to click on Tabbles LAN -> Administer database and provide the credentials of an Sql Server user with administrator permissions. This means you can either use "Windows Authentication" or "Sql Authentication".
- For Sql Authentication, you need to remember the "sa" password, which you decided when you installed Sql Server. This is the less error-prone way to go.
- For Windows Authentication, your Window user must have been granted administrator permissions, and also you need to be on the same machine where the Sql Server is installed.
In the "database server address" field, you need to type MACHINENAME\SERVERNAME. (Or just MACHINENAME, depending on how you configured Sql Server).
- To know the machine name, go to the Windows Control Panel.
- To learn the SERVERNAME, go to Sql Server Configuration Manager.
Troubleshooting. If you get the message "unable to connect to Sql Server", try to login with Sql Server Management Studio, with either Windows Authentication or Sql Authentication. Take note of which method works. You can use the same method with the Tabbles client.
Create the first Tabbles user
Click on Tabbles LAN and fill the tab Administer database as in the picture (obviously, swap "Andrea" with your username, etc). The login should be automatic afterwards.
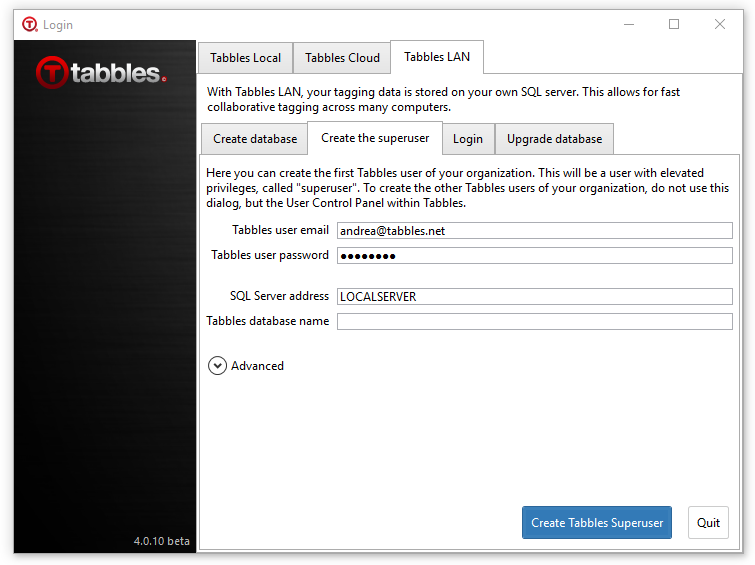
In the "database server address", type MACHINENAME\SERVERNAME, as explained in the previous section.
This way you create the first user. For creating other users, you have two possibilities:
- If your users are all on the same level, i.e. they are all "first-class citizens" with the same permissions, then to create other users you can follow this same procedure again, i.e. use the "create user" tab in the login window.
- If your users are subordinate users, which need to have fewer permissions, or if you want to import users from Active Directory, then to create users you can use the User Control Panel within Tabbles.
Configuring SQL Server Express for use in a network
You need to do this step if:
- you have many Tabbles users which need to collaborate, each with his own machine;
- you are a single user but want to use Tabbles from several different machines.
In this case, you need to configure Sql Server to accept connections from other machines.
For this, refer to this how-to video.
If you still have problems, please enable port 1433 as explained in these tutorials: [1] and [2]
Add groups and users
As you created your database, we recommend to create user groups first of all: in Tabbles open Sharing > Manage user groups and create the workgroups you need (you can also check the section "Create a Group" in this manual).
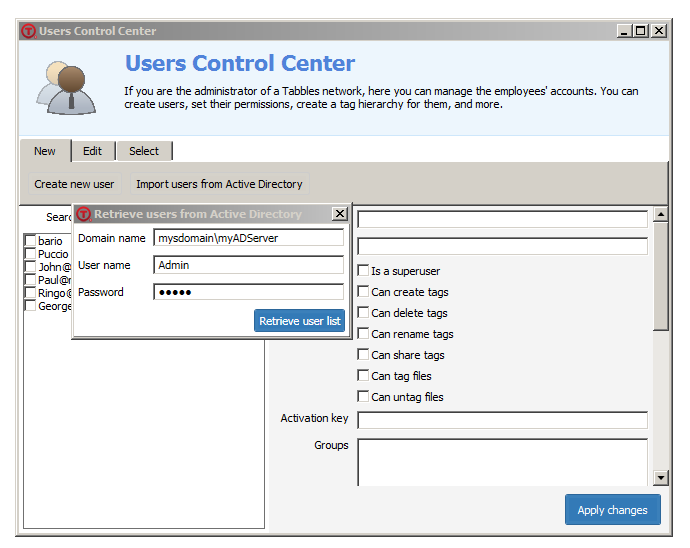
After creating a group, you can add your organization's users. If you ActiveDirectory configured, you can use Tabbles "Import from ActiveDirectory" feature, you will need to fill in the ActiveDirectory's domain controller (machine name), and the user and password that have privileges to retrieve the user list on that machine:
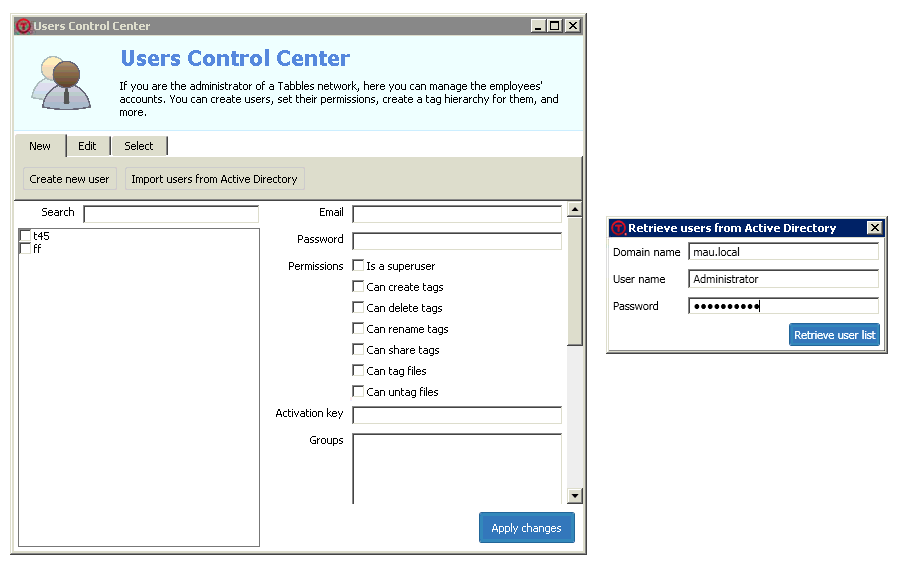
This window will then open and you can import all the users at once (existing users will not be duplicated and ignored).

Important: currently as the ActiveDirectory import tool creates the users inside Tabbles, it also generates a password for each of them which is the same as their username. The users can later modify their passwords from Tabbles.
Import Users from Active Directory
The Superuser can create the Tabbles users by importing a list from Active Directory: Sharing > User Control Center > Import from Active Directory. This feature imports a list of user names from AD and creates users in Tabbles where the Tabbles username matches the Windows user name read from AD. See the screenshots below
Deploy Tabbles on a Windows Network using Group Policies
Briefly: you'll need to deploy the .msi installer (get it from our Download page), then modify the file Config.xml and push this file to the %AppData%\Tabbles\Config of every machine where Tabbles will be.
Prerequisites
Tabbles needs a Microsoft SQL Server (https://www.microsoft.com/en-us/sql-server/sql-server-editions-express) to run, the Express 2017 version should be good enough up to 100+ clients.
If you're deploying the .msi file, you'll need to make sure the software requirements are met on the target machines. Tabbles needs:
- .net framework 4.5.1: https://www.microsoft.com/en-us/download/confirmation.aspx?id=40779
- Microsoft VSTO: http://go.microsoft.com/fwlink/?LinkId=158917
Deployment of the .msi
You can deploy the .msi (get it on our download page) using Group Policies. The .msi needs Administrator privileges to run.
Single Sign On (SSO)
In order to use SSO, you'll need to push a Config.xml file to every machine where Tabbles will be deployed.
After the sysdamin (Tabbles Superuser) has setup a database, imported the users from Active Directory and deployed Tabbles on the network, there will be an SQL Server with a database and a list of users/passwords. We now need to let each Tabbles installation now, where the database is and also that each Tabbles has to login using the Windows user of the current user on that machine and a password that is generated algorithmically.
This is what the Config.xml looks like:
<?xml version="1.0" encoding="utf-8" standalone="yes"?>
<config using_web_or_lan="lan" side_tree_width="250" freq_restart_fswatcher_network_drives_seconds="4" freq_restart_fswatcher_normal_drives_seconds="3" log_file_system_watcher_events="False" log_overlay_handler_events="False"  connection="Data Source=MYSERVER\SQL2014; initial catalog = tabbles4; Persist Security Info=True; User ID=tabbles4; Password=tabbles4; Connection Timeout=60" tabbles_mode="lan" last_shown_popup_new_version="03/09/2017 12:30:26" first_boot="false" global_shortcut_quick_combine="True" write_tags_as_metadata="False" disable_overlays="False" outlook_attach_handlers="False" />
So you'll need to do the following:
- If you created the Tabbles database with the default name (“tabbles4” – else see below), then all you have to do is modify the address of the SQL Server in the connection string (the default port is 1433):
connection="Data Source=SERVER\SQL2014;of the Config.xml.- If the name of the database is different you will also need to change the initial catalog (database name), User ID and Password to the same value. So in the Config.xml you will have something like:
initial catalog = MyDatabaseName; User ID=MyDatabaseName; Password=MyDatabaseName; - If you created the database manually or modified its user and password, you will of course need to change that in Config.xml, that will look something like:
initial catalog = MyDatabaseName; User ID=MyDatabaseUser; Password=MyDatabasePassword;
- If the name of the database is different you will also need to change the initial catalog (database name), User ID and Password to the same value. So in the Config.xml you will have something like:
- After you have written the address of the SQL Server, along with the database name, in the Config.xml, you will need to push the file to the folder %AppData%\Tabbles\Config of each machine where Tabbles will be used.
After pushing the Config.xml to every user's machine, the users can launch Tabbles and they should automatically be logged in Tabbles with their correct user: congratulations! :)
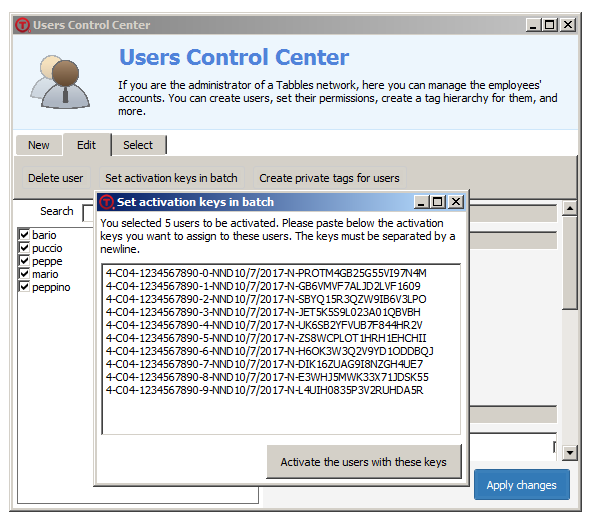
Assign keys to users in batch
After setting up the users, you'll probably want to assign serial keys to each user, you do it as following:
- in the User Control Center, select the users you want to change the license to. If you want to select all users, click on the tab "Select" and click on "Select all users"
- click on the tab "Edit" and click on "Set activation keys in batch"
- then paste the keys here and click on "Activate the users with this keys", this will write the keys in the database.
- Tabbles reads the serial from the database only when it starts up, so each user will have to restart Tabbles to see te change. They can restart by clicking on File > Restart Tabbles
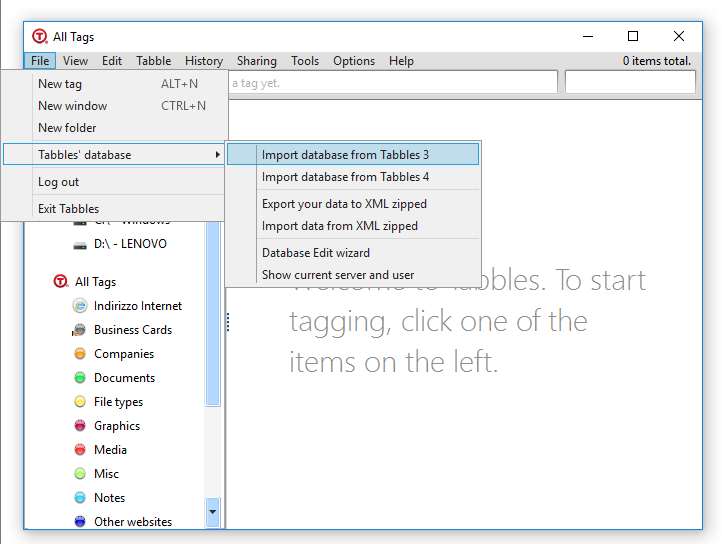
Tabbles 4: importing database from Tabbles 3
Are you using Tabbles 3 already? Then you can import your existing database this way:
Importing to "Local" or "Cloud" mode
If you want to run Tabbles in Local mode (we didn't have that in Tabbles 3) or Cloud (for single users only), you will first need to export your database to xml from Tabbles 3:
- Export from Tabbles 3: File > Tabbles databases' > Export data to xml zipped
- Import in Tabbles 4: File > Tabbles databases' > Import data from xml zipped
Importing to "LAN"
If you're upgrading from Tabbles 3 LAN, to Tabbles 4(or 5) LAN, then the path is much easier as you can import directly from the Tabbles 4 GUI, just follow the instructions:
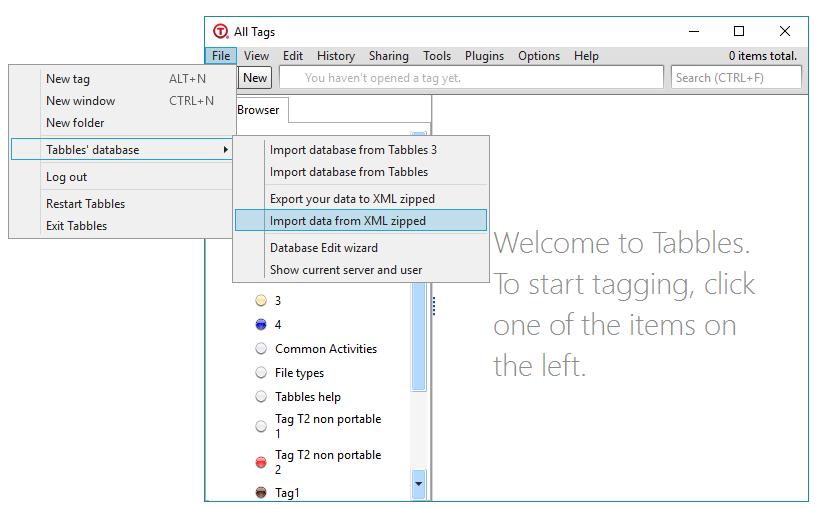
Tabbles 4: importing database from Tabbles 2
Starting from Tabbles 4.3.1 you can import your tags directly from Tabbles 2.
Find your database (db.zip)
You will need to find your database file, which is a file named db.zip:
- If you're using the installed version, it will be in the folder (just copy and past this into Windows Explorer): %userprofile%\Documents\Tabbles\Databases
- If you're using the portable version, in the \Databases folder of Tabbles portable
Import your database
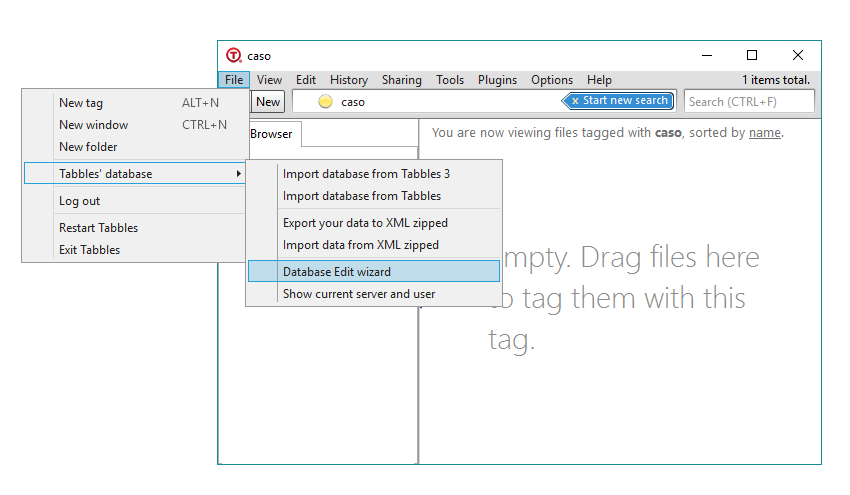
You will find the import function in the Tabbles menu seen below: File > Tabbles' database > Import Data as XML zipped
What can you do with Tabbles?
Tag files
Any kind of file can be tagged, i.e. associated to one or more tabbles. New tabbles can be created at any time and can be given a color.
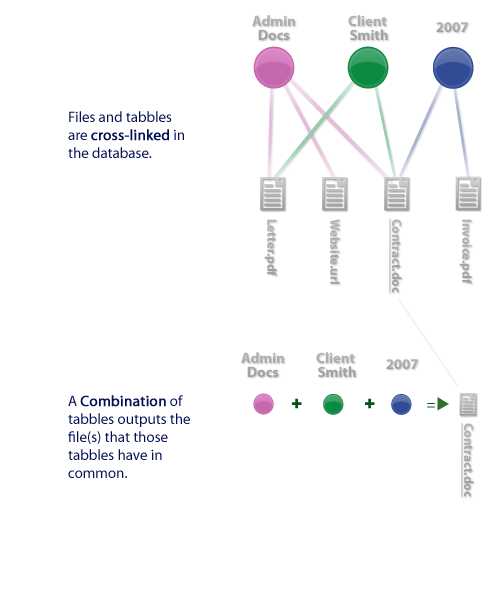
Find files by combining two or more tabbles

Tabbles can be intersected with, and subtracted from, each other. These operations are referred to as "combine".
The intersection is the most common way to combine two or more tabbles. This kind of combine is identified by a "plus" sign, like in "John + Picture". When two or more tabbles are combined with a plus sign, as a result you will see the files that are in both tabbles.
For more informations, see here.
Basic operations I: the GUI creating tabbles
Here you will learn how to move your first steps with Tabbles. You will learn how to use the GUI, how to create a tag, how to tag files, folders and Internet addresses, and how to do searches by combining tabbles.
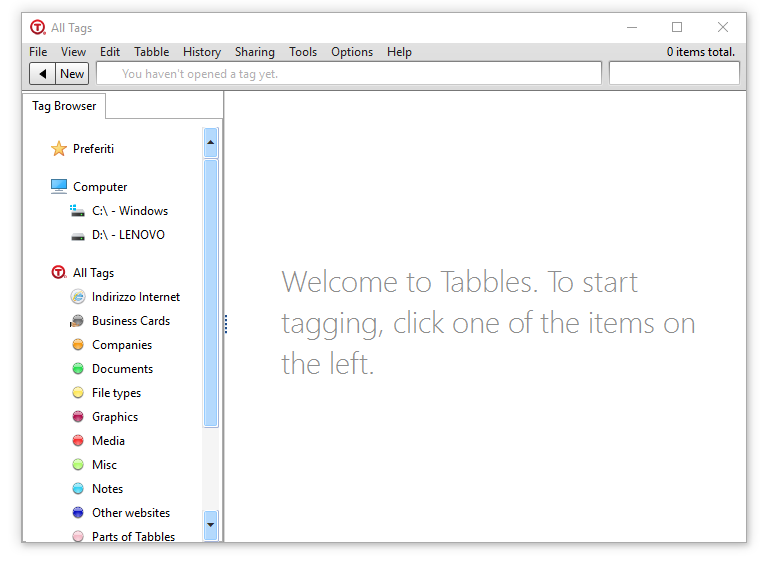
Introducing the Tabbles GUI
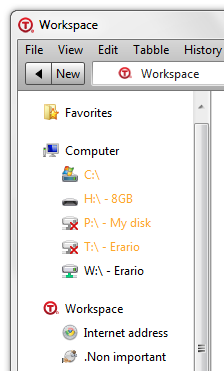
In the current version the Tabbles window looks like this:
Creating tabbles
Think of a tag as something like a virtual folder: you need to create it first and fill it with files/folders/urls afterwards...as you do with folders!
You can do this in several ways:
- By clicking on the "New" button
- Menu > File > New tag
- Alt + N
- Using the "Quick tag" window: create a tag on the fly while tagging a file/folder. See: #Tagging_files_.28putting_files_into_tabbles.29
Choosing a color
Tabbles comes with a set of default colors. You can also make a custom color with File > New tag > Manage color.
Basic operations II: tagging files/folders/urls
Note: "Tagging a file or folder" is equal to "putting a file/folder into one or more tabbles": the tabbles are tags and virtual folders at the same time, so keep in mind that you can use them as both.
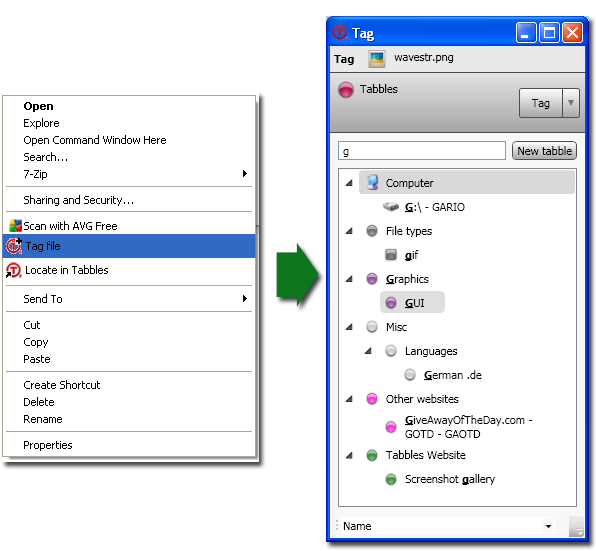
| Tagging (using tabbles as tags): right-click on a file/folder and click on "tag" |
| Categorizing (using tabbles as virtual folders): drag'n'drop a file/folder/url into a tag |
Tagging files (putting files into tabbles)
The tabbles are “magic containers”: sometimes they contain files, some other times they float around files. The idea behind the categorization is that files, internet addresses and folders are ‘placed or pasted into tabbles’: in reality what happens is that they become ‘linked to tabbles’. Placing or pasting files into tabbles will simply create an association in the Tabbles’ database: the files and folders are not moved or copied on the hard disk. You have several ways to do this:
- The shell extension: the first one you'll see it's probably the shell extension: right-click on a file and see this:
- Drag'n'drop: by drag'n'drop a file into a tag
- Copy'n'paste: by copy'n'paste a file into a tag
- Inside Tabbles: using the tagging functions inside Tabbles.
Tagging Internet addresses
To see how to tag Internet addresses with Tabbles 4, see this how-to video.
This technique can also be used to easily tag your Gmails and tweets with Tabbles.
Tagging folders (putting folders into tabbles)
You can tag folders in several ways:
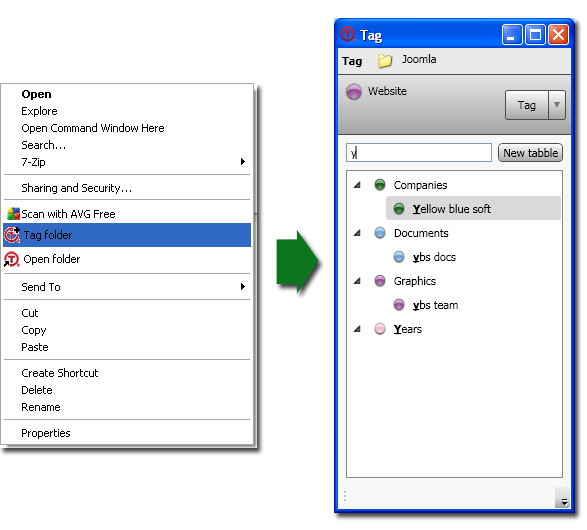
- Shell extension: using the "tag folder" link in the shell extension (right-click from Windows Explorer)
- Drag'n'drop: by drag'n'drop of a folder into a tag
- Copy'n'paste: by copy'n'paste a folder into a tag
- Inside Tabbles: using the tagging functions inside Tabbles (right click, drag'n'drop, copy'n'paste...)
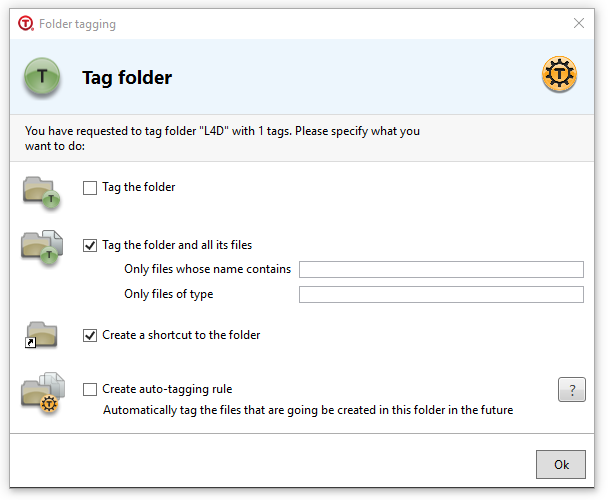
Tabbles will open the Folder Tagging window, which looks like this:
The shell extension (when you're tagging a folder) looks like this:
Important: how folders and subfolder are handled in Tabbles
When categorizing a folder, Tabbles will by default go through the folder and its subfolders recursively and categorize the all files inside each subfolders as well. After the categorization, you can see the files and folders linked to the tag you are viewing: here the file and the folders containing them will be shown on the same level. You can anyway browse the folders in the usual way (hierarchically, double clicking on a folder to go “inside” it). The idea behind this choice is that while Tabbles aims to allow the user to categorize files based on a different principle than folders, it also build to help user categorize files and folders on the basis of their existing folder categorization.
Tagging only the folder
This function will tag the folder only, not the files in it and not its subfolders (and their content).
Tagging the folder, its files and its subfolders
This function will tag the folder and the files in it, as well all its subfolders: all the files in the its subfolders will be tagged all the way down until the end of folder tree. Please consider that this operation can take quite some time (depending on how many files are in the subfolder), but since it's executed in a parallel thread you shouldn't notice... it may take a while until all your files are tagged though.
Create an auto-tagging rule for the folder (read our blog article)
This is an advanced feature that needs some understanding! By using this function you're telling Tabbles 2 things:
1) "tag this folder, its files and its subfolders" (same as the previous functions)
2) "keep an eye on this folder (and its subfolders) and as soon I copy/move/create/save a new file into it, tag it as well, forever and ever".
Using this function you can "explain" Tabbles how your folders are organized and have them tagged based on this. One basic use of this function is to group together folders that are similar but far away from each other, e.g. C:\customers, D:\customers and\\fileserver\customers.
Basic operations III – browsing and combining
How to search for files: the Combine and Subtract functions
The concept of “don’t search for files, think of them” is the core behind the logic of Tabbles. The way you have to find your files involves remembering the characteristics of the file(s) you’re looking for (i.e. Product name, Customer, Project, Event, Type of media, Subject etc). Therefore you should find the relevant tabbles which are probably linked to the files you’re looking for, double-click on their Nucleus to see the files linked to it and then refine the search using the Combine function.
- The Combine function allows you to see the files linked to all the tabbles you are combining (they have the “+” sign in front of them).
- The Subtract function allows you to hide the files linked to the tabbles which are being subtracted (they will have a “-“ sign in front of them).
You can also refine combinations dynamically adding and removing tabbles to the combination. We called this Horizontal browsing: this allows you to group and sort files (which are far away from each other) quickly and precisely.
Opening a tag
Since the version 1.4.5, the main window of Tabbles looks a lot like Windows Explorer. To open the first tag you have several options:
Alternatively you can open the Quick-open window and select the tabbles to open/combine from there. You can open the Quick-open window in two ways:
- From the menu bar click Tools > Quick-open tabbles
- Press alt + c
File sorting
Tabbles offers different ways to sort files:
- by name (the default, like in Windows)
- by modification date: the most recently modified files go on top. This is very useful so your most recently used files and folders are always on top; this helps you avoid scanning long lists of files when you are working. We suggest using this view for most of your work. However, this view is a bit slower than "by name", because the files must be sorted, and this involves accessing the disk to obtain the modification date of all the files; so if there are a lot of files in the current view (say 1000), this can take sensibly more time. If you use this view, we suggest to uncheck the menu item "keep folders on top".
- by file size: the biggest files go on top; this is useful in rare situations where you are freeing space off your disks.
In addition, you can choose whether to keep folders on top (this is the Windows default), or whether to mix them with the files (this is especially useful if you are sorting by modification date).
The Combine function and Horizontal browsing
Horizontal browsing represents a groundbreaking improvement in the file-browsing. As any major improvement, it’s not easy to be explained with simple words: Horizontal browsing gives you the chance to navigate throughout tabbles based on the files are commonly linked to. Horizontal browsing is tightly linked to the Combine concept.
| The Combine function displays all the files, folders and URLS linked to all the tabbles in the combination. |
| The Combine function performs one or more logical AND/OR between the files/folders/URLs linked to the tabbles in the combination. |
Sounds complicated? We promise it isn’t! :-D
The picture below should explain it a bit better:
Performing a combination
In the latest version of Tabbles, we made an effort to make the make the "combining" as close as possible to the browsing folders in Windows Explorer. This means that the user experience is very similar to Windows Explorer (the way you interact with Tabbles, what happens when you click and how all the items look like), but nevertheless what happens under the hood is quite different... let's try and explain it, and let's focus on the differences between Tabbles and Windows Explorer:.
In Windows Explorer you can only browse vertically and only through one path
Let's say you are in C:\ and want to reach c:\photos\2009\holidays, you'll have to go all the way down to the \holidays folder, like this:
c:\ <--- Start here
c:\photos\
c:\photos\2009\
c:\photos\2009\holidays <--- Arrive here!
Let's say you are in the folder e:\photos\2009, if you want to reach c:\photos\2009\ you'll have to go all the way up and then down again.
With Tabbles you would combine the tabbles "photos" and "2009" and this would show you all the photos from 2009, regardless from where they are.
In Tabbles the path you can browse is built dynamically
This concepts may requires a little effort to understand... but we promise it will be worth it.
In the previous example, The position of the folder c:\photos\2009\holidays is fixed, therefore the path to get to it is fixed too. Tabbles does things differently: it builds a path (a browsing tree) dynamically, depending on how things are related.
So: if you're in the tag "photos" and the tag "photos" has some file in common with the tag "2009", then tag will give you the chance to go into the tag "2009"... when you double into "photos" you'll be in the combination "photos" + "2009"
Once you're into "photos" + "2009", Tabbles will show you all the tabbles that have files in common both "photos" and "2009"
The "+" next to a tabbles: means that the tag is combinable. As your tabbles will grow, you will start putting tabbles into each-other: at that point the "+" becomes handy - it will help you understand if the tabbles you're looking at are "brothers" (they're inside the same tag) or if they really have some files in common with the open tabbles.
The power of the tree
The tree on left side of the screen is providing you with useful information about what makes sense to combine and what doesn't: if Tabbles understands that the tag you have opened have some files in common with any of the tabbles in the tree, the tabbles will be displayed with a circle around them. You can also right click on a tag in the tree and combine it from there.
The concept of "combinable" - the true power of Tabbles'
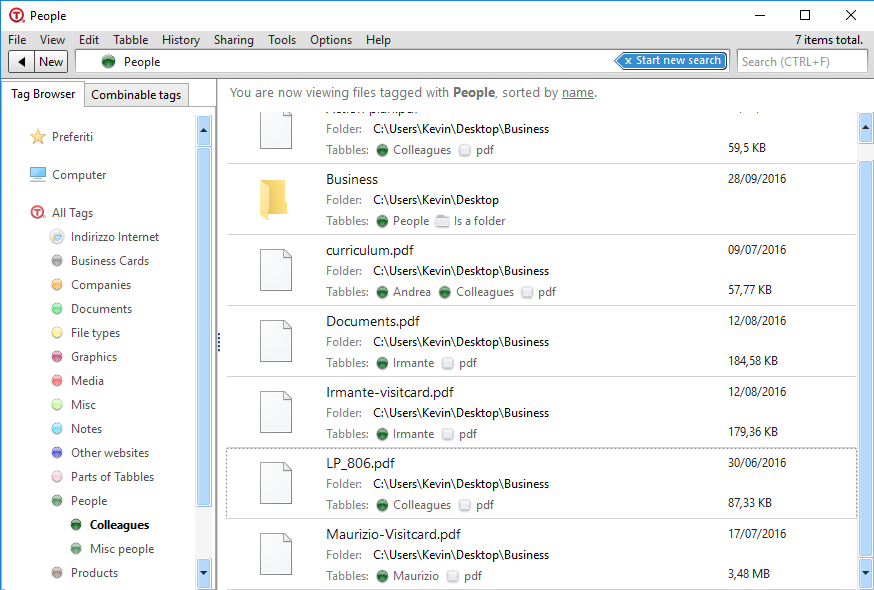
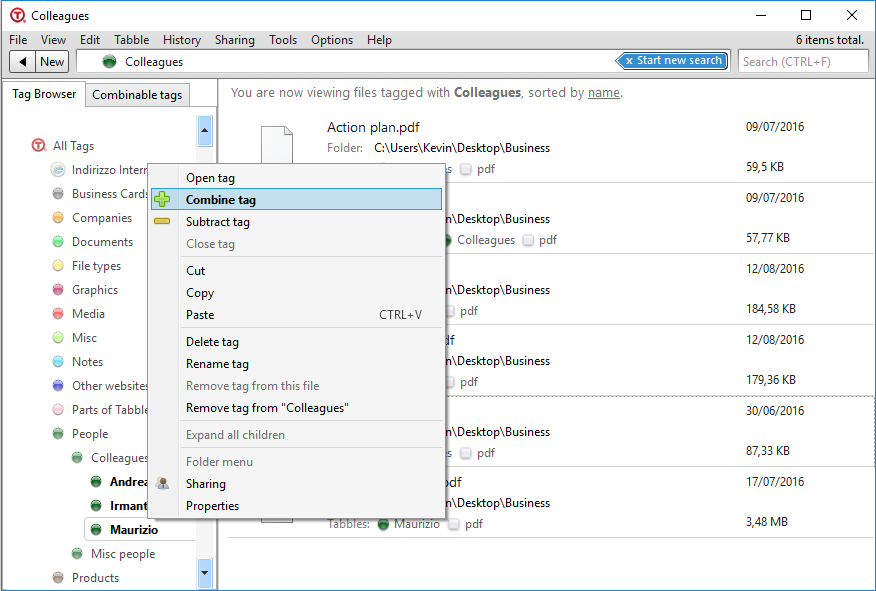
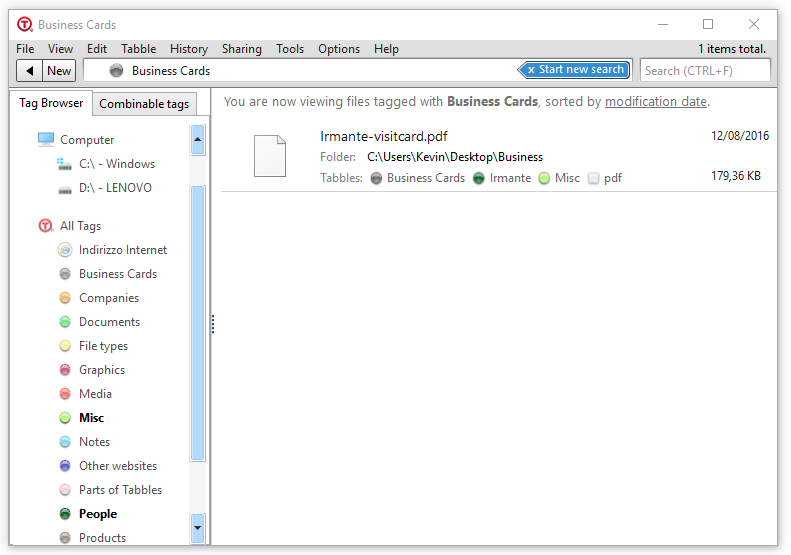
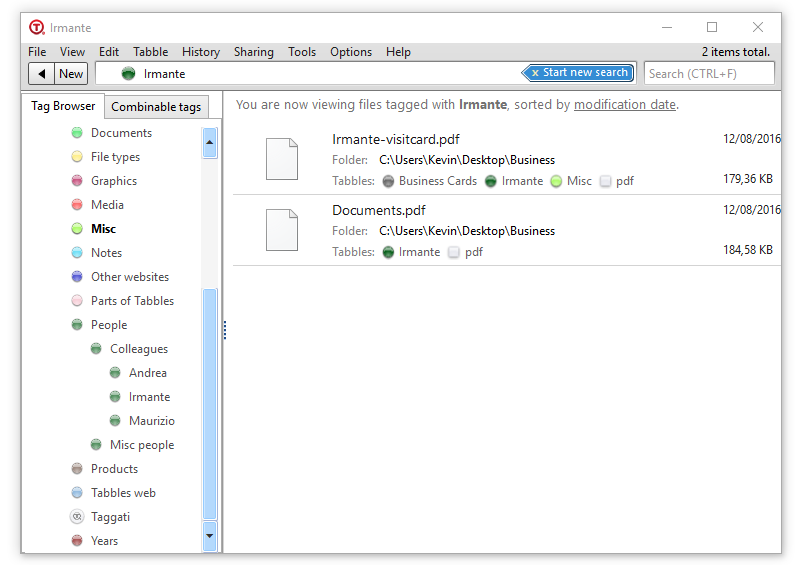
What Tabbles is doing when deciding what tag it should display in the main window (and put a "+" next to it and in the tree) is checking which tag has some files/folders/url in common with the one already open and filtering out all the rest. The ratio behind this choice is that what you probably want is to start from a tag and advance performing progressive "logical ANDs" with other tabbles only when the operation would give you a non-empty list. Example: In this picture, after opening the tag Business cards I can see that the tabbles Andrea and Maurizio are circled - Tabbles is telling me "there are Business cards for Andrea and Maurizio but not for any other people in the list". All the tabbles in the main body of the application are also combinable, meaning that you can "go into them" and you will find something...
"Excuse me but I'm dumb, can you please explain me how it works?"
Hehe, of course :-D
Each time you open a tag, the program checks the whole database and picks all the tabbles that have some file in common with the tag you opened - and marks them with a "+".
"Ok, but what' the whole point of that?"
The purpose of Tabbles is helping you sorting and finding files based on what they're related to or what you remember of that, right?
The typical workflow in this case is that you'll start looking the files related to an "idea" (a tag) and thenrefine your search by adding another "idea" to the previous one. The combinable tabbles push your search one step further to finding: if they're not combinable it means that you won't find what you're looking for given your starting point.
Example: let's say you're looking for the "pics" of that "mountain" in "the Alps": you'll probably start opening the tag "pics". Now, if there is any file/url related to file "pics" and "mountain" or "Alps", the software will put a "+" next to each of the tag, and show the tag in the main body. If the tabbles "mountain" or "Alps" are showed in the main body, this will mean that there is no "pic" related to "Mountain" and "the Alps".
We know that this sounds hard to understand at first... practice a bit and you'll find it out yourself! This is by the way the very core of the "Combine" function, if you understand this, than you can use Tabbles as its best! :-D
The Subtract function: filtering out files from a combination
If you want to visualize, for example, the files linked to the “Project Homepage” but excluding the files linked to the “User John” or the files “.jpg”, then the Subtract function is what you need.
The Subtract function is accessible from the right-click menu of the tabbles in the File window.
Father and children tabbles: nesting tabbles
A tag can be placed into one (or more other) tag, as you do with folders. There are anyway several differences between nesting of folders and nesting of tabbles:
1) A tag can be put into several other tabbles at the same time, without copying it.
2) Placing the tag "Child" into the tag "Father" will cause the files tagged with the "child" to also be tagged with the "father", but in a one-way process (read below).
3) Because of the point 2), tag "child" will become combineable with the tag "father" and viceversa.
Visualization: the side-tree vs the main body
- The left side tree, you will see only the static hierarchy of the tabbles, meaning you'll see only the tabbles in the way you organized them yourself.
- In the main body, you will see the dynamic hierarchy meaning that you'll see the tabbles you manually nested, blended with the combineable tabbles.
In the shot below, you can see the difference between the content of the tag "Documents" in the side-tree and in the main body of the app.
One way inheritance: the tag father contains the files, but not viceversa
When the tag "child" is put inside the tag "father", the "father" will receive the files tagged with "child". For this reason, the files will appear when browsing the "father", but the tag "father" will not appear in the file properties: check image below:
The tag "EULA" is nested inside the tag "Documents": the files contained in "EULA" are (apparently) not tagged with the tag "Documents". But if you browse the tag "Documents" you'll also see the files contained in "EULA".
This is due to a design choice: the goal is to keep the view as clean as possible.
How to link files, folders and URLs to several tabbles at the same time (this time from the File window).
The tabbles behave the same everywhere: now you are on the File window. Here you can view and interact with group of tabbles as well as with the files they’re linked to. You can interact with the single tabbles in the same way you do in the Main window. Furthermore, you can use the functions of the Active tag panel: from there you can perform operations on all the tabbles inside it.
Basic operations IV: file management
Tabbles allows the user to perform the most common file management operations, like copy/cut/paste/move/rename/delete.
Moving files within Tabbles
Since the version 3, Tabbles tracks file movements done in Windows Explorer (or File Manager). More precisely, it tracks: - File/Folder movement - File/Folder rename - File/Folder delete - File/Folder cut&paste
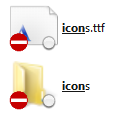
Shadow files
A shadow file (or folder) is a file that has been moved or deleted without Tabbles knowing it. You can recognize it as it is marked with a ["no entry" road sign]:
If you double click on a shadow file, Tabbles will show a window that will help you to specify the current location of the file and also of the other files that has been moved together with it (if any). Note: you can do copy/cut and paste of files from Windows Explorer to Tabbles, but not the other way around.
When do Shadow files occur?
Shadow files, can typically occur in two situations: - In a Windows network where some machines have Tabbles installed, and some other don't, if user on a machine without Tabbles, moves a file/folder that was previously tagged. - If a user moves a file using a file manager that is not Windows Explorer ("File Manager" in Windows 10) or Tabbles and does it without using the Explorer Context menu, when available.
Completely removing Shadow files/folders
If you untag a shadow file, Tabbles will still hold a record of the file in its database. This is done for several reason. You can completely remove shadow files in different ways:
Remove the selected shadow file(s)/folder(s)
You'll need to select the file(s)/folder(s) you want to remove, then Right click > More > Untag completely (ALT + F).
Bulk remove shadow file(s)/folder(s)
If you need to remove all the shadow files from a folder, a disk or a tag, then Right click > Advanced > Remove all shadow files in this tag from the database.
If you want to remove all the shadow files from the database, Right click on "Workspace" then "Remove all shadow files in this tag from the database".
File previews
Tabbles offers file previews, and those are read from Windows Explorer. Basically if Explorer can create the preview, Tabbles will be able to use it and show it.
Note: Tabbles can only use some preview sizes (not all), therefore if Tabbles is not showing the preview, make sure that Explorer can generate previews of any size (you can check this by visualizing icons of different sizes).
PDF File Preview
There is a setting in Adobe Reader that when enabled not only makes it work in Windows Explorer, but it also made it work in Tabbles. In Adobe Reader the setting is "Enable Thumbnail Views in Windows Explorer".
Auto-tagging rules and the One-click tagging
Watch training videos 6, 9, 10
These set of features appears in the 1.3.0 release and is explained in this blog post. The idea behind those features is to minimize the workload required for a user to tag files (One-click tag) or to automatize it based on where the file is or on other user-defined rules (Auto-tagging rules).
Auto-tagging rules
The background of the feature is explained in our blog post.
The idea is that users already have their files organized in a folder structure and the tagging should reflect this categorization and start from there.
Creating and editing a simple Auto-tagging rule for a folder
An Auto-tagging rule for a folder will tag all the files currently present in the folder and those that will be there in future, with the selected tabbles. Therefore, once the rule is created Tabbles starts "listening" to everything that happens in that folder, and (as long as Tabbles is running) whenever you can create/move/copy files in that folder, Tabbles will "see it" and tag the file consequently (and/or show a One-click tagging pop-up)
You can create Auto-tagging rules in different ways.
- The easiest way is by using the dialog box that appears whenever you tag a folder (check the chapter: #Tagging_folders_.28putting_folders_into_tabbles.29).
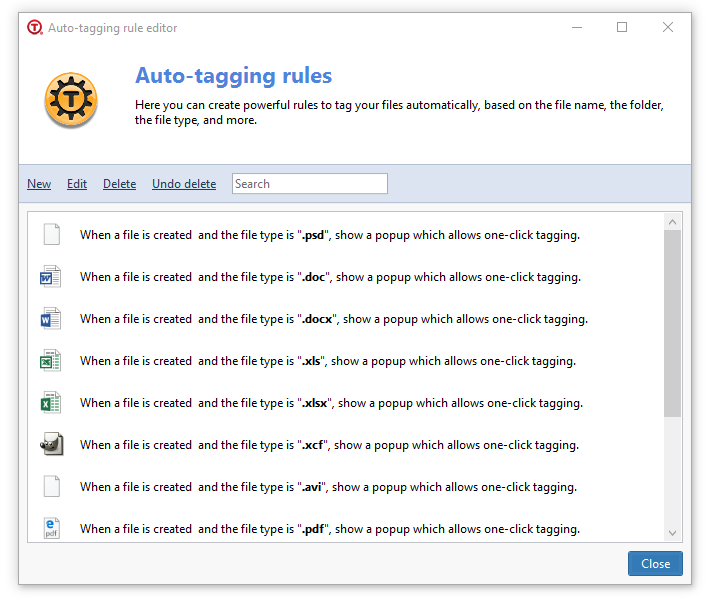
- Or you can create a rule using the Tools > Auto-tagging rules > New - the "Edit rule" Window will appear:
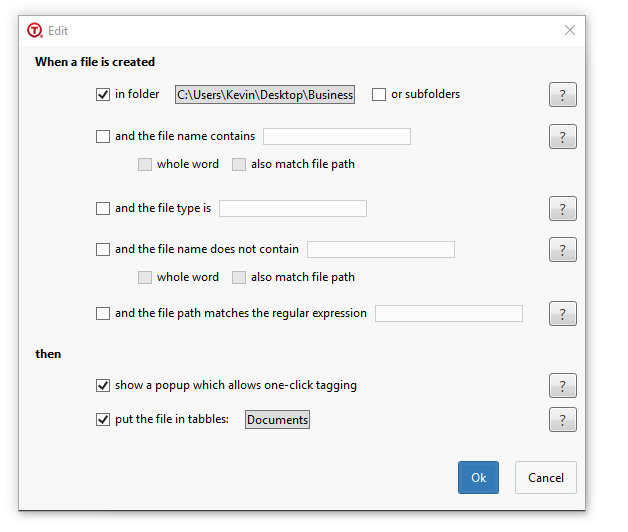
| Function + explanation | Better explanation |
| When a file is created | * Each time a file is created |
| In folder: use this option to monitor a particular folder (e.g.: c:\projects\2009) | This is optional! You can create a rule that works for all your disks. Tabbles is constantly monitoring to all the files created into your disk, this doesn’t slow down your system: Windows does it already, Tabbles is just listening to it… |
| And the file name contains: use this to filter in files | Using this you can filter all the files with a certain name (in a certain folder or within all the disks). E.g.: file_germany_something.doc |
| And the file type is: use this to filter file types | You can create rules that affect certain file types both inside selected folders or in all your disks. |
| Then | * This is what happens. Whenever one of the above conditions is met, one of the following applies: |
| Show a pop-up which allows one-click tagging | The one-click tagging is explained in the chapter 5.3 |
| Put the file in tabbles: pick the tabbles that will be attached to the files mathing the rule | Keep in mind that:
|
One-click tagging
The one-click tagging feature is meant to minimize the amount of work needed for a user to tag his files. The idea behind it is that the user will create sensible auto-tagging rules, and when a file is created matching those rules, than Tabbles will show a pop-up allowing the user to tag the file without the need to find it on the hard-drive. The pop-up will appear on the bottom-right corner of the screen looking like this:
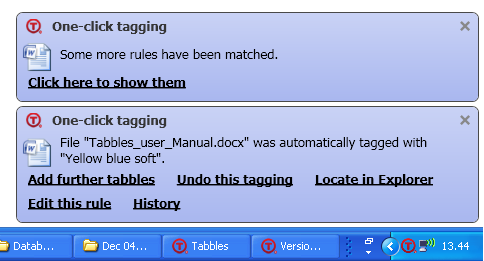
It will stay visible for a few seconds. Upon clicking “Add further tabbles” the Tag window will appear allowing the user to attach more tabbles to the file.
Regular expressions
You can use regular expressions to auto-tag files. A common usage is to match two file extensions with a single rule. See the dedicated wiki page here: Regular expressions
Folder Synchronization
This new major version brings a popularly demanded feature: synchronization support. , I.e. support for Dropbox, OneDrive (SkyDrive), Google Drive, Copy, etc.
What does this mean? Suppose you are using Dropbox (or OneDrive... you name it) to synchronize a folder across two PCs. The two folders on the two PCs are exact clones of each other.
In this case, when You tag files in one folder, you want the Corresponding file in the other folder to be automatically tagged as well. You do not wanna
have to tag each file twice.
This is finally possible. Basically you only need to tell Tabbles That two (or more) folders are clones of each other. You do this by creating a
so-called "synchronization group", and putting Both folders in the group. It's as simple as that.
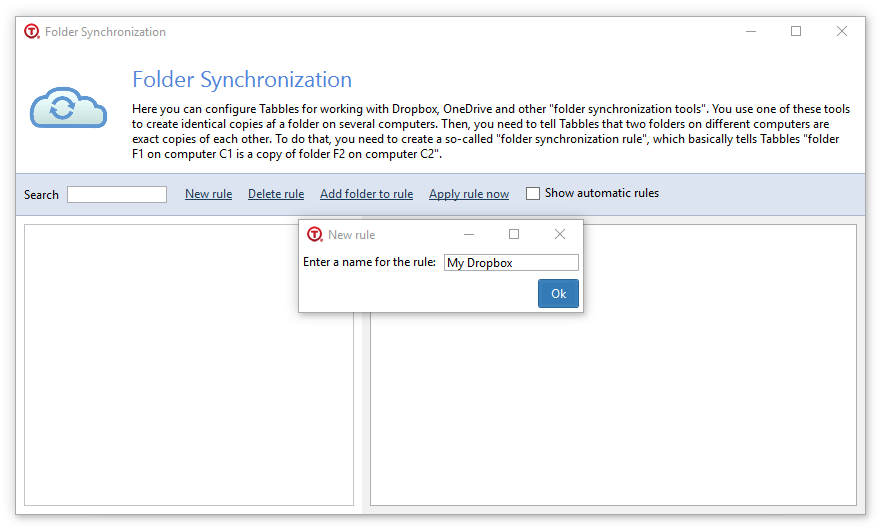
How to setup Tabbles' Folder Synchronization
To setup this feature, the user must create a new 'rule' (Corresponding to Dropbox's folder) and then, the user must indicate tabbles what is the folder
Create a new rule for your Dropbox's folder
Click on New rule and add a rule name (for example My Dropbox)
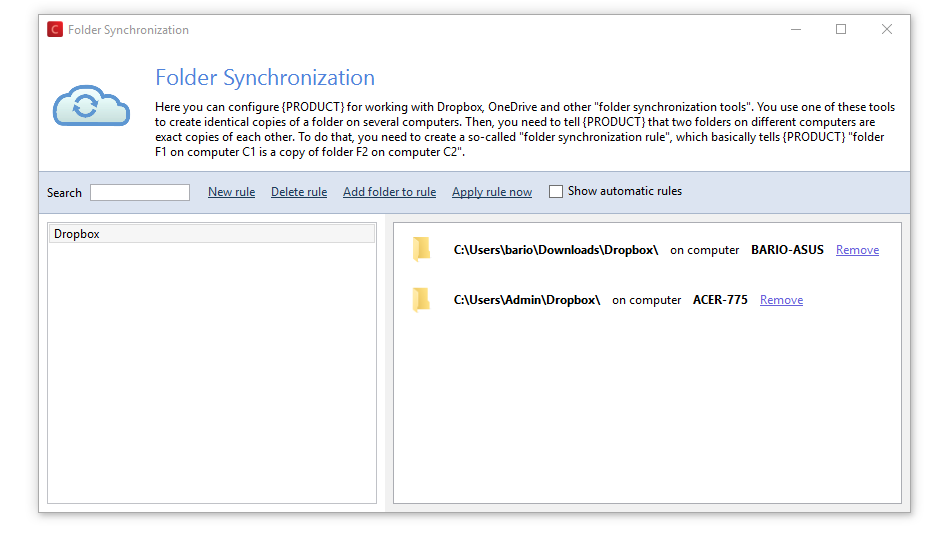
Add a folder to the rule My Dropbox
1) Select the rule
2) Click Add folder to rule.
3) Click on Choose a folder and select your Dropbox's folder
4) Make sure that the "Computer name" is the name of the computer you are working on
5) Repeat for any PC you have Tabbles and the synchronization working on

And this is what a properly setup rule between two computers should look like:
Tag sharing
"Tag sharing" is a feature allowing users to share their tagging with each other. For example: I tag a file, you see it, you tag it a bit more, and I can see that too.
With Tabbles, sharing your tagging is very natural and does not require long explanations. You can choose to share any of your tags with any other user. To specify which users to share a tag with, you can create a user group.
In corporate scenarios, the Tabbles administrator (called "supervisor") can also define a set of shared tags to be used by the employees, thus sparing employees the burden of creating and sharing tags, and preventing tag naming inconsistencies. The supervisor can also prevent users from sharing tags, from the user control panel.
1) Add a user
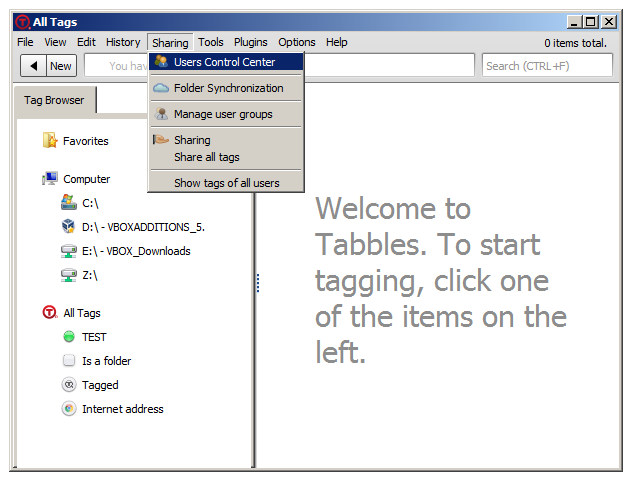
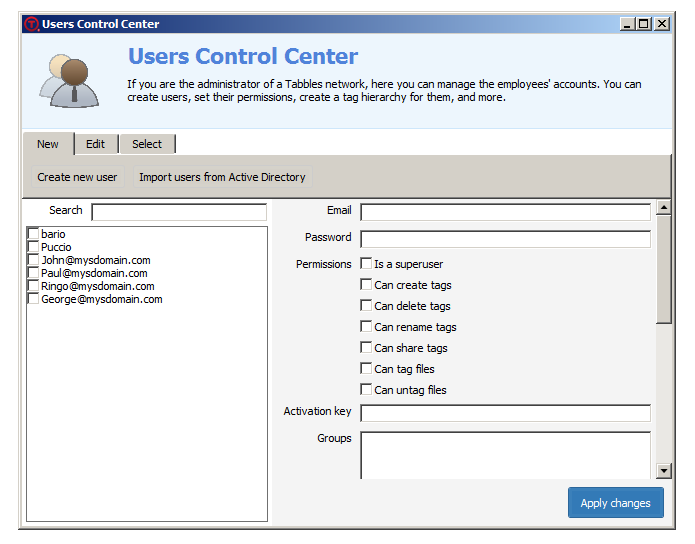
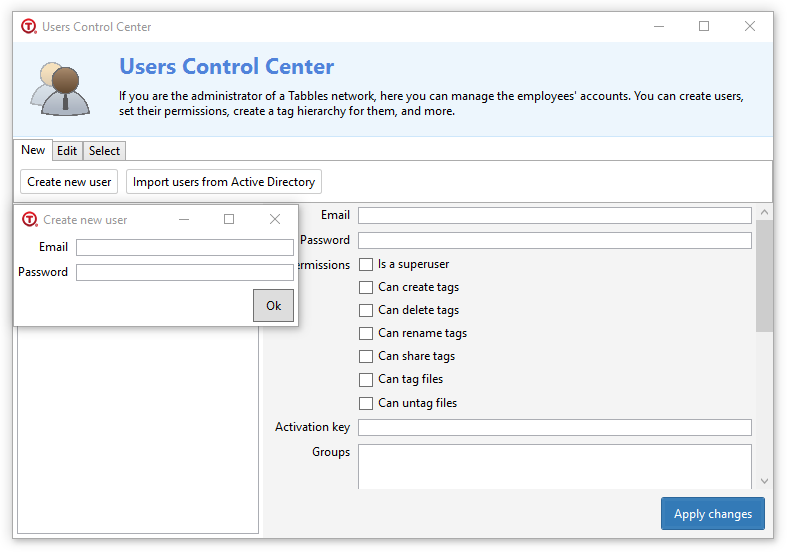
First of all you need to add one or more users, to do so click on: Sharing > Users Control Center, the window in the screenshot below will open.
Then, click on Create new user and fill in the fields Email and Password. This window allows you to set specific permissions for each users.
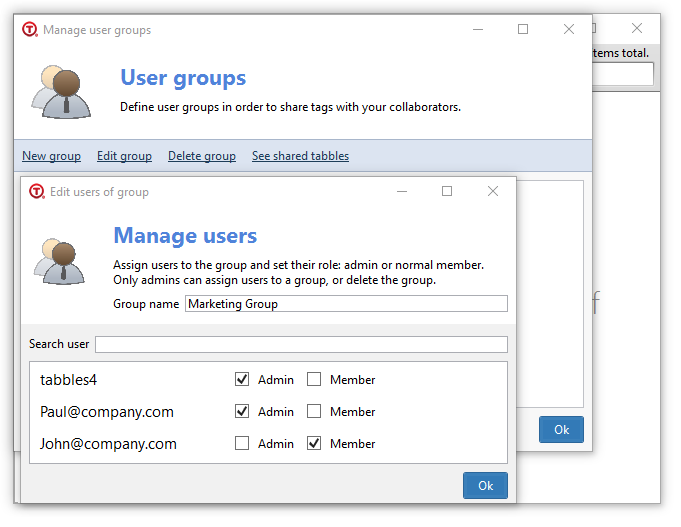
2) Create a Group
The second step is to create a group of users. You can assign users to a group and set their role (Admin/Member). The group's creator becomes also the group's admin: only admins can assign users to a group, or delete a group.
To create a group click on: Sharing > Manage user groups. Then click on the button New Group, fill in the field Group name and select the users you want to add to the group, and when done click on Ok.
Right click the tag you want to share, from the context menu click on Sharing. A new window will be opened and you can select the group you want to share the tag with.
You are also able to allow the users in the group to only open the content of the tag as well as to tag or untag files with it. You can do this by checking the checkboxes Open or Tag.

Advanced functions
Short (but growing) list of features that you will likely need after you start using Tabbles for real.
The auto-tagging rules "Whitelist" and "Blacklist"
Beginning from the version 1.5.36 we implemented a "Whitelist" of disks and removed the possibility to exclude paths of the type \\machine-name\folder-name previously available in the "Blacklist", which has also been removed.
You can access these options using the menu Options > Auto-tagging rules >
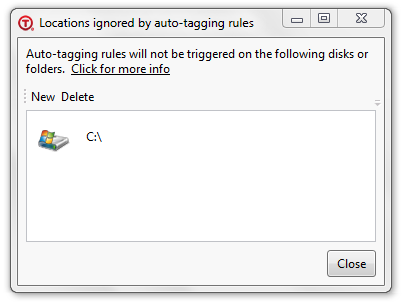
"locations ignored by auto-tagging rules" dialog (Blacklist)
This dialog is used to define a list of network folders/disks where the auto-tagging rules will not work. Keep in mind that this list will be overridden by the "Whitelist" (explained in the next paragraph).
Starting from the version 1.5.11rev3, you can now disable rules on paths of the kind \\share\folder\foo\bar. (removed in version 1.5.36 - you can now use the "Whitelist" instead, explained in the next paragraph).
How it works:
- In the menu, click options > set ignored locations.
- In the dialog, click "new". Navigate to "Computer", and click a network drive.
- Press ok.
- You will not see one-click-tagging popups when you create a file in that drive anymore.
"locations that trigger auto-tagging rules" dialog (Whitelist)
This dialog is used to define which network folders/disks will trigger the auto-tagging rules.
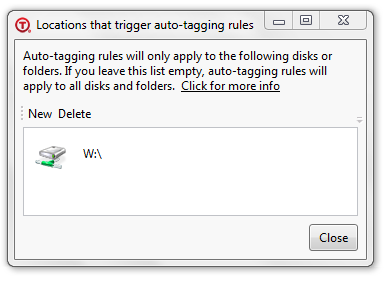
The window works like the one of the "Blacklist" but the result is quite different
- If the list is empty, all the network disks (excluding those which are in the "Blacklist") will trigger the auto-tagging rules.
- If one or more network disks are in the list, all the others will be excluded (they won't trigger the auto-tagging rules).
An Example: one drive in both the lists
In the screenshot below you can see the result of setting up the "Blacklist" and "Whitelist" as showed above (drive C:\ in the "Blacklist" and drive W: in the "Whitelist")
All the drives apart from W: are excluded (including only one drive in the "Whitelist" makes the "Blacklist" redundant).
The Tabbles database
Most of the information relative to graphics present in Tabbles are contained in the file db.xml, located in the folder My Documents\Tabbles\Config. Everything that you can do by modifying the db.xml, you can also do using the Tabbles’ user interface.
The way Tabbles uses the db.xml allows you to create a database structure (meaning tabbles and Color groups) that would fit your office, colleagues or friends needs, and sharing it with them. If you are a distributor or an OEM partner, you can create your unique setup and have it distributed with Tabbles.
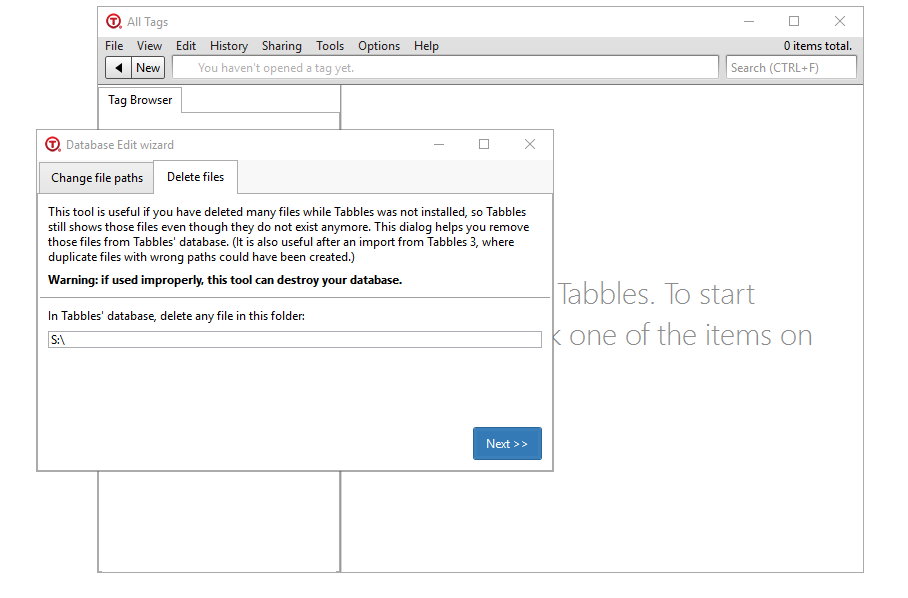
Database Edit wizard
You'll need this operation when you'r moving (or have moved) all your tagged files/folders to a different drive: please keep in mind that an easy and viable alternative is to simply move all your files using Tabbles(using the cut&paste functions). Open the window here:
This function will perform a simple text-replacement of all the database paths, whenever appliable. This is anyway an extremely delicate operation that can potentially destroy your database if you're not performing it correctly.
Keep in mind that replacing C:\ with D:\ will also cause all your auto-tagging rules to be modified consequently.
This is the window:

The rules:
1) use capital letters for the drive letters (C: and D:)
2) if the first path ends with a "\" then also the second must end with a "\"
How to do it (examples):
- Replace C:\ with D:\
Resulting in:
C:\Users\Andrea\Downloads\CentOS-5.5-i386-netinstall.iso
---> D:\Users\Andrea\Downloads\CentOS-5.5-i386-netinstall.iso
- Replace C: with D:
Resulting in:
C:\Users\Andrea\Downloads\CentOS-5.5-i386-netinstall.iso
---> D:\Users\Andrea\Downloads\CentOS-5.5-i386-netinstall.iso
- Replace C:\ with D:\Data\
Resulting in:
C:\Users\Andrea\Downloads\CentOS-5.5-i386-netinstall.iso
---> D:\Data\Users\Andrea\Downloads\CentOS-5.5-i386-netinstall.iso
How NOT TO DO IT (examples):
- Replace c:\ with d:\
(you'll get an error message here)
- Replace C:\ with D:
Resulting in:
C:\Users\Andrea\Downloads\CentOS-5.5-i386-netinstall.iso
---> D:Users\Andrea\Downloads\CentOS-5.5-i386-netinstall.iso
- Replace C:\ with D:\Data
Resulting in:
C:\Users\Andrea\Downloads\CentOS-5.5-i386-netinstall.iso
---> D:\DataUsers\Andrea\Downloads\CentOS-5.5-i386-netinstall.iso
Delete files (delete tagging from the database)
If you tagged some files on a drive or a folder and suddenly regret having done so, you can use this feature to delete, at once, all the tagging that happened on a certain path. Needless to say, this will NOT delete the files on drives, but only the entries in the Tabbles database. The Wizard will look like this:
SQL Scripts for SysAdmins
Here a collection of SQL scripts you may want to use if you're SysAdmin and have Tabbles running in your network. You will need Microsoft SQL Server Management studio, you get it for free on Microsoft website: https://docs.microsoft.com/en-us/sql/ssms/download-sql-server-management-studio-ssms
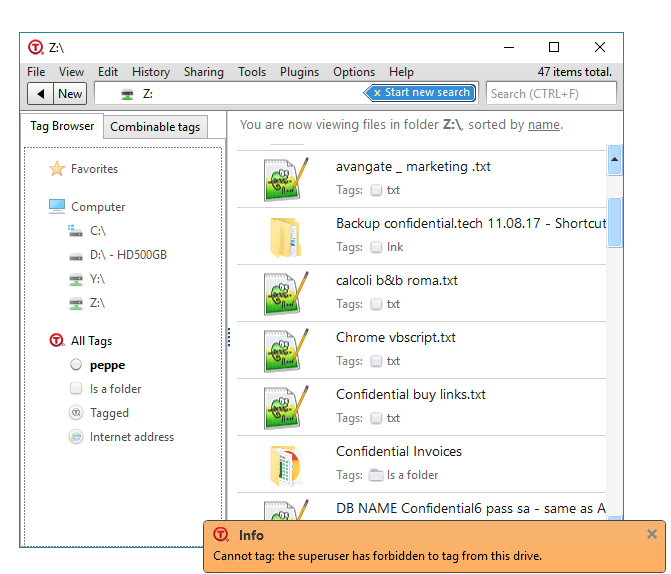
Blacklist a drive, to disallow (restrict) users to tag files on it
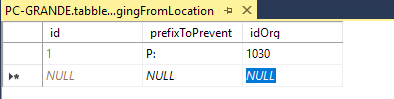
We implemented this feature to fix the following problem: you have the deployed Tabbles in your network and you have users who have mapped the same letter (e.g.: S:\) on different drives. If that's the case, the best solution is to prevent them from tagging on that drive.
- You'll first need to find out what the 'idOrg' of your organization is, so run with this query:
select o.id
from organization o
the result will typically be '1' (don't mind that it's '1030' in our case).
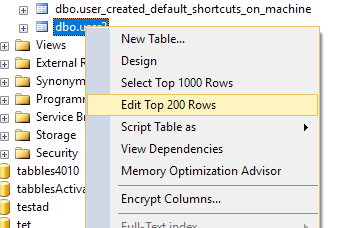
- you will need to edit the table 'preventTaggingFromLocation' manually:

and under 'prefixToPrevent' you can put the letter(s) of the drive(s) to be excluded:
- When tagging on a blacklisted drive, your users will see something like this:
"Revert to free" a user in the database
If you have assigned licenses to a batch of users and want to delete the users or assign those licenses to someone else, you can do it easily in SQL. Note: if the license has been activated already, we'll need to remove the license from our activation table, so drop us line if it's the case.
- use the script:
update user2
set activation_key = null
where name = 'user-you-want-to-revert-to-free'
- or set to 'null' the column 'activation_key' on the table 'user2' for the user:
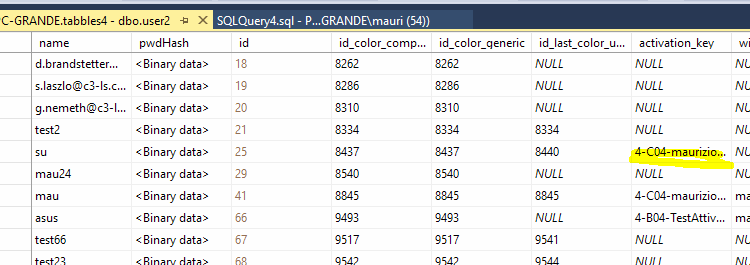
- If you want to revert all the users at once, run this query:
update user2
set activation_key = null
Get a list of all the files in the database
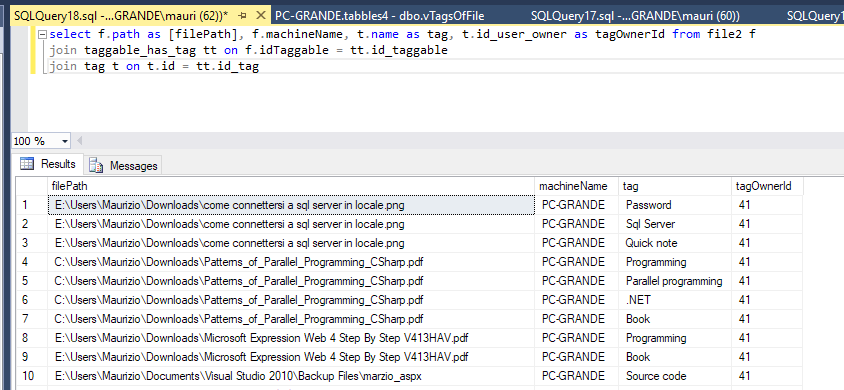
If you want to pull a list of all the files in the database, you'll have to use the query below. In case you're looking at the table dbo.vTagsOfFile, be aware that this contains an "exploded" view of the database, so you'll have the impressions that files are duplicated while this isn't the case. This is the query you need:
select f.path as [filePath], f.machineName, t.name as tag, t.id_user_owner as tagOwnerId from file2 f
join taggable_has_tag tt on f.idTaggable = tt.id_taggable
join tag t on t.id = tt.id_tag
It should look something like this:
Problem: "We are finding staff are tagging files through different drive mappings...and we need to figure out who and what is doing it"
Script:
 SELECT *
  FROM pathTranslationRule r
  join pathTranslationRuleItem i on i.idRule = r.id
You should see something like the screenshot below:
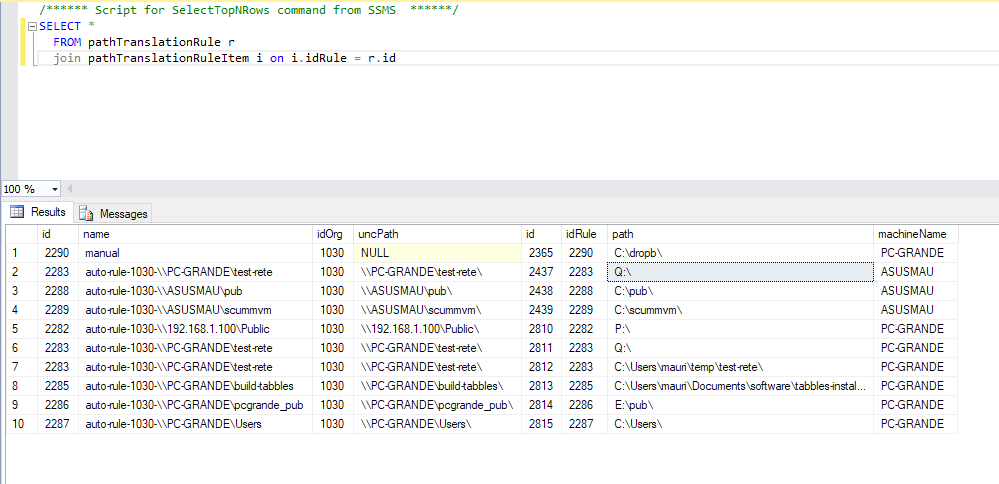
This query outputs all the mapped letters on all the machines where Tabbles it running (it doesn't output the user name, but the machine name).
Here you have 2 possible problems:
- A user mapped a letter that is unused by anybody else: if this is the case, sort the output by path and find the intruder
- A user mapped a letter on a different shared drive/folder than anybody else: in this case, sort the output by uncPath and find on what machine that drive is mapped with a funny letter
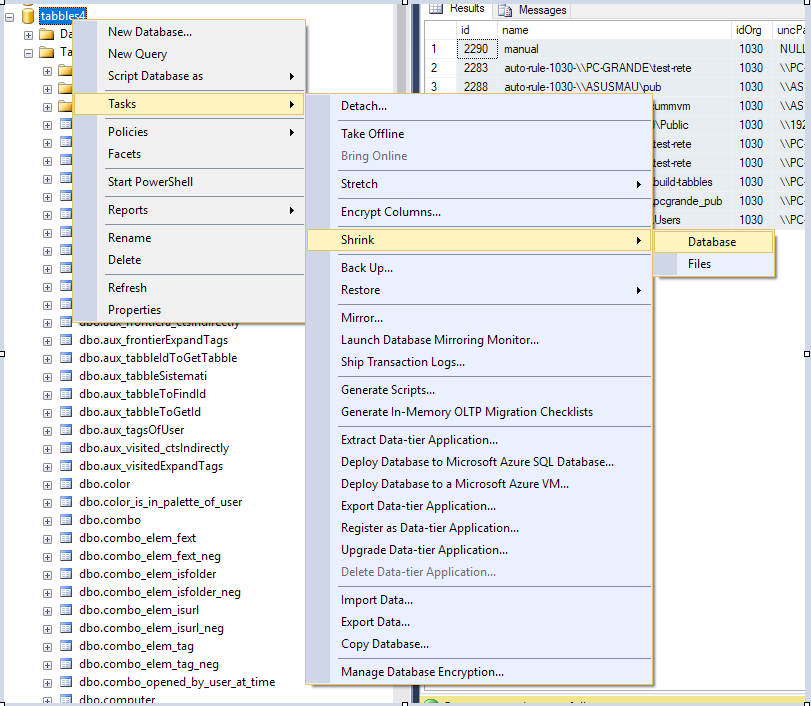
Shrink your database to improve performances of several queries
We found that several storedProcedures speed up considerably after shrinking the database. This is how you do it:
Misc howto's
See here.