Difference between revisions of "Tabbles Manual (EN)"
m (→SQL Scripts for SysAdmins) |
m |
||
| (51 intermediate revisions by the same user not shown) | |||
| Line 1: | Line 1: | ||
<!-- | <!-- | ||
[[Image:Tabbles_logo_slogan_b1_640x480.jpg|thumb|640px| ]] | [[Image:Tabbles_logo_slogan_b1_640x480.jpg|thumb|640px| ]] | ||
| − | + | https://tabbles.net/forum/download/file.php?id=127.png | |
| Line 16: | Line 16: | ||
| genre = Relational file manager | | genre = Relational file manager | ||
| license = [[Proprietary software|Proprietary]] [[EULA]] | | license = [[Proprietary software|Proprietary]] [[EULA]] | ||
| − | | website = [ | + | | website = [https://tabbles.net Tabbles homepage] |
}} | }} | ||
| Line 25: | Line 25: | ||
Tabbles© is a way to find files, emails, and Internet bookmarks, when you don’t remember ''where'' they are, but only ''what they are about''. Tabbles allows you to combine tags with a few mouse clicks, immediately finding the file, regardlessly of what folder or disk it is stored on. It even tells you what drive you need to connect, in case the file is archived on a disconnected drive. | Tabbles© is a way to find files, emails, and Internet bookmarks, when you don’t remember ''where'' they are, but only ''what they are about''. Tabbles allows you to combine tags with a few mouse clicks, immediately finding the file, regardlessly of what folder or disk it is stored on. It even tells you what drive you need to connect, in case the file is archived on a disconnected drive. | ||
| − | For a more detailed introduction, see the [ | + | For a more detailed introduction, see the [https://tabbles.net/feature-list/ feature list], the [https://tabbles.net/what-is-it/quick-intro/ quick intro], and the [https://tabbles.net/what-is-it/whats-tabbles/ long intro]. |
| − | Also do not miss our [ | + | Also do not miss our [https://tabbles.net/videos/tabbles-videos/ basic training videos] and our [https://tabbles.net/how-to-videos/ how-to videos] |
| Line 84: | Line 84: | ||
* '''Tabbles Cloud:''' this is an experimental feature, not meant for daily use. It is a version of Tabbles which spares you from having to install Sql Server, and runs on our remote server. This is slower than Tabbles normal, so please consider this only as a demo of Tabbles, which is easy for you to try. In the future, we plan on making the Tabbles Cloud option faster. | * '''Tabbles Cloud:''' this is an experimental feature, not meant for daily use. It is a version of Tabbles which spares you from having to install Sql Server, and runs on our remote server. This is slower than Tabbles normal, so please consider this only as a demo of Tabbles, which is easy for you to try. In the future, we plan on making the Tabbles Cloud option faster. | ||
| − | For more details on the features, please refer to our [ | + | For more details on the features, please refer to our [https://tabbles.net/feature-list/ feature list]. |
= Setting up Tabbles = | = Setting up Tabbles = | ||
| Line 100: | Line 100: | ||
All you have to do is pressing the '''GO''' button. No setup needed. | All you have to do is pressing the '''GO''' button. No setup needed. | ||
| − | + | https://tabbles.net/images/wiki/t4_Cloud_create_user.png | |
| − | |||
| + | === Check what database and mode you are on === | ||
To see what database and mode you are using, go to ''File > Show current server and user'', if the pop-up you get is like the one in the screenshot, than you are in "Local" mode: | To see what database and mode you are using, go to ''File > Show current server and user'', if the pop-up you get is like the one in the screenshot, than you are in "Local" mode: | ||
| − | + | https://tabbles.net/images/wiki/T5_LocalDB__PopUp.png | |
| + | === Switch mode to "LAN" or "Cloud" === | ||
If you want to switch to "LAN" or "Cloud", you will first need to Log out, by doing ''File > Log out'' (you can log back in anytime by pressing "GO" in the Local tab of the login window. Find in this manual "LAN" or "Cloud" to see how to set it up. | If you want to switch to "LAN" or "Cloud", you will first need to Log out, by doing ''File > Log out'' (you can log back in anytime by pressing "GO" in the Local tab of the login window. Find in this manual "LAN" or "Cloud" to see how to set it up. | ||
| + | |||
| + | === Back-up your LocalDb database === | ||
| + | |||
| + | Your database is contained in the two files ''tabbles4.mdf'' and ''tabbles4_log.ldf'' located in the folder '''%localappdata%\Tabbles\LocalDb\''' | ||
| + | |||
| + | Just backup those two files and replace them if needed. You'll need to stop and restart MSSQL LocalDB to do this, instructions for that are contained in this manual, in several parts. | ||
| Line 128: | Line 135: | ||
'''"C:\Program Files\Microsoft SQL Server\120\Tools\Binn\SqlLocalDB.exe" delete TabblesLocalDb4''' | '''"C:\Program Files\Microsoft SQL Server\120\Tools\Binn\SqlLocalDB.exe" delete TabblesLocalDb4''' | ||
| − | + | https://tabbles.net/images/wiki/cmq_LocalDb_delete.png | |
| − | - If you want to keep your current database, you need to copy all the files in the current database folder ''' | + | - If you want to keep your current database, you need to copy all the files in the current database folder '''%localappdata%\Tabbles\LocalDb\''' to wherever you want the database to be from now on. |
| − | - Open ''' | + | - Open '''%appdata%\Tabbles\Config\config.xml''' and modify '''mdf_folder_tabbles_local=" ''WRITE THE NEW PATH HERE'' "''' as you see in the screenshot below and save the file. |
| − | + | https://tabbles.net/images/wiki/Config-xml_localdb_change.png | |
- Launch Tabbles, press "GO" and enjoy :) | - Launch Tabbles, press "GO" and enjoy :) | ||
| Line 148: | Line 155: | ||
| − | + | https://tabbles.net/images/wiki/t4_errorLocalDB1.png | |
| Line 209: | Line 216: | ||
Once you receive your email, click on the email verification link and afterwards you will be able to login in Tabbles Cloud with your user. This is what the Cloud login window looks like: | Once you receive your email, click on the email verification link and afterwards you will be able to login in Tabbles Cloud with your user. This is what the Cloud login window looks like: | ||
| − | + | https://tabbles.net/images/wiki/T5_CloudCreateNewAccount.png | |
| Line 227: | Line 234: | ||
=== Install MSSQL Server (Microsoft SQL Server) === | === Install MSSQL Server (Microsoft SQL Server) === | ||
| − | To install Sql Server and configure it correctly for usage with Tabbles, refer to our [ | + | To install Sql Server and configure it correctly for usage with Tabbles, refer to our [https://www.youtube.com/watch?v=3VJZYJ_3yVA how-to video]. |
If you do not have Sql Server, you can download the free version (called Express) as shown in the video. Tabbles does not work with anything else than Microsoft SQL Server: '''MySql, MongoDB etc. won't work'''. | If you do not have Sql Server, you can download the free version (called Express) as shown in the video. Tabbles does not work with anything else than Microsoft SQL Server: '''MySql, MongoDB etc. won't work'''. | ||
| Line 234: | Line 241: | ||
https://tabbles.net/images/wiki/SQL_Auth.jpg | https://tabbles.net/images/wiki/SQL_Auth.jpg | ||
| + | |||
| + | ==== Collation ==== | ||
| + | |||
| + | Make sure you install the MSSQL Server with the default collation being: '''SQL_Latin1_General_CP1_CI_AS''' (make sure about the ''CI'' bit, as an oppostite to ''CS''). | ||
==== Install MSSQL on Linux ==== | ==== Install MSSQL on Linux ==== | ||
| Line 247: | Line 258: | ||
=== Create the Tabbles database === | === Create the Tabbles database === | ||
| − | + | If you are logged in Tabbles, you will need to log out first, by doing '''File > log out''' | |
| − | + | When Tabbles starts again, you will see this dialog: | |
| − | + | https://tabbles.net/images/wiki/t4_LAN0.png | |
| − | You need to click on '''Tabbles LAN''' | + | You need to click on '''Tabbles LAN''' and be on the tab '''Create database''', here you need to provide the credentials of your Microsoft Sql Server user with ''administrator'' permissions (so called '''sa''' account). You can either use "Windows Authentication" (less usual) or "Sql Authentication". |
| − | can either use "Windows Authentication" or "Sql Authentication". | ||
| − | * For Sql Authentication, you need to remember the | + | * For Sql Authentication, you need to remember the '''sa''' password, of the Microsoft Sql Server, this is the most common way. |
* For Windows Authentication, your Window user must have been granted administrator permissions, and also you need to be on the same machine where the Sql Server is installed. | * For Windows Authentication, your Window user must have been granted administrator permissions, and also you need to be on the same machine where the Sql Server is installed. | ||
| Line 264: | Line 274: | ||
In the "database server address" field, you need to type MACHINENAME\SERVERNAME. (Or just MACHINENAME, depending on how you configured Sql Server). | In the "database server address" field, you need to type MACHINENAME\SERVERNAME. (Or just MACHINENAME, depending on how you configured Sql Server). | ||
| − | * | + | * If you don't know the machine name of the Micorosoft SQL Server, check the Windows Control Panel of the machine where it is installed. |
| + | |||
| + | * To learn the SERVERNAME, go to Sql Server Configuration Manager of the machine. | ||
| + | |||
| + | |||
| + | Also type in the name you want to give to the database that Tabbles we use (the window suggests "tabbles4" but it can be any name). | ||
| + | |||
| + | |||
| + | After you have filled all the info, you can press the '''Create database''' button and a progress bar should appear, the task should take 30-60 seconds. | ||
| − | |||
'''Troubleshooting'''. If you get the message "unable to connect to Sql Server", try to login with Sql Server Management Studio, with either Windows Authentication or Sql Authentication. Take note of which method works. You can use the same method with the Tabbles client. | '''Troubleshooting'''. If you get the message "unable to connect to Sql Server", try to login with Sql Server Management Studio, with either Windows Authentication or Sql Authentication. Take note of which method works. You can use the same method with the Tabbles client. | ||
| Line 272: | Line 289: | ||
=== Create the first Tabbles user === | === Create the first Tabbles user === | ||
| − | + | After you have created the database, while on the '''Tabbles LAN''' main tab, make sure you are in the '''Create Superuser''' tab as in the picture: | |
| − | + | https://tabbles.net/images/wiki/t4_LAN1.png | |
| − | + | First type in your username (in the pic it's "Andrea", but it can be whatever you want). | |
| − | This way you create the ''first'' user. For creating other users, you have two possibilities: | + | The "database server address" and "Tabbles database name" should be populated automatically. Otherwise, in the "database server address", type MACHINENAME\SERVERNAME, as explained in the previous section. |
| + | |||
| + | This way you create the ''first'' user, after this Tabbles should log you in automatically. | ||
| + | |||
| + | For creating other users, you have two possibilities: | ||
* If your users are all on the same level, i.e. they are all "first-class citizens" with the same permissions, then to create other users you can follow this same procedure again, i.e. use the "create user" tab in the login window. | * If your users are all on the same level, i.e. they are all "first-class citizens" with the same permissions, then to create other users you can follow this same procedure again, i.e. use the "create user" tab in the login window. | ||
| Line 295: | Line 316: | ||
In this case, you need to configure Sql Server to accept connections from other machines. | In this case, you need to configure Sql Server to accept connections from other machines. | ||
| − | For this, refer to [ | + | For this, refer to [https://www.youtube.com/watch?v=vrcgCvhYttY this how-to video]. |
If you still have problems, please enable port 1433 as explained in these tutorials: [http://stackoverflow.com/questions/2486610/how-to-connect-to-sql-server-from-another-computer/6765184#6765184] and [http://jeffreypalermo.com/blog/how-to-configure-sql-server-2012-for-remote-network-connections/] | If you still have problems, please enable port 1433 as explained in these tutorials: [http://stackoverflow.com/questions/2486610/how-to-connect-to-sql-server-from-another-computer/6765184#6765184] and [http://jeffreypalermo.com/blog/how-to-configure-sql-server-2012-for-remote-network-connections/] | ||
| Line 305: | Line 326: | ||
After creating a group, you can add your organization's users. If you ActiveDirectory configured, you can use Tabbles "Import from ActiveDirectory" feature, you will need to fill in the ActiveDirectory's domain controller (machine name), and the user and password that have privileges to retrieve the user list on that machine: | After creating a group, you can add your organization's users. If you ActiveDirectory configured, you can use Tabbles "Import from ActiveDirectory" feature, you will need to fill in the ActiveDirectory's domain controller (machine name), and the user and password that have privileges to retrieve the user list on that machine: | ||
| − | + | https://tabbles.net/images/wiki/t4-Import-AD1.png | |
This window will then open and you can import all the users at once (existing users will not be duplicated and ignored). | This window will then open and you can import all the users at once (existing users will not be duplicated and ignored). | ||
| − | + | https://tabbles.net/images/wiki/t4-Import-AD2.png | |
| Line 319: | Line 340: | ||
The Superuser can create the Tabbles users by importing a list from Active Directory: ''Sharing > User Control Center > Import from Active Directory''. This feature imports a list of user names from AD and creates users in Tabbles where the Tabbles username matches the Windows user name read from AD. See the screenshots below | The Superuser can create the Tabbles users by importing a list from Active Directory: ''Sharing > User Control Center > Import from Active Directory''. This feature imports a list of user names from AD and creates users in Tabbles where the Tabbles username matches the Windows user name read from AD. See the screenshots below | ||
| − | + | https://tabbles.net/images/wiki/T4_UserControlCenter.png | |
| − | + | https://tabbles.net/images/wiki/T4_UserControlCenter2.png | |
| − | + | https://tabbles.net/images/wiki/T4_ImportFromAD.png | |
| Line 386: | Line 407: | ||
# Tabbles reads the serial from the database only when it starts up, so each user will have to restart Tabbles to see te change. They can restart by clicking on ''File > Restart Tabbles'' | # Tabbles reads the serial from the database only when it starts up, so each user will have to restart Tabbles to see te change. They can restart by clicking on ''File > Restart Tabbles'' | ||
| − | + | https://tabbles.net/images/wiki/T4_Activation_batch.png | |
| Line 417: | Line 438: | ||
See screenshot below: | See screenshot below: | ||
| − | + | https://tabbles.net/images/wiki/T5_CachedOverlayRet.png | |
| Line 427: | Line 448: | ||
| − | + | https://tabbles.net/images/wiki/T5_CachedOverlayResync.png | |
| + | |||
| + | |||
| + | === Upgrade Database === | ||
| + | |||
| + | Every once in a while, So after you updated the software the latest version, the software will require you to upgrade your database. The process is straightforward, you will be redirected to the the Database upgrade window where you'll have to enter your database's ''sa'' user and password, the window looks like this: | ||
| + | |||
| + | https://tabbles.net/images/wiki/db-upgrade-t5.png | ||
| + | |||
| + | |||
| + | In order to gain the privileges to upgrade your database you could be using the "SQL Authentication mode" (as in the screenshot) or the "Windows Authentication Mode" (if your current Windows user has the privileges to modify that database - check with your IT if you're not sure). After the upgrade succeeded the software should make you login again as usual. | ||
| + | |||
| + | Note: it's recommended that you plan such an upgrade outside from the usual working hours, as your users won't be able to use Tabbles while they're on an older version of the software and the database has been updated. | ||
| + | |||
| + | == Using Tabbles on Azure SQL == | ||
| + | |||
| + | Starting from Tabbles 6, Tabbles support Azure SQL. | ||
| + | |||
| + | In order to user this new feature, you first need to setup your Azure SQL database in the Azure admin panel. Then from the ''Tabbles Login'' window, you can use the ''Tabbles Azure > Create database'' to initialize the database in order for Tabbles to use it. The window behaves exactly like the ''Tabbles LAN > Create Database window'' except that you need to create the database in Azure first, so please follow the instructions in the previous chapter. | ||
| + | |||
| + | https://tabbles.net/wp-content/uploads/2024/01/Tabbles_6_Azure.png | ||
| + | |||
== importing database from Tabbles 3 == | == importing database from Tabbles 3 == | ||
| Line 446: | Line 488: | ||
| − | + | https://tabbles.net/images/wiki/t4_Import_database_from_ver2.png | |
== Importing database from Tabbles 2 == | == Importing database from Tabbles 2 == | ||
| Line 462: | Line 504: | ||
You will find the import function in the Tabbles menu seen below: ''File > Tabbles' database > Import Data as XML zipped'' | You will find the import function in the Tabbles menu seen below: ''File > Tabbles' database > Import Data as XML zipped'' | ||
| − | + | https://tabbles.net/images/wiki/t4_Import_database_from_tabbles2.png | |
== Auto-update == | == Auto-update == | ||
| Line 507: | Line 549: | ||
| − | + | https://tabbles.net/images/wiki/t4_combine2.png | |
Tabbles can be intersected with, and subtracted from, each other. These operations are referred to as "combine". | Tabbles can be intersected with, and subtracted from, each other. These operations are referred to as "combine". | ||
| Line 513: | Line 555: | ||
The intersection is the most common way to combine two or more tabbles. This kind of combine is identified by a "plus" sign, like in "John + Picture". When two or more tabbles are combined with a plus sign, as a result you will see the files that are in ''both'' tabbles. | The intersection is the most common way to combine two or more tabbles. This kind of combine is identified by a "plus" sign, like in "John + Picture". When two or more tabbles are combined with a plus sign, as a result you will see the files that are in ''both'' tabbles. | ||
| − | For more informations, see [ | + | For more informations, see [https://tabbles.net/what-is-it/whats-tabbles/#combine here]. |
= Basic operations I: the GUI creating tabbles = | = Basic operations I: the GUI creating tabbles = | ||
| Line 527: | Line 569: | ||
| − | + | https://tabbles.net/images/wiki/t4_basic.png | |
=== Creating tabbles === | === Creating tabbles === | ||
| Line 581: | Line 623: | ||
| − | <br> | + | <br> https://tabbles.net/images/wiki/shell_extension_tag_file.png <br> |
*'''Drag'n'drop''': by drag'n'drop a file into a tag | *'''Drag'n'drop''': by drag'n'drop a file into a tag | ||
| Line 612: | Line 654: | ||
| − | + | https://tabbles.net/images/wiki/t4_folder_tagging.png | |
<br> | <br> | ||
| Line 622: | Line 664: | ||
| − | + | https://tabbles.net/images/wiki/shell_extension_tag_folder.png | |
<br> | <br> | ||
| Line 637: | Line 679: | ||
This function will tag the folder and the files in it, as well all its subfolders: all the files in the its subfolders will be tagged all the way down until the end of folder tree. Please consider that this operation can take quite some time (depending on how many files are in the subfolder), but since it's executed in a parallel thread you shouldn't notice... '''it may take a while until all your files are tagged''' though. | This function will tag the folder and the files in it, as well all its subfolders: all the files in the its subfolders will be tagged all the way down until the end of folder tree. Please consider that this operation can take quite some time (depending on how many files are in the subfolder), but since it's executed in a parallel thread you shouldn't notice... '''it may take a while until all your files are tagged''' though. | ||
| − | === Create an auto-tagging rule for the folder (read our [ | + | === Create an auto-tagging rule for the folder (read our [https://tabbles.net/2-more-shaggadelic-features-in-the-oven-auto-tagging-wizard-hierarchical-tabbles/ blog article]) === |
This is an advanced feature that needs some understanding! By using this function you're telling Tabbles 2 things: | This is an advanced feature that needs some understanding! By using this function you're telling Tabbles 2 things: | ||
| Line 664: | Line 706: | ||
| − | + | https://tabbles.net/images/wiki/t4_open_first_tabble.png | |
<br> <br> Alternatively you can open the ''Quick-open'' window and select the tabbles to open/combine from there. You can open the '''Quick-open''' window in two ways: | <br> <br> Alternatively you can open the ''Quick-open'' window and select the tabbles to open/combine from there. You can open the '''Quick-open''' window in two ways: | ||
| Line 712: | Line 754: | ||
The picture below should explain it a bit better: | The picture below should explain it a bit better: | ||
| − | + | https://tabbles.net/images/wiki/cross_link-1.png | |
<br><br> | <br><br> | ||
| Line 763: | Line 805: | ||
| − | <br> | + | <br> https://tabbles.net/images/wiki/t4_combine_tree_plus.png |
<br> <br> | <br> <br> | ||
| Line 797: | Line 839: | ||
| − | + | https://tabbles.net/images/wiki/T5-subtract-find-untagged.png | |
=== Father and children tabbles: nesting tabbles === | === Father and children tabbles: nesting tabbles === | ||
| Line 819: | Line 861: | ||
| − | <br> | + | <br> https://tabbles.net/images/wiki/t4_nesting-tabbles.png |
<br> | <br> | ||
| Line 829: | Line 871: | ||
| − | + | https://tabbles.net/images/wiki/t4_transparent-inheritance.png | |
'''The tag "EULA" is nested inside the tag "Documents": the files contained in "EULA" are (apparently) not tagged with the tag "Documents". But if you browse the tag "Documents" you'll also see the files contained in "EULA".''' | '''The tag "EULA" is nested inside the tag "Documents": the files contained in "EULA" are (apparently) not tagged with the tag "Documents". But if you browse the tag "Documents" you'll also see the files contained in "EULA".''' | ||
| Line 861: | Line 903: | ||
A shadow file (or folder) is a file that has been moved or deleted without Tabbles knowing it. You can recognize it as it is marked with a [[http://www.google.com/images?hl=en&rlz=1C1SVEC_enIT373IT373&biw=1248&bih=486&tbs=isch:1&sa=1&q=no+entry+road+sign&aq=f&aqi=&aql=&oq=&gs_rfai= "no entry" road sign]]: | A shadow file (or folder) is a file that has been moved or deleted without Tabbles knowing it. You can recognize it as it is marked with a [[http://www.google.com/images?hl=en&rlz=1C1SVEC_enIT373IT373&biw=1248&bih=486&tbs=isch:1&sa=1&q=no+entry+road+sign&aq=f&aqi=&aql=&oq=&gs_rfai= "no entry" road sign]]: | ||
| − | <br> | + | <br> https://tabbles.net/images/wiki/shadow_file_folder.png |
If you double click on a shadow file, Tabbles will show a window that will help you to '''specify the current location of the file''' and also of the other files that has been moved together with it (if any). Note: you can do '''copy/cut and paste of files from Windows Explorer to Tabbles, but not the other way around'''. | If you double click on a shadow file, Tabbles will show a window that will help you to '''specify the current location of the file''' and also of the other files that has been moved together with it (if any). Note: you can do '''copy/cut and paste of files from Windows Explorer to Tabbles, but not the other way around'''. | ||
| Line 871: | Line 913: | ||
- If a user moves a file using a file manager that is not Windows Explorer ("File Manager" in Windows 10) or Tabbles and does it without using the Explorer Context menu, when available. | - If a user moves a file using a file manager that is not Windows Explorer ("File Manager" in Windows 10) or Tabbles and does it without using the Explorer Context menu, when available. | ||
| + | ==== Use the Shadow File tool ==== | ||
| + | If you want to find all the Shadow Files in a certain folder you can use this feature: | ||
| − | + | https://tabbles.net/images/wiki/T5_DisplayShadowFilesFolder.png | |
| − | + | <br> <br> | |
| − | <br> | + | Afterwards, you are propmted with a window that allows you delete the Shadow Files you just found: |
| + | |||
| + | https://tabbles.net/images/wiki/T5_DeleteShadowFiles.png | ||
| + | |||
| + | <br> <br> | ||
| − | ==== | + | ==== Removing Shadow files/folders using the ''Database Edit Wizard'' ==== |
| − | You' | + | If you untag a shadow file, Tabbles will still hold a record of the file in its database. You can also use the ''Database Edit Wizard'' (see below) to remove shadow files from the database. |
<br> | <br> | ||
| + | ==== Remove the selected shadow files/folders via untagging ==== | ||
| + | |||
| + | Alternatively, in order to remove Shadow files/folders, you can also untag them. You'll need to select the file(s)/folder(s) you want to remove, then ''Right click > More > Untag completely (ALT + F)''. | ||
| + | |||
| + | <br> | ||
=== Get a complete list of the Shadow Files in your database === | === Get a complete list of the Shadow Files in your database === | ||
| Line 947: | Line 1,000: | ||
'''Watch training videos [http://www.youtube.com/v/ea9ovReiFC8&hl=en&autoplay=1& 6], [http://www.youtube.com/v/Iv2jtqGLX4E&hl=en&autoplay=1& 9], [http://www.youtube.com/v/yONTcRxpUyo&hl=en&autoplay=1& 10]''' | '''Watch training videos [http://www.youtube.com/v/ea9ovReiFC8&hl=en&autoplay=1& 6], [http://www.youtube.com/v/Iv2jtqGLX4E&hl=en&autoplay=1& 9], [http://www.youtube.com/v/yONTcRxpUyo&hl=en&autoplay=1& 10]''' | ||
| − | These set of features appears in the 1.3.0 release and is explained in this [ | + | These set of features appears in the 1.3.0 release and is explained in this [https://tabbles.net/2-more-shaggadelic-features-in-the-oven-auto-tagging-wizard-hierarchical-tabbles/ blog post]. The idea behind those features is to minimize the workload required for a user to tag files (One-click tag) or to automatize it based on where the file is or on other user-defined rules (Auto-tagging rules). |
=== Auto-tagging rules === | === Auto-tagging rules === | ||
| Line 953: | Line 1,006: | ||
| − | + | https://tabbles.net/images/wiki/t4_auto-tagging-rule.png | |
| − | The background of the feature is explained in our [ | + | The background of the feature is explained in our [https://tabbles.net/2-more-shaggadelic-features-in-the-oven-auto-tagging-wizard-hierarchical-tabbles/ blog post]. |
The idea is that users already have their files organized in a folder structure and the tagging should reflect this categorization and start from there. | The idea is that users already have their files organized in a folder structure and the tagging should reflect this categorization and start from there. | ||
| Line 1,034: | Line 1,087: | ||
Since version 5, Tabbles can search into files and tag them if a certain word or string is matched. You can combine tagging parameter, to have a complex rule like this: | Since version 5, Tabbles can search into files and tag them if a certain word or string is matched. You can combine tagging parameter, to have a complex rule like this: | ||
| − | + | https://tabbles.net/images/wiki/T5-Auto-Tagging-Find-in-Files.png | |
| + | |||
| + | <br> <br> | ||
| + | |||
| + | |||
| + | === Auto-tagging rule for file creation date === | ||
| + | |||
| + | Tabbles can also check the file creation date and perform auto-tagging based on a combination of parameters, for example: | ||
| + | |||
| + | * To tag all the files created in 2018, type “2018” in both the “year” fields | ||
| + | * To tag all the files created in Q1, select “1” from the dropdown on the starting month and “3” from the dropdown of the ending month | ||
| + | * To tag all the files created in the first half of each month, select “1” from the dropdown on the starting day and “15” from the dropdown of the ending day | ||
| + | |||
| + | https://tabbles.net/images/wiki/T5-Auto-Tagging-Creation-date.png | ||
<br> <br> | <br> <br> | ||
| + | |||
| Line 1,046: | Line 1,113: | ||
This is what such an auto-tagging rule would look like: | This is what such an auto-tagging rule would look like: | ||
| − | + | https://tabbles.net/images/wiki/T5-Auto-Tagging-RegEx.png | |
<br> <br> | <br> <br> | ||
| Line 1,055: | Line 1,122: | ||
Select a folder or a disk in Tabbles and look for the '''Apply auto-tagging rules menu''' entry, that will appear when you right click on a folder in Tabbles. If you right-click on a disk, you have to do a step more, it will look like this: | Select a folder or a disk in Tabbles and look for the '''Apply auto-tagging rules menu''' entry, that will appear when you right click on a folder in Tabbles. If you right-click on a disk, you have to do a step more, it will look like this: | ||
| − | + | https://tabbles.net/images/wiki/T5_run_rules_.png | |
| Line 1,076: | Line 1,143: | ||
| − | + | https://tabbles.net/images/wiki/T5-Auto-Tagging-history1.png | |
| − | + | https://tabbles.net/images/wiki/T5-Auto-Tagging-history2.png | |
=== One-click tagging === | === One-click tagging === | ||
| Line 1,086: | Line 1,153: | ||
The one-click tagging feature is meant to minimize the amount of work needed for a user to tag his files. The idea behind it is that the user will create sensible auto-tagging rules, and when a file is created matching those rules, than Tabbles will show a pop-up allowing the user to tag the file '''without the need to find it on the hard-drive'''. The pop-up will appear on the bottom-right corner of the screen looking like this: | The one-click tagging feature is meant to minimize the amount of work needed for a user to tag his files. The idea behind it is that the user will create sensible auto-tagging rules, and when a file is created matching those rules, than Tabbles will show a pop-up allowing the user to tag the file '''without the need to find it on the hard-drive'''. The pop-up will appear on the bottom-right corner of the screen looking like this: | ||
| − | + | https://tabbles.net/images/wiki/one-click.png | |
<br> | <br> | ||
| Line 1,150: | Line 1,217: | ||
| − | + | https://tabbles.net/images/wiki/T5_LocalDB__PopUp.png | |
| Line 1,160: | Line 1,227: | ||
== How to setup Tabbles' Folder Synchronization == | == How to setup Tabbles' Folder Synchronization == | ||
| − | Follow step by step, first someone has to '''create a "Rule" (only once)'''. Then each user must tell Tabbles where | + | Follow step by step, first someone has to '''create a "Rule" (only once)'''. Then '''on each PC''' where Tabbles is used, the user must tell Tabbles '''where the local Dropbox folder''' is, by '''adding the folder to the rule (once per user)'''. |
| Line 1,169: | Line 1,236: | ||
| − | + | https://tabbles.net/images/wiki/t4_FolderSync1.png | |
=== Add a folder to the rule My Dropbox === | === Add a folder to the rule My Dropbox === | ||
| Line 1,183: | Line 1,250: | ||
'''5) Repeat for any PC you have Tabbles and the synchronization working on''' | '''5) Repeat for any PC you have Tabbles and the synchronization working on''' | ||
| − | + | https://tabbles.net/images/wiki/t4_FolderSync2.png | |
| Line 1,189: | Line 1,256: | ||
And this is what a properly setup rule between two computers should look like: | And this is what a properly setup rule between two computers should look like: | ||
| − | + | https://tabbles.net/images/wiki/t4_rule_created.png | |
= Tag sharing = | = Tag sharing = | ||
| − | + | https://tabbles.net/images/stories/web_v2/versions/tabble_sharing_corporate.png | |
"Tag sharing" is a feature allowing users to share their tagging with each other. For example: I tag a file, you see my tagging, you tag it a bit more, and I can see your tagging too. Or instead, one person (or one machine) tags and 100+ users will just browse the tagging coming from this user. | "Tag sharing" is a feature allowing users to share their tagging with each other. For example: I tag a file, you see my tagging, you tag it a bit more, and I can see your tagging too. Or instead, one person (or one machine) tags and 100+ users will just browse the tagging coming from this user. | ||
| Line 1,208: | Line 1,275: | ||
| − | + | https://tabbles.net/images/wiki/T5_LocalDB__PopUp.png | |
| Line 1,220: | Line 1,287: | ||
| − | + | https://tabbles.net/images/wiki/T5_UserControlCenter.png | |
== Setup Tag Sharing == | == Setup Tag Sharing == | ||
| Line 1,232: | Line 1,299: | ||
Users can also be imported in bulk from Active Directory (search ''Import Users from Active Directory'' in this manual) | Users can also be imported in bulk from Active Directory (search ''Import Users from Active Directory'' in this manual) | ||
| − | + | https://tabbles.net/images/wiki/T5_CreateNewUser.png | |
=== 2) Create a Group === | === 2) Create a Group === | ||
| Line 1,240: | Line 1,307: | ||
To create a group click on: ''Sharing > Manage user groups''. Then click on the button ''New Group'', fill in the field ''Group name'' and select the users you want to add to the group, and when done click on ''Ok''. | To create a group click on: ''Sharing > Manage user groups''. Then click on the button ''New Group'', fill in the field ''Group name'' and select the users you want to add to the group, and when done click on ''Ok''. | ||
| − | + | https://tabbles.net/images/wiki/t4_create_group.png | |
=== 3) Share tags === | === 3) Share tags === | ||
| Line 1,249: | Line 1,316: | ||
You are also able to allow the users in the group to only open the content of the tag as well as to tag or untag files with it. You can do this by checking the checkboxes ''Open'' or ''Tag''. | You are also able to allow the users in the group to only open the content of the tag as well as to tag or untag files with it. You can do this by checking the checkboxes ''Open'' or ''Tag''. | ||
| − | + | https://tabbles.net/images/wiki/t4_share_tag.png | |
| + | |||
| + | |||
| + | === Share all tags at once === | ||
| + | |||
| + | You may as well want to share all your existing tags at once, to do so click on ''Sharing > Share all tags'' | ||
| + | |||
| + | https://tabbles.net/images/wiki/t5-share-all-tags.png | ||
| + | |||
| + | = Google file stream (and more) support = | ||
| + | In Tabbles 5.7.1 we added another highly requested feature the tagging of “file stream” drives for teams. | ||
| + | |||
| + | Tabbles now supports tagging on “Google file stream” and similar technologies, so basically it works any software that mounts a cloud drive locally, without synchronizing the files (there are many solutions that do that (Expandrive, Mountain Duck, odrive…). You can now tell Tabbles that “G:\” is a shared drive, and tag files on it along with your team. | ||
| + | |||
| + | == Open the Sharing > Files stream drives window == | ||
| + | |||
| + | You can set it up under ''Sharing > Files stream drives'': | ||
| + | |||
| + | https://tabbles.net/images/wiki/T5_FileStreamDrives1.png | ||
| + | |||
| + | == Set the letter of your team's file stream drive == | ||
| + | |||
| + | Then you need to add the letter of your “file stream drive” (that is typically G: if you’re using Google file stream), the result would look like this: | ||
| + | |||
| + | https://tabbles.net/images/wiki/T5_FileStreamDrives2.png | ||
| + | |||
| + | From now, everyone in your organization who uses Tabbles and has a file stream drive mapped on the same letter, can share tagging with you. Remember of course to setup and activate the ''tag sharing'' (search this manual for instructions). | ||
| + | |||
| + | |||
= Advanced functions = | = Advanced functions = | ||
| Line 1,264: | Line 1,359: | ||
You can access these options using the menu '''Options > Auto-tagging rules >''' | You can access these options using the menu '''Options > Auto-tagging rules >''' | ||
| − | <br> | + | <br> https://tabbles.net/images/wiki/T5_Whitelist.png |
=== "locations ignored by auto-tagging rules" dialog (Blacklist) === | === "locations ignored by auto-tagging rules" dialog (Blacklist) === | ||
| Line 1,270: | Line 1,365: | ||
This dialog is used to define a list of network folders/disks where the auto-tagging rules will not work. Keep in mind that this list will be overridden by the "Whitelist" (explained in the next paragraph). | This dialog is used to define a list of network folders/disks where the auto-tagging rules will not work. Keep in mind that this list will be overridden by the "Whitelist" (explained in the next paragraph). | ||
| − | <br> | + | <br> https://tabbles.net/images/wiki/set_ignored_locations.png |
<br> | <br> | ||
| Line 1,292: | Line 1,387: | ||
This dialog is used to define which network folders/disks will trigger the auto-tagging rules. | This dialog is used to define which network folders/disks will trigger the auto-tagging rules. | ||
| − | <br> | + | <br> https://tabbles.net/images/wiki/set_whitelist.png |
<br> The window works like the one of the "Blacklist" but the result is quite different | <br> The window works like the one of the "Blacklist" but the result is quite different | ||
| Line 1,308: | Line 1,403: | ||
| − | + | https://tabbles.net/images/wiki/side_tree_ignored.png | |
All the drives apart from W: are excluded (including only one drive in the "Whitelist" makes the "Blacklist" redundant). | All the drives apart from W: are excluded (including only one drive in the "Whitelist" makes the "Blacklist" redundant). | ||
| Line 1,326: | Line 1,421: | ||
https://www.confidential.tech/wp-content/uploads/2017/09/Mark-2clicks_512x400_net-e1519399400745.png | https://www.confidential.tech/wp-content/uploads/2017/09/Mark-2clicks_512x400_net-e1519399400745.png | ||
| − | = | + | == the ''Quick-open tags'' window == |
| − | + | Use the Quick-tags window to perform a number of tasks, including: | |
| − | + | * Search interactively tags by part of their name | |
| + | * Delete tags | ||
| + | * Share tags or manage their properties | ||
| − | + | You can open it from the main menu, click on ''Tools > Quick-open tags'' or pressing ALT + c, this is what it looks like: | |
| − | + | https://tabbles.net/images/wiki/T5_QuickOpen1.png | |
| − | |||
| − | |||
| − | |||
| − | |||
| − | + | https://tabbles.net/images/wiki/T5_QuickOpen2.png | |
| − | |||
| + | == Delete tags in bulk == | ||
| − | You' | + | Do you want to delete a bunch of tags all at once? You can use the ''Quick-open tags'' window: |
| + | * In the main menu, click on ''Tools > Quick-open tags'' or press ALT + c | ||
| + | * Click on the tags you want to delete to select them | ||
| + | * Click the triangle button on the right side of the "Open" button, in the bottom of the window and then click ''Delete (N) tags''. | ||
| − | + | The result should look like this: | |
| + | https://tabbles.net/images/wiki/T5_BulkDeleteTags.png | ||
| − | + | == How to tag from command line == | |
| − | + | You can tag files by invoke Tabbles from command line, in the following fashion: | |
| − | + | ''Tagger.exe tag_files_pre -f "C:\Directory\File1.doc" -f "P:\Shared Directory\File2.txt" -t MyTag1 -t MyCoolStuff'' | |
| − | |||
| + | And you can also tag URLs in the same way: | ||
| − | '' | + | ''tagger.exe tag_url_pre https://tabbles.net "My fav URL" -t MyTag1 -t CoolUrls'' |
| − | |||
| − | + | Using the same technique as the Bookmarklet, you can use this to programmatically tag bookmarks, something like this: | |
| − | = | + | ''javascript:void(location.href='tabbles:tag_url_pre'+';'+encodeURIComponent(document.title)+';'+encodeURIComponent(window.location.href)+';'+'-t'+';'+'InsertTag1'+';'+'-t'+';'+' InsertTag1')'' |
| − | + | where the URL and site tile could also be inserted via code. | |
| − | |||
| − | + | == The Outlook plugin == | |
| − | - | + | The Outlook plugin for Tabbles is included in the regular installer. Outlook occasionally disables plugins automatically, so you may need to re-enable it again. The source code of the plugin is on [https://github.com/tabbles/TabblesOutlookPlugin Github] |
| − | + | === Manually enable the plugin === | |
| − | + | Follow the instruction on this link: | |
| + | [https://support.microsoft.com/en-us/office/turn-an-add-in-on-in-outlook-for-windows-f2ec3c07-59ce-4fd4-912d-460aa0bd009d add-in-on-for-outlook-for-windows] | ||
| − | + | = The Tabbles database: tips, tricks and maintenance = | |
| − | + | Most of the information relative to graphics present in Tabbles are contained in the file db.xml, located in the folder My Documents\Tabbles\Config. Everything that you can do by modifying the db.xml, you can also do using the Tabbles’ user interface. | |
| − | + | '''The way Tabbles uses the db.xml allows you to create a database structure (meaning tabbles and Color groups) that would fit your office, colleagues or friends needs, and sharing it with them. If you are a distributor or an OEM partner, you can create your unique setup and have it distributed with Tabbles.''' | |
| − | + | == Limits of Tabbles: how many files and tags should I have? == | |
| − | * | + | Often we get asked how many files/tags can Tabbles support. As a rule of thumb, if you're using '''Tabbles Local''', you should not notice any important slow-down or SQL timeout with: |
| + | * 500.000 files: you should in fact be able to go up to 1 milion without problems. We have several corporate customers having 2-3M files on their databases, and the software runs smooth | ||
| + | * 500 tags: we empirically found that, until 300-400 tags you will hardly notice any slowdown. Between 500 and 600 you will start seeing slowdowns and timeouts. If you pass 1000 tags, the software will cry and yell for help, and will become unusable. | ||
| + | * 1000 files per tags: this is more a ''best practice'' than a rule. The software will probably still run ok if you have tags with 3-4000 files in it, but having a tag with 4000 files defeats the purpose of the software: try and create children-tags and tag your files accordingly. | ||
| − | + | === Limits on LAN (using MSSQL running on a server) === | |
| − | + | If you're using a MSSQL server, the performances will depend on the version of MSSQL you have, as well as the hardware you're using. So far we found that a MSSQL Express 2017 (the free version) running on a dedicated mid-power server, can accomodate some 150 users. | |
| − | + | == Database Edit wizard == | |
| − | |||
| − | + | You'll need this operation when you'r moving (or have moved) all your tagged files/folders to a different drive: please keep in mind that '''an easy and viable alternative is to simply move all your files using Tabbles'''(using the cut&paste functions). Open the window here: | |
| − | + | https://tabbles.net/images/wiki/t4_DatabaseEditWizardMenu.png | |
| − | |||
| − | + | This function will perform a simple text-replacement of all the database paths, whenever appliable. This is anyway an '''extremely delicate operation''' that can potentially destroy your database if you're not performing it correctly. | |
| − | + | Keep in mind that replacing C:\ with D:\ will also cause '''all your [[#Auto-tagging_rules_and_the_One-click_tagging|auto-tagging rules]] to be modified''' consequently. | |
| − | + | This is the window: | |
| − | + | https://tabbles.net/images/wiki/t4_DatabaseEditWizard.png | |
| − | |||
| − | *Replace C:\ with D:\ | + | '''The rules:''' |
| + | |||
| + | 1) use capital letters for the drive letters (C: and D:) | ||
| + | |||
| + | 2) if the first path ends with a "\" then also the second must end with a "\" | ||
| + | |||
| + | === How to do it (examples): === | ||
| + | |||
| + | *Replace C:\ with D:\ | ||
Resulting in: | Resulting in: | ||
| Line 1,420: | Line 1,524: | ||
C:\Users\Andrea\Downloads\CentOS-5.5-i386-netinstall.iso | C:\Users\Andrea\Downloads\CentOS-5.5-i386-netinstall.iso | ||
| − | ---> | + | ---> D:\Users\Andrea\Downloads\CentOS-5.5-i386-netinstall.iso |
| − | + | <br> | |
| − | + | *Replace C: with D: | |
| − | + | Resulting in: | |
| − | + | C:\Users\Andrea\Downloads\CentOS-5.5-i386-netinstall.iso | |
| − | + | ---> D:\Users\Andrea\Downloads\CentOS-5.5-i386-netinstall.iso | |
| − | + | <br> | |
| + | *Replace C:\ with D:\Data\ | ||
| − | + | Resulting in: | |
| + | C:\Users\Andrea\Downloads\CentOS-5.5-i386-netinstall.iso | ||
| + | ---> D:\Data\Users\Andrea\Downloads\CentOS-5.5-i386-netinstall.iso | ||
| − | === | + | ==== How NOT TO DO IT (examples): ==== |
| + | |||
| + | *Replace c:\ with d:\ | ||
| − | + | (you'll get an error message here) | |
| − | + | <br> | |
| − | + | *Replace C:\ with D: | |
| − | |||
| − | + | Resulting in: | |
| + | C:\Users\Andrea\Downloads\CentOS-5.5-i386-netinstall.iso | ||
| + | ---> '''D:Users'''\Andrea\Downloads\CentOS-5.5-i386-netinstall.iso | ||
| − | + | <br> | |
| − | + | *Replace C:\ with D:\Data | |
| − | + | Resulting in: | |
| − | + | C:\Users\Andrea\Downloads\CentOS-5.5-i386-netinstall.iso | |
| + | ---> '''D:\DataUsers'''\Andrea\Downloads\CentOS-5.5-i386-netinstall.iso | ||
| + | === Delete files or shadow files (delete tagging from the database) === | ||
| − | + | If you tagged some files on a drive or a folder and suddenly regret having done so, you can use this feature to delete, at once, all the tagging that happened on a certain path. Needless to say, this will NOT delete the files on drives, but only the entries in the Tabbles database. The Wizard will look like this: | |
| − | + | https://tabbles.net/images/wiki/T4_DatabaseUpdateWizardDelete.png | |
| − | |||
| − | + | === Change machine name in the database === | |
| − | + | For each tagged file, our software saves the machine name were the file is tagged. If you change the name of your machine (or move all your files to a new machine), the machine name needs to be updated in the database. Use this tool '''if you have changed computer or changed machine name''' and you can see '''all your tags are empty'''. Write your old machine name in the first line and the new machine name in the second like, and press next. You'll have a preview of the effected files before going forward. | |
| − | |||
| − | |||
| − | |||
| + | https://tabbles.net/images/wiki/T5-ChangeMachineName.png | ||
| + | |||
| + | == SQL Scripts for SysAdmins == | ||
| − | + | === How to use the scripts === | |
| + | Here a collection of SQL scripts you may want to use if you're SysAdmin and have Tabbles running in your network. You will need Microsoft SQL Server Management studio, you get it for free on Microsoft website: https://docs.microsoft.com/en-us/sql/ssms/download-sql-server-management-studio-ssms | ||
| − | |||
| + | Alternatively, you may want to use the ''Microsoft Command Line Utilities 14.0 for SQL Server'' a.k.a ''sqlcmd.exe'' that you can download from: https://www.microsoft.com/en-us/download/details.aspx?id=53591 | ||
| − | |||
| − | + | === Blacklist a drive, to disallow (restrict) users to tag files on it === | |
| − | + | We implemented this feature to fix the following problem: you have the deployed Tabbles in your network and you have users who have mapped the same letter (e.g.: S:\) on different drives. If that's the case, the best solution is to prevent them from tagging on that drive. | |
| − | |||
| − | + | * You'll first need to find out what the 'idOrg' of your organization is, so run with this query: | |
| − | + | <source>select o.id | |
| + | from organization o</source> | ||
| − | + | the result will typically be '1' (don't mind that it's '1030' in our case). | |
| − | |||
| − | |||
| − | |||
| − | |||
| + | * you will need to edit the table 'preventTaggingFromLocation' manually: | ||
| − | + | https://tabbles.net/images/wiki/T4_Edit_preventTaggingFromLocation.png | |
| − | + | and under 'prefixToPrevent' you can put the letter(s) of the drive(s) to be excluded: | |
| − | + | https://tabbles.net/images/wiki/T4_Edit_prefixToPrevent.png | |
| − | |||
| − | |||
| − | |||
| − | + | * When tagging on a blacklisted drive, your users will see something like this: | |
| + | |||
| + | https://tabbles.net/images/wiki/T4_Blacklist_Drive_error.png | ||
| − | + | === "Revert to free" a user in the database === | |
| − | + | If you have assigned licenses to a batch of users and want to delete the users or assign those licenses to someone else, you can do it easily in SQL. Note: if the license has been activated already, we'll need to remove the license from our activation table, so drop us line if it's the case. | |
| − | + | * use the script: | |
| − | |||
| − | |||
| − | == | + | <source>update user2 |
| + | set activation_key = null | ||
| + | where name = 'user-you-want-to-revert-to-free' </source> | ||
| − | |||
| − | + | * or set to 'null' the column 'activation_key' on the table 'user2' for the user: | |
| − | |||
| − | + | https://tabbles.net/images/wiki/T4_dbo.user2.png | |
| − | |||
| − | |||
| − | |||
| − | + | https://tabbles.net/images/wiki/t4_dbo.user2.activation.png | |
| − | |||
| − | |||
| − | |||
| + | * If you want to revert all the users at once, run this query: | ||
| − | = | + | <source>update user2 |
| + | set activation_key = null </source> | ||
| − | + | === Get a list of all the files in the database === | |
| − | + | If you want to pull a list of all the files in the database, you'll have to use the query below. In case you're looking at the table dbo.vTagsOfFile, be aware that this contains an "exploded" view of the database, so you'll have the impressions that files are duplicated while this isn't the case. This is the query you need: | |
| − | <source> | + | <source>select f.path as [filePath], f.machineName, t.name as tag, t.id_user_owner as tagOwnerId from file2 f |
| + | join taggable_has_tag tt on f.idTaggable = tt.id_taggable | ||
| + | join tag t on t.id = tt.id_tag</source> | ||
| − | + | It should look something like this: | |
| − | + | https://tabbles.net/images/wiki/T4_listAllFilesInDB.png | |
| − | |||
| − | |||
| − | |||
| − | |||
| − | |||
| − | |||
| − | |||
| − | |||
| − | |||
| − | |||
| − | |||
| − | + | === Convert tags to comments === | |
| + | |||
| + | One of our oldest user, had grown his database to 1400 tags: at that point Tabbles was hardly usable. He had then the brilliant idea to convert some tags to comments: comments are managed differently from files and while are still searchable, they weight much less on the MSSQL database server. | ||
| + | This is how this can be done: | ||
| + | |||
| + | ==== Step 1 BACKUP YOUR ENTIRE DATABASE ==== | ||
| − | + | but before you go any further, BACKUP YOUR ENTIRE DATABASE as this procedure can destroy it (you've been warned!). | |
| − | |||
| − | + | ==== Step 2 create comments from tags ==== | |
| − | |||
| − | |||
| − | + | Our user needed to: ''convert some tags to comments : the tags that I don't really need to find in the tabbles tree. They start with "'''PIECE …'''" or "'''ECRITURE …'''"'' | |
| − | |||
| − | + | This is the SQL Query to create comments from tags: | |
| + | <source> | ||
| + | INSERT INTO dbo.comments (commentText, idUserAuthor, dateCreated, dateModified, idTaggable) SELECT (tag.name, tag.id_user_owner, GETDATE(), GETDATE(), taggable_has_tag.id_taggable) FROM dbo.tag INNER JOIN dbo.taggable_has_tag ON taggable_has_tag.id_tag = tag.id WHERE tag.name LIKE 'ÉCRITURE %' OR tag.name LIKE 'ECRITURE %' OR tag.name LIKE 'PIECE %'; | ||
| + | </source> | ||
| + | ==== Step 3 check the comments that were created ==== | ||
| − | + | Have a good look at the comments created before you delete anything | |
| − | + | ==== Step 4 delete the tags ==== | |
| + | Once you're sure the operation worked as needed, go on to delete your tags, with two queries: | ||
| − | + | 1st: | |
<source> | <source> | ||
| + | DELETE dbo.taggable_has_tag FROM dbo.taggable_has_tag INNER JOIN dbo.tag ON taggable_has_tag.id_tag = tag.id WHERE tag.name LIKE 'ÉCRITURE %' OR tag.name LIKE 'ECRITURE %' OR tag.name LIKE 'PIECE %'; | ||
| + | </source> | ||
| − | + | 2nd: | |
| − | |||
| − | |||
| − | |||
| + | <source> | ||
| + | DELETE FROM dbo.tag WHERE tag.name LIKE 'ÉCRITURE %' OR tag.name LIKE 'ECRITURE %' OR tag.name LIKE 'PIECE %'; | ||
</source> | </source> | ||
| − | |||
| − | + | === Get a list of all tags, highlighting a what tag contains more files tagged with a specific tag === | |
| + | We had this request from a user that uses our tool for project management, and wants to know what ''customer'' has the most files marked as ''Work in progress'', where for each customer there is a corresponding tag (all the customers' files are tagged with each customer's tag) and ''Work in progress'' is a tag itself. | ||
| − | + | You'll need this script: | |
| − | |||
| − | |||
| − | |||
| − | |||
<source> | <source> | ||
| − | + | select t.id, t.name, | |
| − | |||
| − | </source> | + | ( select count(*) |
| − | + | from taggable_has_tag tt | |
| − | + | where tt.id_tag = t.id | |
| + | and exists (select * from taggable_has_tag tt2 | ||
| + | join tag specialTag on specialTag.id = tt2.id_tag | ||
| + | where tt2.id_taggable = tt.id_taggable | ||
| + | and specialTag.name = 'Work in progress' | ||
| + | |||
| + | ) | ||
| + | ) as countFiles | ||
| + | |||
| + | from tag t | ||
| + | order by t.name asc | ||
| + | |||
| + | </source> | ||
| + | |||
| + | |||
| + | You will need to change the 'Work in progress' text with the name of the tag you want to use for the matching. The tag name (inside the quotation marks) can contain spaces and is not case sensitive. | ||
| − | + | You can alternatively sort the output by number of file, replacing the last line with: | |
| − | + | <source> | |
| + | order by countFiles desc | ||
| + | </source> | ||
| − | + | The output should look like in the screenshot below, where the tag chosen to match is names ''Free'', you '''can copy & paste it to an Excel file''' for further sorting and manipulation: | |
| − | + | ||
| − | |||
| − | |||
| − | |||
| − | + | https://tabbles.net/images/wiki/T5_QueryJoinTags.png | |
| − | |||
| − | This query outputs all the mapped letters on all the machines where Tabbles it running (it doesn't output the user name, but the machine name). | + | === Export all comments === |
| − | + | ||
| − | Here you have 2 possible problems: | + | If you need to export every comment in your database, along with the file the comments were attached to, you can use this script: |
| + | |||
| + | <source> | ||
| + | |||
| + | -- get all file comments ordered by date, annotated with the file path , comment author and creation date, for the database "tabbles5" | ||
| + | |||
| + | use tabbles5; | ||
| + | |||
| + | select u.name as 'username', c.commentText, c.idUserAuthor, c.dateCreated, f.path as 'file path' | ||
| + | from comment c | ||
| + | join taggable tgb ON tgb.id = c.idTaggable | ||
| + | join file2 f on f.idTaggable = tgb.id | ||
| + | join user2 u on u.id = c.idUserAuthor | ||
| + | order by c.dateCreated asc | ||
| + | |||
| + | </source> | ||
| + | |||
| + | |||
| + | |||
| + | |||
| + | The result should look like this: | ||
| + | |||
| + | |||
| + | https://tabbles.net/images/wiki/T5_Export_Comments.png | ||
| + | |||
| + | |||
| + | |||
| + | |||
| + | In order to save it to a csv, you can click on the top left of the output, right-click and click on "Save Results As...": | ||
| + | |||
| + | https://tabbles.net/images/wiki/T5_Export_Comments_save.png | ||
| + | |||
| + | === Delete files from the database manually === | ||
| + | |||
| + | Let's see if you have a list of files (with their path) that you want to delete, maybe because they are '''Shadow Files''' (search this manual for '''Shadow Files'''). | ||
| + | |||
| + | |||
| + | You'll need this script: | ||
| + | |||
| + | <source> | ||
| + | |||
| + | delete from taggable | ||
| + | where id in (select fi.idTaggable from file2 fi | ||
| + | join taggable tgb on fi.idTaggable = tgb.id | ||
| + | where fi.path = 'T:\My Stuff\My Doc.docx') | ||
| + | |||
| + | </source> | ||
| + | |||
| + | Here you will have to change the path of the file, for each file that you want to remove. | ||
| + | |||
| + | IMPORTANT: this script '''won't work properly if you have the feature "Folder Synchronization" enabled'''. | ||
| + | |||
| + | === Change the machine name of the files tagged in your database === | ||
| + | |||
| + | For each file in the Tabbles databases, the software save the machine name where the file was when it was tagged. So if you are on a PC called "MyComputer" and tag the file "C:\Documents\MyDoc.docx", the machine name will be bound to the file name. | ||
| + | |||
| + | If you tag some stuff and later change the name of the machine, or your move (or copy) your whole hard drive with to a new PC, the database will be stuck to "old" machine name, as a result you will see all your tags but '''the tags will be empty'''. The easiest solution would be to change the machine name bound to every file. | ||
| + | |||
| + | <source> | ||
| + | |||
| + | update file2 | ||
| + | set machineName = 'MyNewComputer' | ||
| + | |||
| + | </source> | ||
| + | |||
| + | IMPORTANT: this script changes the machine name for every single file of the database, so '''if you are on a multiuser environment, you don't want to use this script''' as it will destroy your database. | ||
| + | |||
| + | |||
| + | === Produce a list of workspace tags in a hierarchy === | ||
| + | |||
| + | This script can be used to produce a list of workspace tags in a hierarchy. The start point is ''@sourceid INT = 21'' where: | ||
| + | * ''21'' is the tag id the workspace of a Tabbles user in your database | ||
| + | * ''MyTabblesDatabase'' is the name of your Tabbles' database | ||
| + | |||
| + | You probably want to replace both. | ||
| + | |||
| + | |||
| + | <source> | ||
| + | |||
| + | DECLARE @sourceid INT = 21; | ||
| + | WITH cte ([id_tag_child], [id_tag_parent], [tag_name], level, path) AS ( | ||
| + | SELECT [id_tag_child], [id_tag_parent], [tag_name], | ||
| + | 0 AS level, CAST([tag_name] AS VARCHAR(1000)) AS path | ||
| + | FROM [MyTabblesDatabase].[dbo].[view_tag_has_child_for_user] | ||
| + | WHERE [id_tag_parent] = @sourceid | ||
| + | UNION ALL | ||
| + | SELECT t.[id_tag_child], t.[id_tag_parent], t.[tag_name], | ||
| + | cte.level + 1 AS level, | ||
| + | CAST((cte.path + '/' + t.[tag_name]) AS VARCHAR(1000)) AS path | ||
| + | FROM [MyTabblesDatabase].[dbo].[view_tag_has_child_for_user] t | ||
| + | INNER JOIN cte ON cte.[id_tag_child] = t.[id_tag_parent] | ||
| + | ) | ||
| + | SELECT [id_tag_child], [id_tag_parent], [tag_name], level, path | ||
| + | FROM cte | ||
| + | WHERE path IS NOT NULL AND path NOT LIKE '!_%' ESCAPE '!' | ||
| + | ORDER BY path ASC | ||
| + | |||
| + | </source> | ||
| + | |||
| + | '''Thanks Brian for this! :-)''' | ||
| + | |||
| + | == Finding who has mapped that shared drive on the wrong letter == | ||
| + | |||
| + | Problem: "We are finding staff are tagging files through different drive mappings...and we need to figure out who and what is doing it" | ||
| + | |||
| + | Script: | ||
| + | <source> SELECT * | ||
| + | FROM pathTranslationRule r | ||
| + | join pathTranslationRuleItem i on i.idRule = r.id | ||
| + | </source> | ||
| + | |||
| + | You should see something like the screenshot below: | ||
| + | |||
| + | https://tabbles.net/images/wiki/T4_SQL_FindUserWrongMapping.png | ||
| + | |||
| + | This query outputs all the mapped letters on all the machines where Tabbles it running (it doesn't output the user name, but the machine name). | ||
| + | |||
| + | Here you have 2 possible problems: | ||
| + | |||
| + | * A user mapped '''a letter that is unused by anybody else''': if this is the case, sort the output by ''path'' and find the intruder | ||
| + | * A user mapped '''a letter on a different shared drive/folder''' than anybody else: in this case, sort the output by ''uncPath'' and find on what machine that drive is mapped with a funny letter | ||
| + | |||
| + | == Move your tagging to a new computer == | ||
| + | |||
| + | === Read this if you have been using Tabbles for a a while and you change PC (or change the machine name of your PC) === | ||
| + | |||
| + | When Tabbles tags a file, it saves its path along its machine name. If you start using a new PC and copy all your tagged files in exactly the same folder(s) as they used to be, you will not be able to see any of those files in Tabbles, as Tabbles still "thinks" those files are on your old machine. | ||
| + | |||
| + | Therefore, in order to fix this, you'll have to change the machine name using the '''Database Edit Wizard''' (search it in this document), you'll need to do this after you have moved your database from a PC to the next one. | ||
| + | |||
| + | === Copy your database to a new PC === | ||
| + | |||
| + | If you want to move the LocalDb database, you need to do the following: | ||
| + | |||
| + | - from your old PC you need to backup all the files in the current database folder '''%localappdata%\Tabbles\LocalDb\''' probably '''tabbles4.mdf''' and '''tabbles4_log.ldf'''. | ||
| + | |||
| + | - On your new PC, you'll need to copy the database files '''tabbles4.mdf''' and '''tabbles4_log.ldf''' into the folder '''%localappdata%\Tabbles\LocalDb\''' (if the folder doesn't exist, just create it, and afterwards Launch Tabbles, press "GO" and enjoy :) | ||
| + | |||
| + | If you have already installed and run Tabbles on the new PC, when try to copy the files into the folder of the new PC, you'll receive an error and won't be allowed to do so... so read on. | ||
| + | |||
| + | |||
| + | ==== Stop and restart SQLLocalDB ==== | ||
| + | |||
| + | - In Tabbles log out: ''File > Log out'' and after close Tabbles (close the window) | ||
| + | |||
| + | - Open a command prompt (cmd.exe) and execute the two following command lines, the result should be as in the screenshot below: | ||
| + | |||
| + | '''"C:\Program Files\Microsoft SQL Server\120\Tools\Binn\SqlLocalDB.exe" stop TabblesLocalDb4''' | ||
| + | |||
| + | '''"C:\Program Files\Microsoft SQL Server\120\Tools\Binn\SqlLocalDB.exe" delete TabblesLocalDb4''' | ||
| + | |||
| + | |||
| + | https://tabbles.net/images/wiki/cmq_LocalDb_delete.png | ||
| + | |||
| + | |||
| + | Now, copy the database files '''tabbles4.mdf''' and '''tabbles4_log.ldf''' into the folder '''%localappdata%\Tabbles\LocalDb\''' you should now be able to. | ||
| + | |||
| + | - Launch Tabbles, press "GO" and enjoy :) | ||
| + | |||
| + | === Change the machine name in your database === | ||
| + | |||
| + | When you move your database to a new pc, each file tagged will still refer to your old machine. In order to fix this, you need to '''change the machine name in the database''', you can do this using the '''Database Edit Wizard''' (search it in this document). | ||
| + | |||
| + | == Reset Tabbles LocalDb Database == | ||
| + | |||
| + | Read this if you want to reset your LocalDb database and start from scratch with a new database: | ||
| + | |||
| + | Copy paste this into a command prompt, or save it into a ResetTabblesLocalDb.bat if you want to do several experiments: | ||
| + | |||
| + | |||
| + | |||
| + | <code> | ||
| + | REM: those lines stop the MSSQL Local and delete the instance. If those two commands don't work, you won't be able to rename or delete the databases | ||
| + | |||
| + | "C:\Program Files\Microsoft SQL Server\120\Tools\Binn\SqlLocalDB.exe" stop TabblesLocalDb4 | ||
| + | |||
| + | "C:\Program Files\Microsoft SQL Server\120\Tools\Binn\SqlLocalDB.exe" delete TabblesLocalDb4 | ||
| + | |||
| + | REM: the following two lines rename the database (and its log file). You can rename them back anytime. | ||
| + | |||
| + | ren %localappdata%\Tabbles\LocalDb\tabbles4.mdf tabbles4.mdf.backup | ||
| + | |||
| + | ren %localappdata%\Tabbles\LocalDb\tabbles4_log.ldf tabbles4_log.ldf.backup | ||
| + | |||
| + | REM: this line renames the config file. | ||
| + | |||
| + | ren %appdata%\Tabbles\Config\config.xml config.xml.backup | ||
| + | |||
| + | ECHO DONE! | ||
| + | </code> | ||
| + | |||
| + | |||
| + | |||
| + | After you did this, if everything worked properly, when you start Tabbles again you'll be asked what mode you want to use, and if you choose "Local", Tabbles will create a new empty database. | ||
| + | |||
| + | == Shrink your database to improve performances of several queries == | ||
| + | |||
| + | We found that several storedProcedures speed up considerably after shrinking the database. This is how you do it: | ||
| + | |||
| + | https://tabbles.net/images/wiki/T4_SQL_ShrinkDatabase.png | ||
| + | |||
| + | = Misc howto's = | ||
| − | + | See [https://tabbles.net/how-to-videos/ here]. | |
| − | |||
| − | |||
| − | |||
| − | = | + | = Tabbles Web = |
| + | Launched on August 1st 2019 | ||
| − | + | == Intro == | |
| − | + | We made a blog post with some info about what it does and how it works [https://tabbles.net/tabbles-10th-birthday-and-tabbles-web/ here ] | |
| + | and check the demo at [http://srv.tag-forge.com/TabblesWebBeta/ http://srv.tag-forge.com/TabblesWebBeta/ ] (user: demo, pass: demo) | ||
| − | |||
| − | + | Tabbles Web 0.2.0 does the first few things that we have been asked to develop, that is it allows you to: | |
| − | + | 1) open tags and do a "Combine" | |
| − | + | 2) to copy file paths from Mac, Android and iOS (it performs a path conversion, for example from G:\Stuff to /system/disk/stuff or to smb://Shared/stuff) | |
| − | 3) | + | 3) download files (if the web server can access the files, to do this you need to have the server in your network, at least for now) |
| − | + | 4) read the last comments | |
| − | + | == Install locally == | |
| + | You can download [https://tabbles.net/counter/click.php?id=87 TabblesWeb] (fixed download link!) and install it on your IIS instance: we believe it works also on Kestrel, we'll do some test asap and report here. | ||
| + | Tabble Web is compatible with the current version of Tabbles 5.7.x (and Confidential 1.7.x). | ||
| − | + | === The Web.config === | |
| + | In order to use it, you'll first need to configure the file '''Web.config''' in the root of the site, and particularly you have the setup the database info: | ||
| − | |||
| − | + | <code>data source=127.0.0.1,1453; </code> <-- write here your MSSQL address and port | |
| − | + | <code>initial catalog=TabblesDB; </code> <-- write here your Tabbles database name | |
| + | <code>user id=TabblesUser; </code> <-- write here your Tabbles database username | ||
| + | <code>password=TabblesPass; </code> <-- write here your Tabbles database password | ||
| − | |||
| − | |||
| − | + | === The Contro Panel (in the Web app) === | |
| − | |||
| − | + | Then you'll also need to configure, in the Control Panel: | |
| − | + | * '''Machine name to impersonate''': write here the machine where most of the tagging was made from, Tabbles Web uses this to understand how disks have to be mapped, see below: | |
| − | |||
| − | |||
| − | + | https://tabbles.net/images/wiki/TabblesWeb1.png | |
| − | |||
| − | |||
| + | * '''Drive letter infos''' use this to configure the disks path conversion, so that for examples a shared drive like ''P:\SharedStuff'' will be converted to ''smb://NetworkServer/SharedStuff'' (the software will convert all the "\" into "/") and check (or not) the "Allow download" box (this will only work if the machine running IIS is able access the actual files and folder), see here: | ||
| − | |||
| − | |||
| − | + | https://tabbles.net/images/wiki/TabblesWeb2.png | |
| − | |||
| − | |||
| − | + | Tabbles Web should now act as any other Tabbles client and serve you the tags that the user in Web.config can see and let you download the files on the drives that the ISS machine and user can see. | |
Latest revision as of 16:28, 8 April 2025
Tabbles© is a way to find files, emails, and Internet bookmarks, when you don’t remember where they are, but only what they are about. Tabbles allows you to combine tags with a few mouse clicks, immediately finding the file, regardlessly of what folder or disk it is stored on. It even tells you what drive you need to connect, in case the file is archived on a disconnected drive.
For a more detailed introduction, see the feature list, the quick intro, and the long intro.
Also do not miss our basic training videos and our how-to videos
Contents
- 1 Intro: why Tabbles?
- 2 What's new in Tabbles 4
- 3 Setting up Tabbles
- 3.1 Using Tabbles Local (runs on Microsoft SQL Server LocalDb)
- 3.2 Using Tabbles Cloud
- 3.3 Using Tabbles Lan (i.e. your own Microsoft SQL Server)
- 3.3.1 Install MSSQL Server (Microsoft SQL Server)
- 3.3.2 Create the Tabbles database
- 3.3.3 Create the first Tabbles user
- 3.3.4 Configuring SQL Server Express for use in a network
- 3.3.5 Add groups and users
- 3.3.6 Import Users from Active Directory
- 3.3.7 Deploy Tabbles on a Windows Network using Group Policies
- 3.3.8 Assign keys to users in batch
- 3.3.9 Setup OverlayHandler's network cache
- 3.3.10 Upgrade Database
- 3.4 Using Tabbles on Azure SQL
- 3.5 importing database from Tabbles 3
- 3.6 Importing database from Tabbles 2
- 3.7 Auto-update
- 3.8 Register a license
- 3.9 Moving from Tabbles Local to Cloud or LAN (or vice versa)
- 4 What can you do with Tabbles?
- 5 Basic operations I: the GUI creating tabbles
- 6 Basic operations II: tagging files/folders/urls
- 7 Basic operations III – browsing and combining
- 7.1 How to search for files: the Combine and Subtract functions
- 7.2 Opening a tag
- 7.3 File sorting
- 7.4 The Combine function and Horizontal browsing
- 7.5 Performing a combination
- 7.6 The Subtract function: filtering out files from a combination
- 7.7 Use the Subtract to filter out tagged files from a folder
- 7.8 Father and children tabbles: nesting tabbles
- 7.9 How to link files, folders and URLs to several tabbles at the same time (this time from the File window).
- 8 Basic operations IV: file management
- 9 File previews
- 10 Auto-tagging rules and the One-click tagging
- 10.1 Auto-tagging rules
- 10.2 Creating and editing a simple Auto-tagging rule for a folder
- 10.3 Create an auto-tagging rule to match a word in files
- 10.4 Auto-tagging rule for file creation date
- 10.5 Data-mining: create an auto-tagging rule to match a pattern in a files
- 10.6 Use auto-tagging rules to automatically categorize your existent files and folder structure
- 10.7 One-click tagging
- 10.8 Regular expressions
- 11 Tag Synchronization
- 12 Folder Synchronization (File Synchronization)
- 13 Tag sharing
- 14 Google file stream (and more) support
- 15 Advanced functions
- 16 The Tabbles database: tips, tricks and maintenance
- 16.1 Limits of Tabbles: how many files and tags should I have?
- 16.2 Database Edit wizard
- 16.3 SQL Scripts for SysAdmins
- 16.3.1 How to use the scripts
- 16.3.2 Blacklist a drive, to disallow (restrict) users to tag files on it
- 16.3.3 "Revert to free" a user in the database
- 16.3.4 Get a list of all the files in the database
- 16.3.5 Convert tags to comments
- 16.3.6 Get a list of all tags, highlighting a what tag contains more files tagged with a specific tag
- 16.3.7 Export all comments
- 16.3.8 Delete files from the database manually
- 16.3.9 Change the machine name of the files tagged in your database
- 16.3.10 Produce a list of workspace tags in a hierarchy
- 16.4 Finding who has mapped that shared drive on the wrong letter
- 16.5 Move your tagging to a new computer
- 16.6 Reset Tabbles LocalDb Database
- 16.7 Shrink your database to improve performances of several queries
- 17 Misc howto's
- 18 Tabbles Web
Intro: why Tabbles?
This chapter is an introduction to the philosophy behind Tabbles: if things sound complicated right now, keep reading: soon your doubts will be cleared.
The contrast between how we think of our objects and how we organize them
We are used to storing our files into folders and then sub-folders and sub-sub-folders. This forces us to a hierarchical (vertical) grouping (categorization) where each group has to be contained into other groups and sealed off from each other.
Objects in real life are stored in the same way: you store your socks in the left drawer of your closet. After all, a real-world object cannot be in two places at once.
In the same fashion you are used to store and organize your files on your hard-disk: “ you save the documents related to the product “A” inside the folder “A” as a subfolder of the folder “Manufacturer Alpha” as a subfolder of the folder “British manufacturers”. There are 2 main issues concerning this way of organizing files:
- Our brain works in a different way: you remember things based on their characteristics as “that product is red, spherical, heavy and has three holes to stick the fingers into it”. You will most likely remember all of those characteristics, rather than its physical location, or the name or the manufacturer.
- What if you want to instantly find all the documents related to all the products? It won’t be that easy.
The limits of keyword-based searches
Many software packages (including modern operative systems) allow users to perform keyword based searches.
While keyword based searches can be pretty efficient if you remember the name of the file, they are less efficient if you only remember a keyword: the more common the keyword is in the data you are searching (the hard-disk of your pc or your office’s local network), the less efficient will the search software be.
Tabbles helps you find files according to the characteristics of the file as you (or someone else) assigned them. These characteristics can be virtually unlimited; also, the search can be refined while you are looking for the file.
Furthermore, keyword searching does not work when you’re looking for files which do not contain text (as images, videos, graphic files, 3D files, archives, proprietary file formats).
Tabbles helps you categorize all sort of files and allows you to efficiently find them based on the way you think of them. The rest of the manual will explain the idea better.
What's new in Tabbles 4
Here is a list of the main new features added in Tabbles 4:
- The whole database logic was rewritten, bringing a major improvement in performances.
- Fast tag sharing with hundreds of machines. We are now using Sql Server for storing our tagging data. This allows collaborative tagging, and the sharing of tagged files, across large enterprise networks. It scales to handle hundreds of interconnected machines and users. Also, now, when you tag something, your collaborators instantly see the new tagged files, and can change the tags applied by someone else (provided they have permission to do so).
- Tabbles is compatible with Sql Server 2008 or above. Sql Express (the free version) works just fine.
- Outlook integration: you can now tag Outlook emails with Tabbles, and search among emails by combining tags with a few mouse click, via Tabbles’ easy to use interface. (As of Aug 18 2014, the Outlook plugin is still in beta)
- Archiving: You can tag files on removable drives (DVDs, USB drives, network drives) and then detach or eject the drives (i.e. archive them). The files will still be found by Tabbles when you make searches. And when you try to actually open the file, Tabbles will tell you what drive you need to connect (or which disk you need to insert) in order to open the file. So now there is no limit to the size of your tagged file archive.
- Explorer integration: finally, if you move or rename a file with the Windows File Explorer, the tags are not lost.
- Explorer integration, part II: in File Explorer, you see an overlay icon (a small ball) beside tagged files.
- Metadata: tags are now also written inside office documents, as metadata. This is useful in order not to lose tags when a document is sent via email, modified by a collaborator, and sent back via email.
- User management: the Tabbles administrator has a control panel in which he can create users and determine whether they can tag, untag, share tags, and so on. This can be specified at the user level or at the tag level. He can also specify what tags are available to users, and enforce a consistent tag structure and policies across the whole enterprise.
- Active directory integration: the administrator is not forced to create his users manually, but he can import users from an existing active directory environment. He can also import a subset of the AD users, with an easy to use GUI.
- Tabbles Cloud: this is an experimental feature, not meant for daily use. It is a version of Tabbles which spares you from having to install Sql Server, and runs on our remote server. This is slower than Tabbles normal, so please consider this only as a demo of Tabbles, which is easy for you to try. In the future, we plan on making the Tabbles Cloud option faster.
For more details on the features, please refer to our feature list.
Setting up Tabbles
- Tabbles requires the .NET framework 4.5 (this is installed automatically by the installer).
- Unless you want to use Tabbles Cloud or the pre-installed Microsoft SQL Express LocalDB, you will need to install Microsoft SQL Server 2008 or above. The free version, called "Express", works just fine.
- Tabbles requires Windows Vista, 7, 8, 8.1 or above. You can use it on Windows XP but you lose some important features, like Explorer integration.
Using Tabbles Local (runs on Microsoft SQL Server LocalDb)
All you have to do is pressing the GO button. No setup needed.
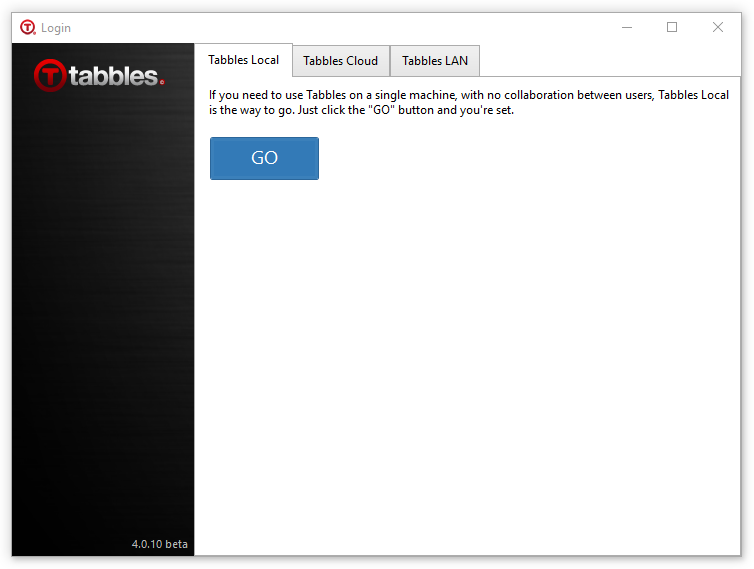
Check what database and mode you are on
To see what database and mode you are using, go to File > Show current server and user, if the pop-up you get is like the one in the screenshot, than you are in "Local" mode:

Switch mode to "LAN" or "Cloud"
If you want to switch to "LAN" or "Cloud", you will first need to Log out, by doing File > Log out (you can log back in anytime by pressing "GO" in the Local tab of the login window. Find in this manual "LAN" or "Cloud" to see how to set it up.
Back-up your LocalDb database
Your database is contained in the two files tabbles4.mdf and tabbles4_log.ldf located in the folder %localappdata%\Tabbles\LocalDb\
Just backup those two files and replace them if needed. You'll need to stop and restart MSSQL LocalDB to do this, instructions for that are contained in this manual, in several parts.
Change LocalDb database location for Tabbles Local
If you want to move the LocalDb database, you need to do the following:
- You should have used Tabbles in LocalDb at least once so: install Tabbles, start it, and press "GO". Tabbles will now create the LocalDb Database in the default location.
- Then log out: File > Log out and after close Tabbles (close the window)
- Open a command prompt (cmd.exe) and execute the two following command lines, the result should be as in the screenshot below:
"C:\Program Files\Microsoft SQL Server\120\Tools\Binn\SqlLocalDB.exe" stop TabblesLocalDb4
"C:\Program Files\Microsoft SQL Server\120\Tools\Binn\SqlLocalDB.exe" delete TabblesLocalDb4

- If you want to keep your current database, you need to copy all the files in the current database folder %localappdata%\Tabbles\LocalDb\ to wherever you want the database to be from now on.
- Open %appdata%\Tabbles\Config\config.xml and modify mdf_folder_tabbles_local=" WRITE THE NEW PATH HERE " as you see in the screenshot below and save the file.
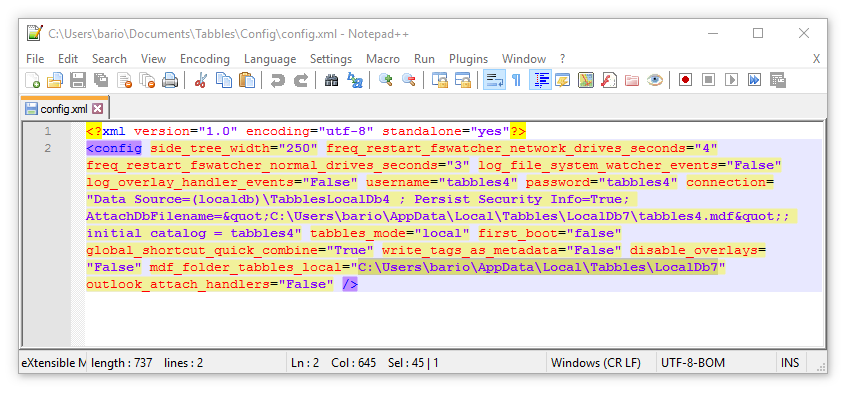
- Launch Tabbles, press "GO" and enjoy :)
Note: using a LocalDb database on a shared drive and try to share tagging, is a bad a idea. Install Microsoft SQL Server Express instead.
Fix "Error initializing LocalDB" - sql exception. Number = 4060
In some cases, LocalDB hangs, you'll get an error message like this:
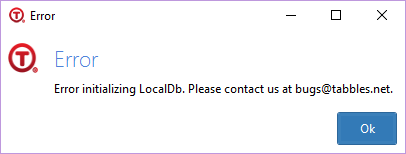
And in the log window/file you'll read something like this:
Cannot login. Sql Exception =


                    -------------------- Level 0 -------------


                   Exception type = System.Data.SqlClient.SqlException


                    hresult = -2146232060


                    sql exception. Number = 4060, state = 1


- LineNumber = 65536


Message = Cannot open database "tabbles4" requested by the login. The login failed.

Login failed for user...
When this happens we need to manually stop and delete the LocalDB instance, you do it so:
- If you have been using Tabbles for a while, backup your Tabbles database, it will be most likely in %UserProfile%\AppData\Local\Tabbles\LocalDb (backup the whole folder).
- Open a cmd prompt
- Run those two commands:
"C:\Program Files\Microsoft SQL Server\120\Tools\Binn\SqlLocalDB.exe" stop TabblesLocalDb4"C:\Program Files\Microsoft SQL Server\120\Tools\Binn\SqlLocalDB.exe" delete TabblesLocalDb4Using Tabbles Cloud
This means that your tags (not the files themselves) will be hosted in our own database hosted online. This option won’t be lightening fast (we’re using a basic hosted database plan at the moment, plus there is the internet between you and the database) but it’s still pretty usable.
How to create a Tabbles Cloud account
if you are already using Tabbles Local, in order to switch to Tabbles Cloud, you will need to log out first: from the Tabbles' main toolbar select File > Log out.
Then you will first need to register an account, which is pretty straightforward: click on the Cloud tab of the login window click on Create user in the bottom right of the Cloud login window. You will be redirected on our website, where you can register an account. The registration page will send you an email, so make sure you check your spambox!
Once you receive your email, click on the email verification link and afterwards you will be able to login in Tabbles Cloud with your user. This is what the Cloud login window looks like:

Export/Import your database from Tabbles Local to Tabbles Cloud
If you want to run Tabbles in Cloud mode and you already have a database made in Tabbles Local, you will first need to export your database to xml from Tabbles Local and then import it in Tabbles Cloud:
- 1) Login Tabbles Local pressing the "GO" button in the login window (if you are in Tabbles Cloud, you first need to logout doing File > Log out )
- 2) Export your database from Tabbles Local: File > Tabbles databases' > Export data to xml zipped
- 3) Log out (File > Log out) and login your Tabbles Cloud account
- 4) Import your database in Tabbles Cloud: File > Tabbles databases' > Import data from xml zipped
Using Tabbles Lan (i.e. your own Microsoft SQL Server)
This will provide the best user experience and control on your data. Since February 2018, Microsoft made their SQL Servers available on Linux too, which give you way more freedom to deploy your Tabbles server.
Install MSSQL Server (Microsoft SQL Server)
To install Sql Server and configure it correctly for usage with Tabbles, refer to our how-to video.
If you do not have Sql Server, you can download the free version (called Express) as shown in the video. Tabbles does not work with anything else than Microsoft SQL Server: MySql, MongoDB etc. won't work.
Please note that you need to enable Sql Server Authentication mode. This can be done during install (as in the video above), or later, with Sql Server Management Studio, as in the following picture:
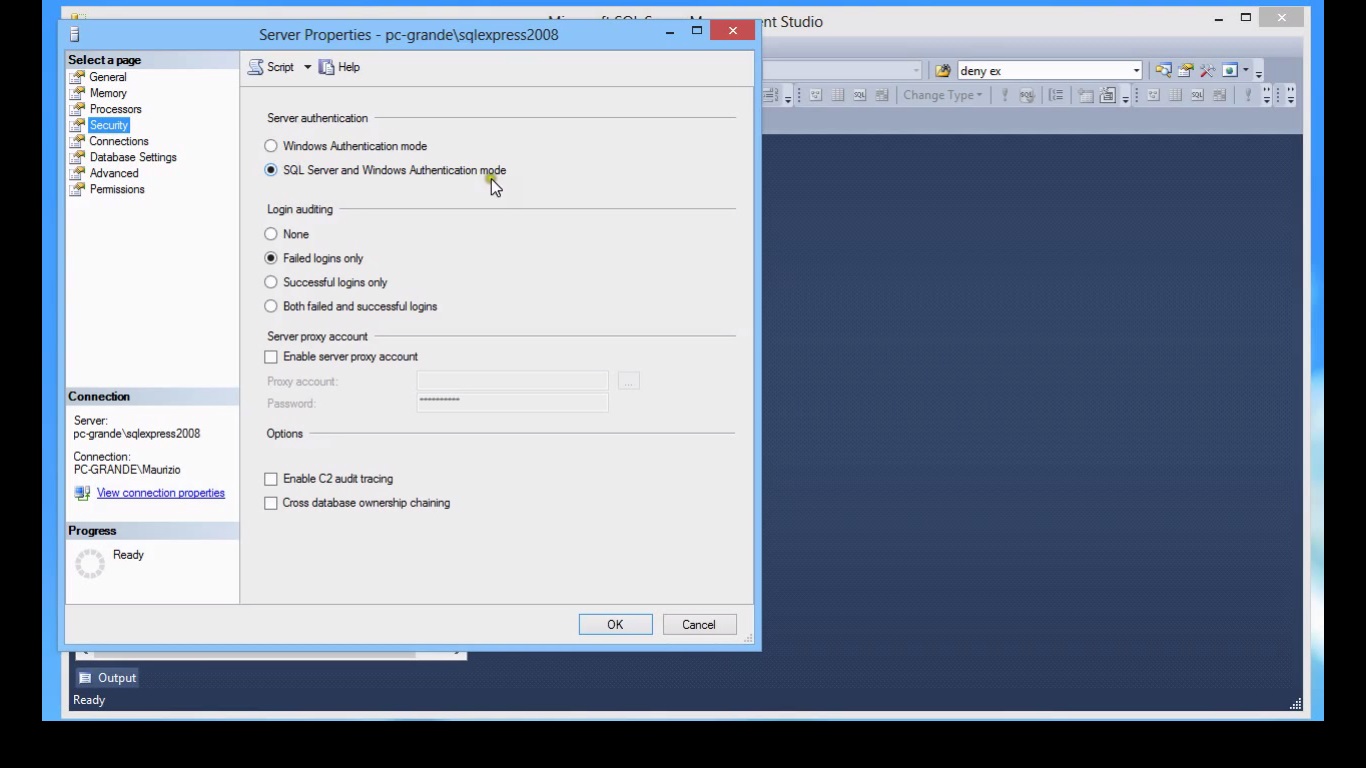
Collation
Make sure you install the MSSQL Server with the default collation being: SQL_Latin1_General_CP1_CI_AS (make sure about the CI bit, as an oppostite to CS).
Install MSSQL on Linux
Since February 2018, Microsoft made their SQL Servers available on Linux too, which gives you way more freedom to deploy your Tabbles server.
Here is information about installation on Redhat, Ubuntu and Suse and here is a detailed walkthrough about the installation on Ubuntu 16.04, which we tested and works just fine.
We tested it on an Ubuntu 16.04 Virtualbox image, found on osboxes.org, we installed tbe ssh server and then we followed the mssql installation tutorial, the result is in the screenshot below:

Create the Tabbles database
If you are logged in Tabbles, you will need to log out first, by doing File > log out
When Tabbles starts again, you will see this dialog:
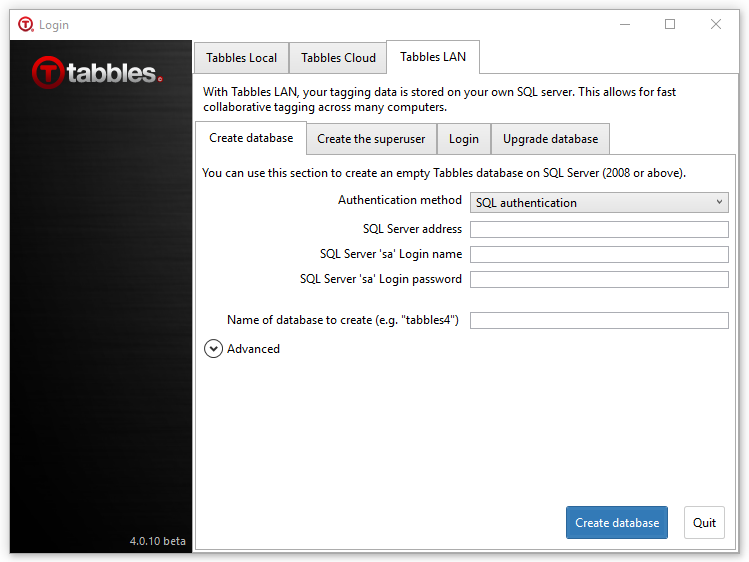
You need to click on Tabbles LAN and be on the tab Create database, here you need to provide the credentials of your Microsoft Sql Server user with administrator permissions (so called sa account). You can either use "Windows Authentication" (less usual) or "Sql Authentication".
- For Sql Authentication, you need to remember the sa password, of the Microsoft Sql Server, this is the most common way.
- For Windows Authentication, your Window user must have been granted administrator permissions, and also you need to be on the same machine where the Sql Server is installed.
In the "database server address" field, you need to type MACHINENAME\SERVERNAME. (Or just MACHINENAME, depending on how you configured Sql Server).
- If you don't know the machine name of the Micorosoft SQL Server, check the Windows Control Panel of the machine where it is installed.
- To learn the SERVERNAME, go to Sql Server Configuration Manager of the machine.
Also type in the name you want to give to the database that Tabbles we use (the window suggests "tabbles4" but it can be any name).
After you have filled all the info, you can press the Create database button and a progress bar should appear, the task should take 30-60 seconds.
Troubleshooting. If you get the message "unable to connect to Sql Server", try to login with Sql Server Management Studio, with either Windows Authentication or Sql Authentication. Take note of which method works. You can use the same method with the Tabbles client.
Create the first Tabbles user
After you have created the database, while on the Tabbles LAN main tab, make sure you are in the Create Superuser tab as in the picture:
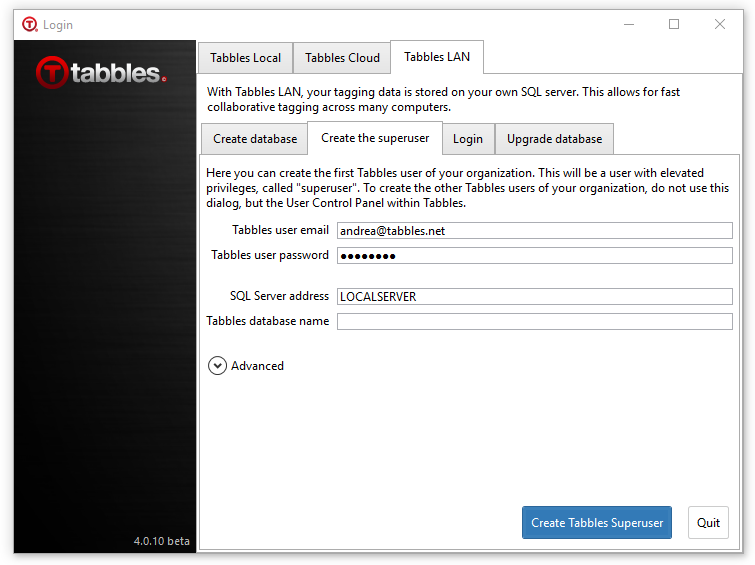
First type in your username (in the pic it's "Andrea", but it can be whatever you want).
The "database server address" and "Tabbles database name" should be populated automatically. Otherwise, in the "database server address", type MACHINENAME\SERVERNAME, as explained in the previous section.
This way you create the first user, after this Tabbles should log you in automatically.
For creating other users, you have two possibilities:
- If your users are all on the same level, i.e. they are all "first-class citizens" with the same permissions, then to create other users you can follow this same procedure again, i.e. use the "create user" tab in the login window.
- If your users are subordinate users, which need to have fewer permissions, or if you want to import users from Active Directory, then to create users you can use the User Control Panel within Tabbles.
Configuring SQL Server Express for use in a network
You need to do this step if:
- you have many Tabbles users which need to collaborate, each with his own machine;
- you are a single user but want to use Tabbles from several different machines.
In this case, you need to configure Sql Server to accept connections from other machines.
For this, refer to this how-to video.
If you still have problems, please enable port 1433 as explained in these tutorials: [1] and [2]
Add groups and users
As you created your database, we recommend to create user groups first of all: in Tabbles open Sharing > Manage user groups and create the workgroups you need (you can also check the section "Create a Group" in this manual).
After creating a group, you can add your organization's users. If you ActiveDirectory configured, you can use Tabbles "Import from ActiveDirectory" feature, you will need to fill in the ActiveDirectory's domain controller (machine name), and the user and password that have privileges to retrieve the user list on that machine:
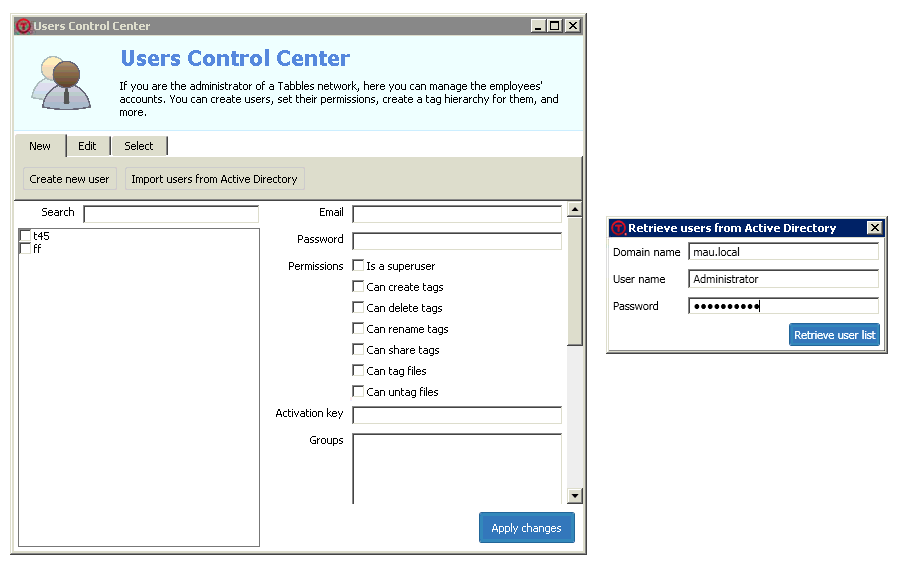
This window will then open and you can import all the users at once (existing users will not be duplicated and ignored).
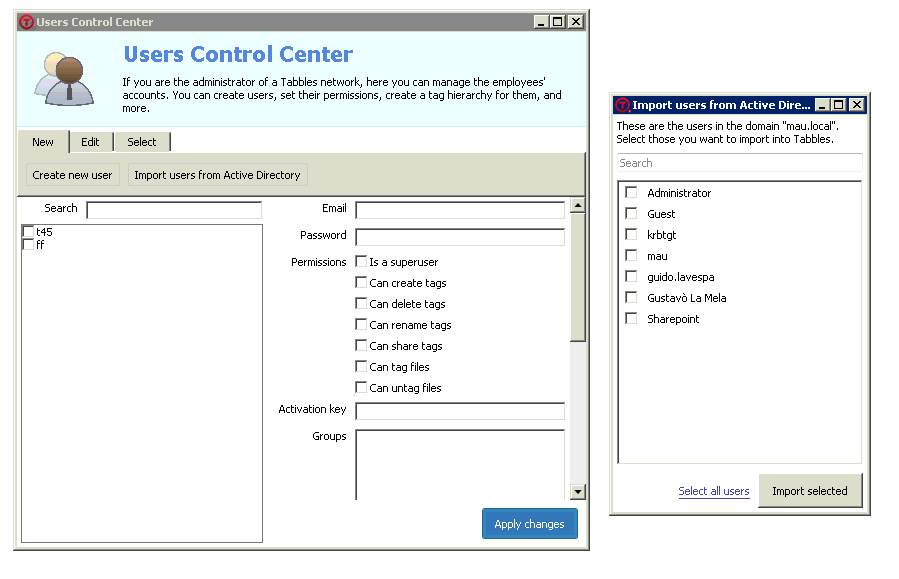
Important: currently as the ActiveDirectory import tool creates the users inside Tabbles, it also generates a password for each of them which is the same as their username. The users can later modify their passwords from Tabbles.
Import Users from Active Directory
The Superuser can create the Tabbles users by importing a list from Active Directory: Sharing > User Control Center > Import from Active Directory. This feature imports a list of user names from AD and creates users in Tabbles where the Tabbles username matches the Windows user name read from AD. See the screenshots below
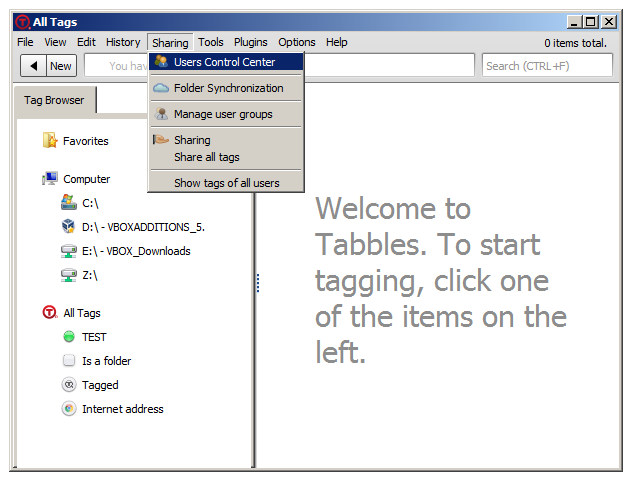
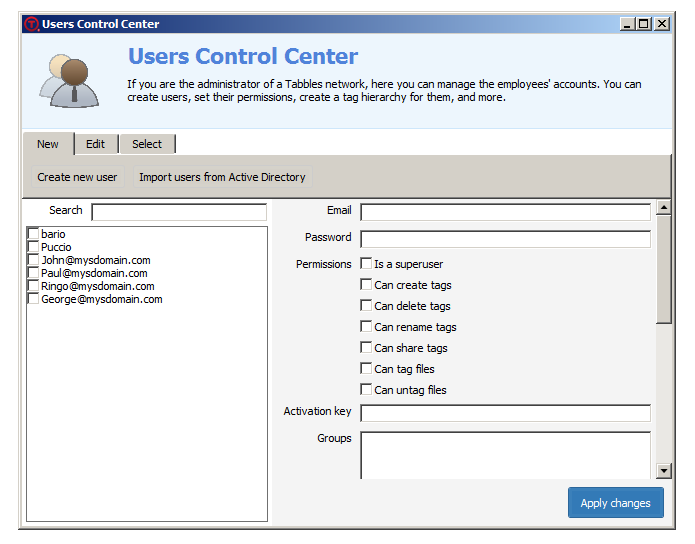
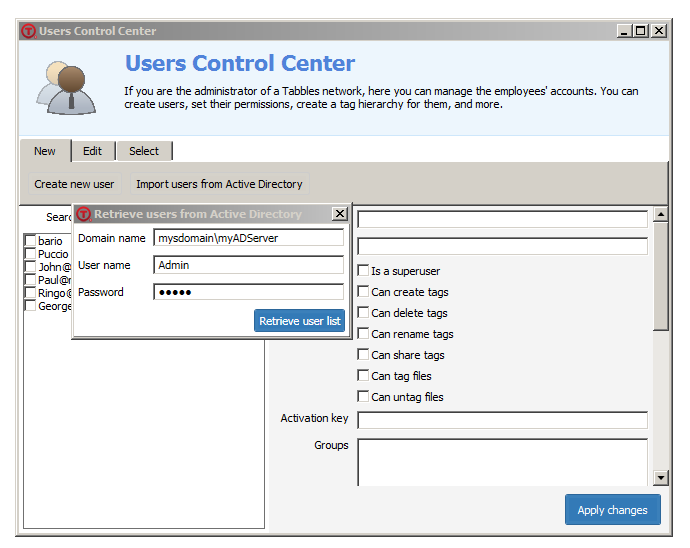
Deploy Tabbles on a Windows Network using Group Policies
Briefly: you'll need to deploy the .msi installer (get it from our Download page), then modify the file Config.xml and push this file to the %AppData%\Tabbles\Config of every machine where Tabbles will be.
Prerequisites
Tabbles needs a Microsoft SQL Server (https://www.microsoft.com/en-us/sql-server/sql-server-editions-express) to run, the Express 2017 version should be good enough up to 100+ clients.
If you're deploying the .msi file, you'll need to make sure the software requirements are met on the target machines. Tabbles needs:
- .net framework 4.5.1: https://www.microsoft.com/en-us/download/confirmation.aspx?id=40779
- Microsoft VSTO: http://go.microsoft.com/fwlink/?LinkId=158917
Deployment of the .msi
You can deploy the .msi (get it on our download page) using Group Policies. The .msi needs Administrator privileges to run.
To install on a single machine to test:
- Open a command prompt with the "run as Administrator" option
- Run the command: msiexec /i TabblesSetup.msi /l*v log.txt /q
Single Sign On (SSO)
In order to use SSO, you'll need to push a Config.xml file to every machine where Tabbles will be deployed.
After the sysdamin (Tabbles Superuser) has setup a database, imported the users from Active Directory and deployed Tabbles on the network, there will be an SQL Server with a database and a list of users/passwords. We now need to let each Tabbles installation now, where the database is and also that each Tabbles has to login using the Windows user of the current user on that machine and a password that is generated algorithmically.
This is what the Config.xml looks like:
<?xml version="1.0" encoding="utf-8" standalone="yes"?>
<config using_web_or_lan="lan" side_tree_width="250" freq_restart_fswatcher_network_drives_seconds="4" freq_restart_fswatcher_normal_drives_seconds="3" log_file_system_watcher_events="False" log_overlay_handler_events="False"  connection="Data Source=MYSERVER\SQL2014; initial catalog = tabbles4; Persist Security Info=True; User ID=tabbles4; Password=tabbles4; Connection Timeout=60" tabbles_mode="lan" last_shown_popup_new_version="03/09/2017 12:30:26" first_boot="false" global_shortcut_quick_combine="True" write_tags_as_metadata="False" disable_overlays="False" outlook_attach_handlers="False" />
So you'll need to do the following:
- If you created the Tabbles database with the default name (“tabbles4” – else see below), then all you have to do is modify the address of the SQL Server in the connection string (the default port is 1433):
connection="Data Source=SERVER\SQL2014;of the Config.xml.- If the name of the database is different you will also need to change the initial catalog (database name), User ID and Password to the same value. So in the Config.xml you will have something like:
initial catalog = MyDatabaseName; User ID=MyDatabaseName; Password=MyDatabaseName; - If you created the database manually or modified its user and password, you will of course need to change that in Config.xml, that will look something like:
initial catalog = MyDatabaseName; User ID=MyDatabaseUser; Password=MyDatabasePassword;
- If the name of the database is different you will also need to change the initial catalog (database name), User ID and Password to the same value. So in the Config.xml you will have something like:
- After you have written the address of the SQL Server, along with the database name, in the Config.xml, you will need to push the file to the folder %AppData%\Tabbles\Config of each machine where Tabbles will be used.
After pushing the Config.xml to every user's machine, the users can launch Tabbles and they should automatically be logged in Tabbles with their correct user: congratulations! :)
Assign keys to users in batch
After setting up the users, you'll probably want to assign serial keys to each user, you do it as following:
- in the User Control Center, select the users you want to change the license to. If you want to select all users, click on the tab "Select" and click on "Select all users"
- click on the tab "Edit" and click on "Set activation keys in batch"
- then paste the keys here and click on "Activate the users with this keys", this will write the keys in the database.
- Tabbles reads the serial from the database only when it starts up, so each user will have to restart Tabbles to see te change. They can restart by clicking on File > Restart Tabbles
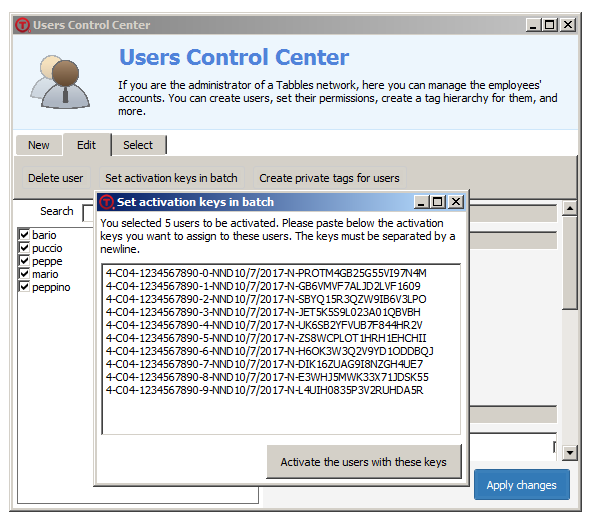
Setup OverlayHandler's network cache
One of the features that are heaviest on the MSSQL Server, is the overlay icon(s) that are drawn on tagged files. The more users you have on the same database, the heaviest the toll on database performance will be. The reason behind this is, that each PC with Tabbles installed, will query the database each time that a folder is opened/browsed in Windows Explorer (File Manager). If you're deploying a multi-user installation larger than 10-20 users we recommend you to setup the OverlayHandler's cache on a network drive: the purpose of this is to offload the SQL queries by creating a file cache on a shared drive.
Important notes about OverlayHandler's network cache
- The cache is created at the organization level, so the folder used to place it is the same for all the users using that database. Therefore, if you setup the cache and one or more users can't access that folder, those users won't see the Tabbles' overlays anymore.
- This cache will be accessed continuously, so make sure you pick a drive that is fast enough. It would also make sense picking a drive that is expandable and does not contain other (important) data: as the drive gets used a lot it may end up failing, and while rebuilding the Tabbles overlay's cache is a 2-clicks operation, you might end up loosing the rest of the data on the drive.
- The setup and deployment is easily and completely reversible (as you'll see below), so you don't need to stress too much about deploying it. As long as you follow the points above, you should be good to go and should be able to turn off or modify the cache setup quickly and without side-effects.
Setup the OverlayHandler's network cache
You'll need to use SQL Management Studio to activate the folder cache mechanism. All you need to do, is write the path of the folder (where you intend to place the cache), in the sharedFileDataFolder field of the dbo.organization table of your organization. In case you have more than one organization (unlikely but possible), you'll need to figure out what organization you are using (the organization is named after the first superuser created on the database) - if you are unsure about how to advance, let us know and we'll help you out.
So step by step, what you need to do is:
- Fire up SQL Management Studio
- Find the database where Tabbles is installed and open it
- Open the Tables folder
- Scroll down to find the dbo.organization table
- Right click on it and click on Edit Top 200 Rows
- Enter the path of the cache folder in the sharedFileDataFolder. The path has to be like X:\Folder, Tabbles can't process UNC paths like \\Drive\Path
- If you're runing a resync (read below), your database will be busy for a while, so we recommend doing a backup. The resync operation will only read information from your database and write xml files on a shared-drive, so you shouldn't expect any database troubles afterwards. But having a backup is never a bad idea, so as you're here, you could as well do a backup of your Tabbles database.
See screenshot below:
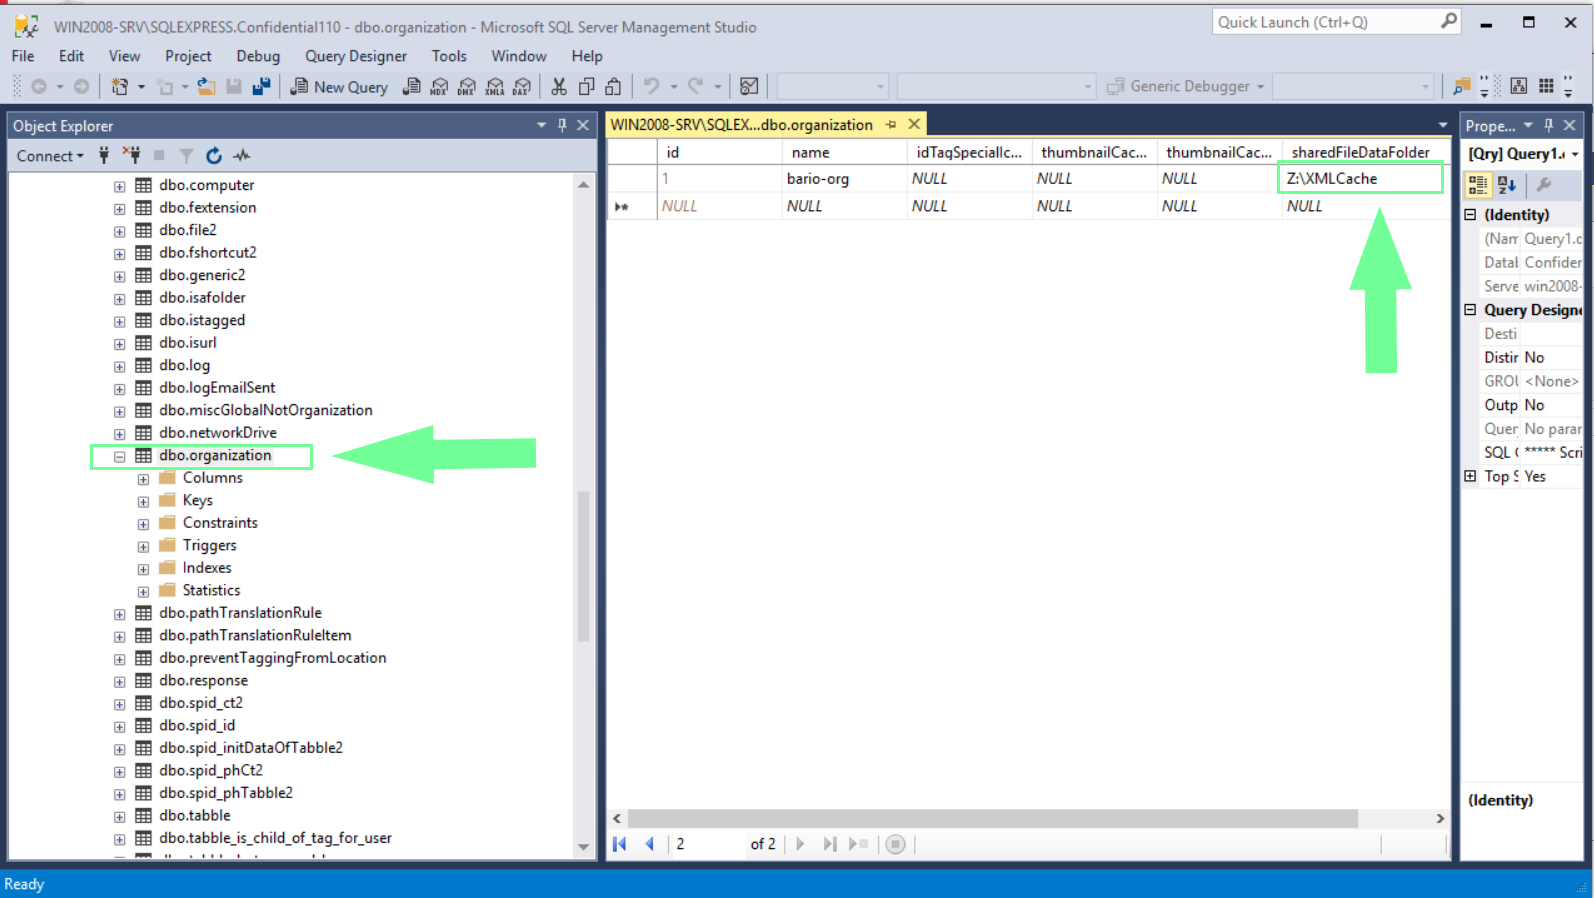
Resync the OverlayHandler's network cache
If you have deployed already Tabbles and have a database of files, you will need to build the cache. This is done using the Tools > Advanced > Resync database cache, see below. If you have 100K+ files, you may expect the operation to take long (expect some 20-60 mins per 100K files, depending on the shared drive speed and the MSSQL database speed). Therefore we recommend to start the process in the afternoon, before leaving the office.
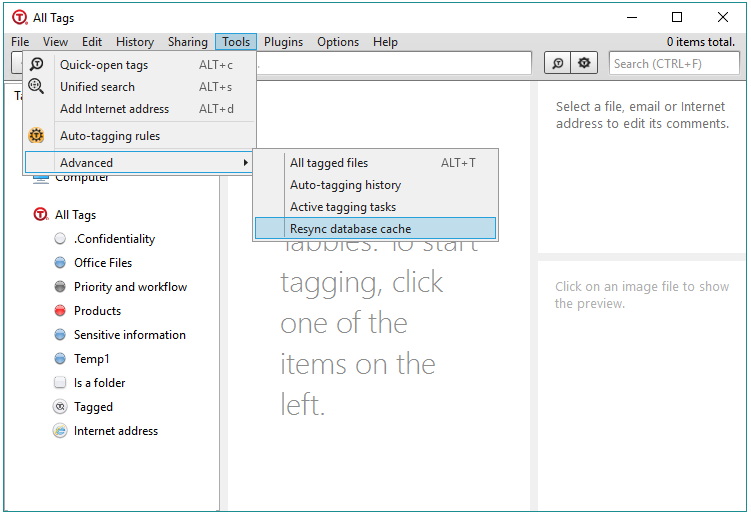
Upgrade Database
Every once in a while, So after you updated the software the latest version, the software will require you to upgrade your database. The process is straightforward, you will be redirected to the the Database upgrade window where you'll have to enter your database's sa user and password, the window looks like this:
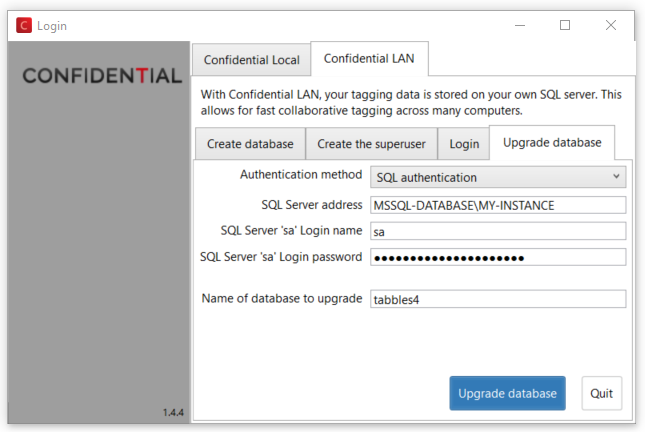
In order to gain the privileges to upgrade your database you could be using the "SQL Authentication mode" (as in the screenshot) or the "Windows Authentication Mode" (if your current Windows user has the privileges to modify that database - check with your IT if you're not sure). After the upgrade succeeded the software should make you login again as usual.
Note: it's recommended that you plan such an upgrade outside from the usual working hours, as your users won't be able to use Tabbles while they're on an older version of the software and the database has been updated.
Using Tabbles on Azure SQL
Starting from Tabbles 6, Tabbles support Azure SQL.
In order to user this new feature, you first need to setup your Azure SQL database in the Azure admin panel. Then from the Tabbles Login window, you can use the Tabbles Azure > Create database to initialize the database in order for Tabbles to use it. The window behaves exactly like the Tabbles LAN > Create Database window except that you need to create the database in Azure first, so please follow the instructions in the previous chapter.

importing database from Tabbles 3
Are you using Tabbles 3 already? Then you can import your existing database this way:
Importing to "Local" or "Cloud" mode
If you want to run Tabbles in Local mode (we didn't have that in Tabbles 3) or Cloud (for single users only), you will first need to export your database to xml from Tabbles 3:
- Export from Tabbles 3: File > Tabbles databases' > Export data to xml zipped
- Import in Tabbles: File > Tabbles databases' > Import data from xml zipped
Importing to "LAN"
If you're upgrading from Tabbles 3 LAN, to Tabbles 4(or 5) LAN, then the path is much easier as you can import directly from the Tabbles GUI, just follow the instructions:
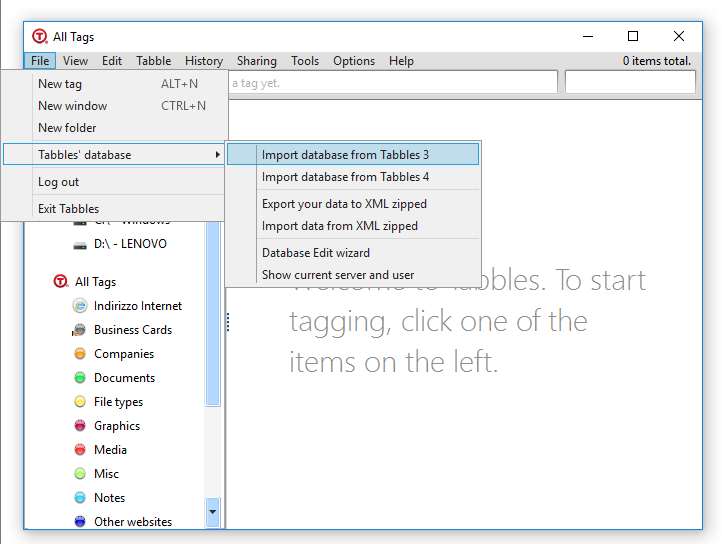
Importing database from Tabbles 2
Starting from Tabbles 4.3.1 you can import your tags directly from Tabbles 2.
Find your database (db.zip)
You will need to find your database file, which is a file named db.zip:
- If you're using the installed version, it will be in the folder (just copy and past this into Windows Explorer): %userprofile%\Documents\Tabbles\Databases
- If you're using the portable version, in the \Databases folder of Tabbles portable
Import your database
You will find the import function in the Tabbles menu seen below: File > Tabbles' database > Import Data as XML zipped
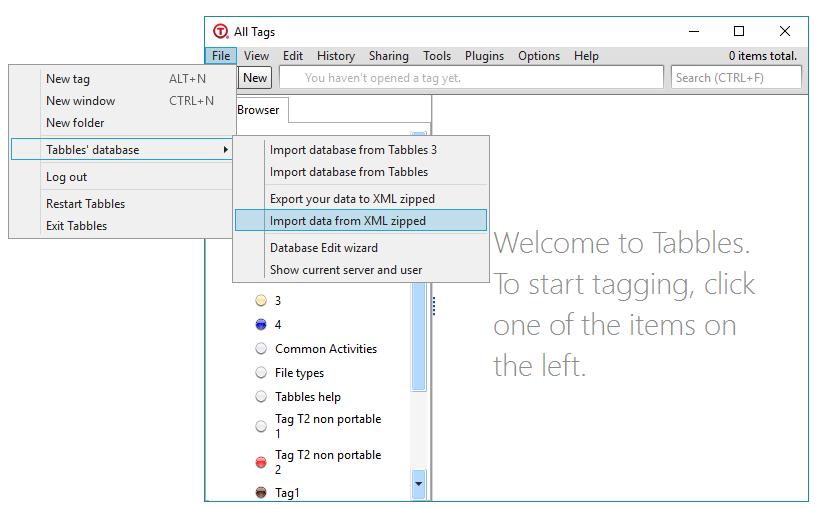
Auto-update
Each time we push a new update, our update web-service gets updated and Tabbles will typically check once every few hours for updates. Once you download an update, Tabbles will store it into %appdata%\Tabbles-installer-autodownloaded.exe and then execute it to get updated.
Register a license
Here is how you can enter a serial key in Tabbles
- Click on Help > Enter registration key
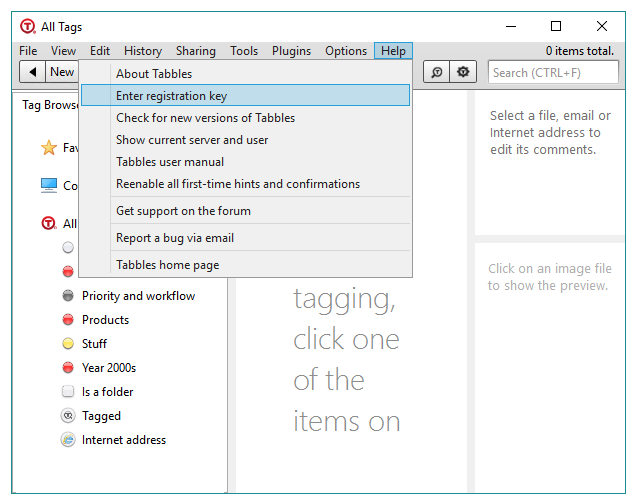
- Click on paste the key in the text field and press Activate. Note: you need to paste the whole key into the field, it always starts with 4- and always ends with a number.
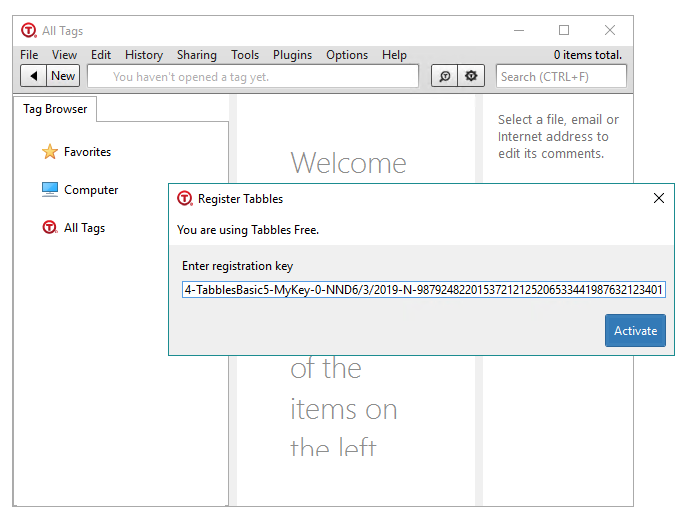
Moving from Tabbles Local to Cloud or LAN (or vice versa)
What if you are using Tabbles Local, have tagged a bunch of stuff, and suddenly decide you need to use Tabbles Cloud (for Tag Synchronization) or Tabbles LAN (for Tag Sharing) and you want to keep your tagging in your new database? Of course we got you covered :)
We have created, and constantly maintain, a system of import/export of data from MSSQL to an XML file.
- To export your data, go to File > Tabbles' database > Export your data to XML zipped as shown below:
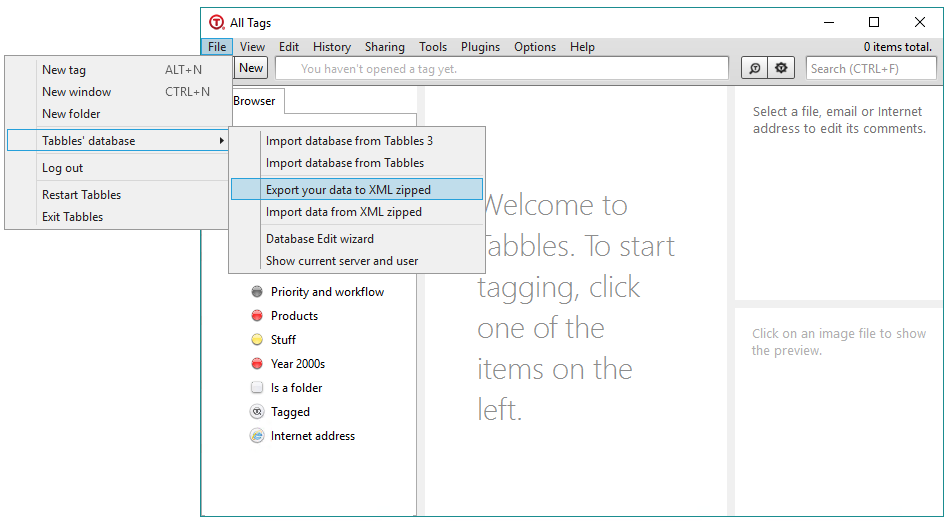
- To import it back, go to File > Tabbles' database > Import data from XML zipped.
What can you do with Tabbles?
Tag files
Any kind of file can be tagged, i.e. associated to one or more tabbles. New tabbles can be created at any time and can be given a color.
Find files by combining two or more tabbles

Tabbles can be intersected with, and subtracted from, each other. These operations are referred to as "combine".
The intersection is the most common way to combine two or more tabbles. This kind of combine is identified by a "plus" sign, like in "John + Picture". When two or more tabbles are combined with a plus sign, as a result you will see the files that are in both tabbles.
For more informations, see here.
Basic operations I: the GUI creating tabbles
Here you will learn how to move your first steps with Tabbles. You will learn how to use the GUI, how to create a tag, how to tag files, folders and Internet addresses, and how to do searches by combining tabbles.
Introducing the Tabbles GUI
In the current version the Tabbles window looks like this:
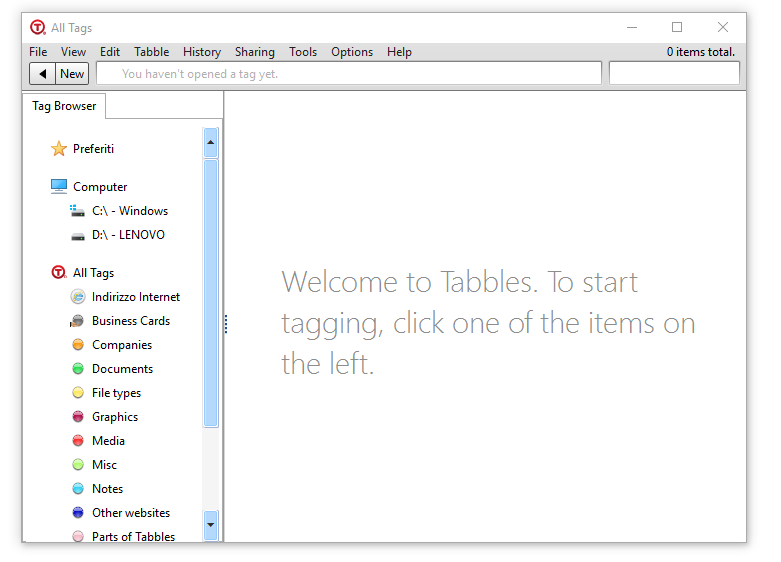
Creating tabbles
Think of a tag as something like a virtual folder: you need to create it first and fill it with files/folders/urls afterwards...as you do with folders!
You can do this in several ways:
- By clicking on the "New" button
- Menu > File > New tag
- Alt + N
- Using the "Quick tag" window: create a tag on the fly while tagging a file/folder. See: #Tagging_files_.28putting_files_into_tabbles.29
Choosing a color
Tabbles comes with a set of default colors. You can also make a custom color with File > New tag > Manage color.
Basic operations II: tagging files/folders/urls
Note: "Tagging a file or folder" is equal to "putting a file/folder into one or more tabbles": the tabbles are tags and virtual folders at the same time, so keep in mind that you can use them as both.
| Tagging (using tabbles as tags): right-click on a file/folder and click on "tag" |
| Categorizing (using tabbles as virtual folders): drag'n'drop a file/folder/url into a tag |
Tagging files (putting files into tabbles)
The tabbles are “magic containers”: sometimes they contain files, some other times they float around files. The idea behind the categorization is that files, internet addresses and folders are ‘placed or pasted into tabbles’: in reality what happens is that they become ‘linked to tabbles’. Placing or pasting files into tabbles will simply create an association in the Tabbles’ database: the files and folders are not moved or copied on the hard disk. You have several ways to do this:
- The shell extension: the first one you'll see it's probably the shell extension: right-click on a file and see this:
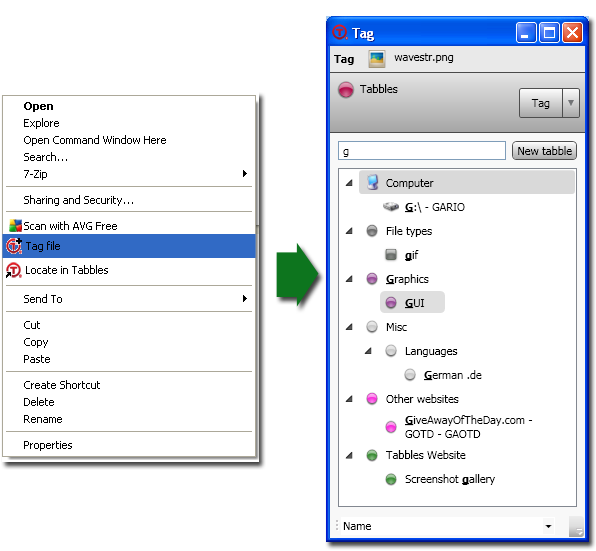
- Drag'n'drop: by drag'n'drop a file into a tag
- Copy'n'paste: by copy'n'paste a file into a tag
- Inside Tabbles: using the tagging functions inside Tabbles.
Tagging Internet addresses
To see how to tag Internet addresses with Tabbles, see this how-to video.
This technique can also be used to easily tag your Gmails and tweets with Tabbles.
Tagging folders (putting folders into tabbles)
You can tag folders in several ways:
- Shell extension: using the "tag folder" link in the shell extension (right-click from Windows Explorer)
- Drag'n'drop: by drag'n'drop of a folder into a tag
- Copy'n'paste: by copy'n'paste a folder into a tag
- Inside Tabbles: using the tagging functions inside Tabbles (right click, drag'n'drop, copy'n'paste...)
Tabbles will open the Folder Tagging window, which looks like this:
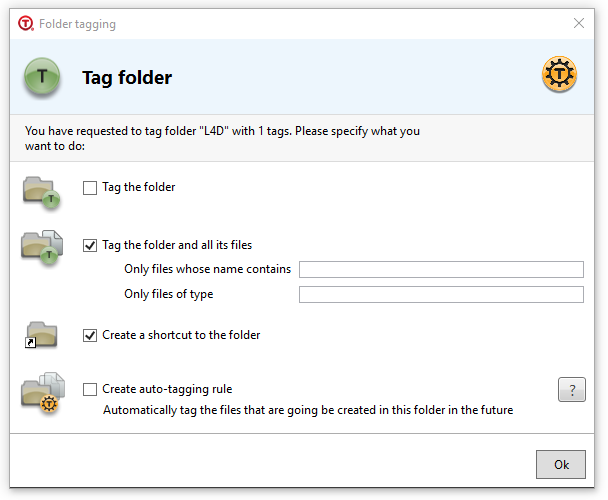
The shell extension (when you're tagging a folder) looks like this:
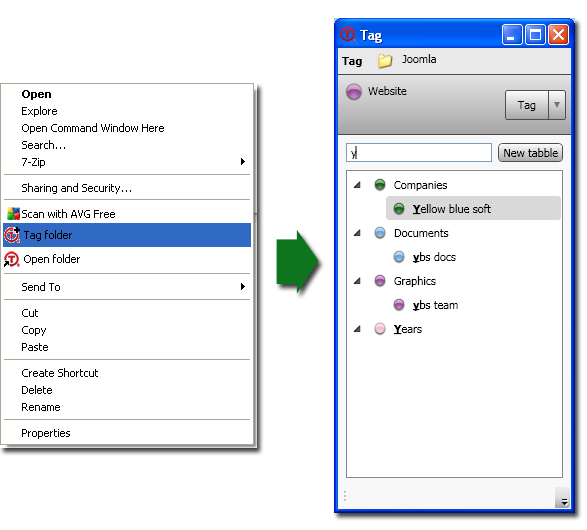
Important: how folders and subfolder are handled in Tabbles
When categorizing a folder, Tabbles will by default go through the folder and its subfolders recursively and categorize the all files inside each subfolders as well. After the categorization, you can see the files and folders linked to the tag you are viewing: here the file and the folders containing them will be shown on the same level. You can anyway browse the folders in the usual way (hierarchically, double clicking on a folder to go “inside” it). The idea behind this choice is that while Tabbles aims to allow the user to categorize files based on a different principle than folders, it also build to help user categorize files and folders on the basis of their existing folder categorization.
Tagging only the folder
This function will tag the folder only, not the files in it and not its subfolders (and their content).
Tagging the folder, its files and its subfolders
This function will tag the folder and the files in it, as well all its subfolders: all the files in the its subfolders will be tagged all the way down until the end of folder tree. Please consider that this operation can take quite some time (depending on how many files are in the subfolder), but since it's executed in a parallel thread you shouldn't notice... it may take a while until all your files are tagged though.
Create an auto-tagging rule for the folder (read our blog article)
This is an advanced feature that needs some understanding! By using this function you're telling Tabbles 2 things:
1) "tag this folder, its files and its subfolders" (same as the previous functions)
2) "keep an eye on this folder (and its subfolders) and as soon I copy/move/create/save a new file into it, tag it as well, forever and ever".
Using this function you can "explain" Tabbles how your folders are organized and have them tagged based on this. One basic use of this function is to group together folders that are similar but far away from each other, e.g. C:\customers, D:\customers and\\fileserver\customers.
Basic operations III – browsing and combining
How to search for files: the Combine and Subtract functions
The concept of “don’t search for files, think of them” is the core behind the logic of Tabbles. The way you have to find your files involves remembering the characteristics of the file(s) you’re looking for (i.e. Product name, Customer, Project, Event, Type of media, Subject etc). Therefore you should find the relevant tabbles which are probably linked to the files you’re looking for, double-click on their Nucleus to see the files linked to it and then refine the search using the Combine function.
- The Combine function allows you to see the files linked to all the tabbles you are combining (they have the “+” sign in front of them).
- The Subtract function allows you to hide the files linked to the tabbles which are being subtracted (they will have a “-“ sign in front of them).
You can also refine combinations dynamically adding and removing tabbles to the combination. We called this Horizontal browsing: this allows you to group and sort files (which are far away from each other) quickly and precisely.
Opening a tag
Since the version 1.4.5, the main window of Tabbles looks a lot like Windows Explorer. To open the first tag you have several options:
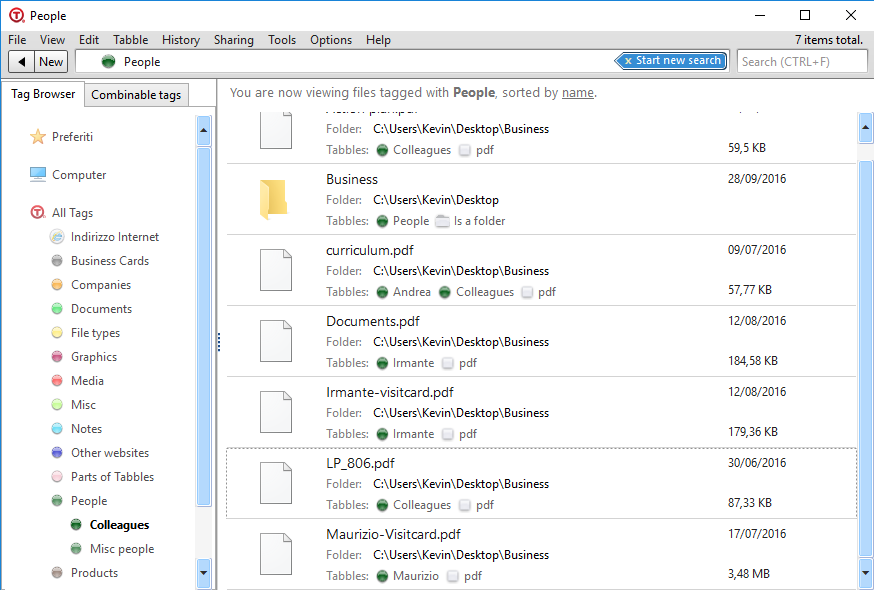
Alternatively you can open the Quick-open window and select the tabbles to open/combine from there. You can open the Quick-open window in two ways:
- From the menu bar click Tools > Quick-open tabbles
- Press alt + c
File sorting
Tabbles offers different ways to sort files:
- by name (the default, like in Windows)
- by modification date: the most recently modified files go on top. This is very useful so your most recently used files and folders are always on top; this helps you avoid scanning long lists of files when you are working. We suggest using this view for most of your work. However, this view is a bit slower than "by name", because the files must be sorted, and this involves accessing the disk to obtain the modification date of all the files; so if there are a lot of files in the current view (say 1000), this can take sensibly more time. If you use this view, we suggest to uncheck the menu item "keep folders on top".
- by file size: the biggest files go on top; this is useful in rare situations where you are freeing space off your disks.
In addition, you can choose whether to keep folders on top (this is the Windows default), or whether to mix them with the files (this is especially useful if you are sorting by modification date).
The Combine function and Horizontal browsing
Horizontal browsing represents a groundbreaking improvement in the file-browsing. As any major improvement, it’s not easy to be explained with simple words: Horizontal browsing gives you the chance to navigate throughout tabbles based on the files are commonly linked to. Horizontal browsing is tightly linked to the Combine concept.
| The Combine function displays all the files, folders and URLS linked to all the tabbles in the combination. |
| The Combine function performs one or more logical AND/OR between the files/folders/URLs linked to the tabbles in the combination. |
Sounds complicated? We promise it isn’t! :-D
The picture below should explain it a bit better:
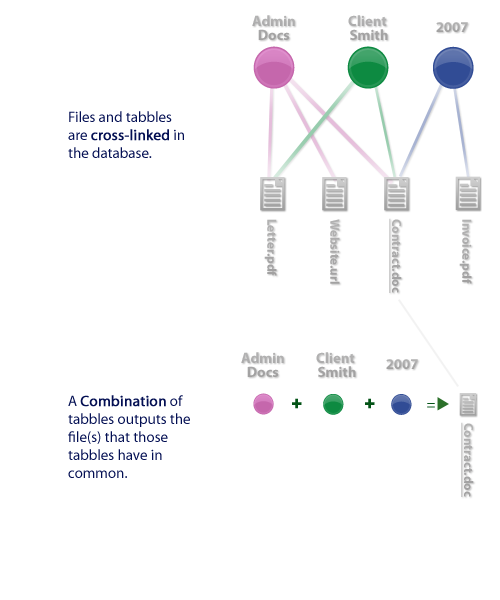
Performing a combination
In the latest version of Tabbles, we made an effort to make the make the "combining" as close as possible to the browsing folders in Windows Explorer. This means that the user experience is very similar to Windows Explorer (the way you interact with Tabbles, what happens when you click and how all the items look like), but nevertheless what happens under the hood is quite different... let's try and explain it, and let's focus on the differences between Tabbles and Windows Explorer:.
In Windows Explorer you can only browse vertically and only through one path
Let's say you are in C:\ and want to reach c:\photos\2009\holidays, you'll have to go all the way down to the \holidays folder, like this:
c:\ <--- Start here
c:\photos\
c:\photos\2009\
c:\photos\2009\holidays <--- Arrive here!
Let's say you are in the folder e:\photos\2009, if you want to reach c:\photos\2009\ you'll have to go all the way up and then down again.
With Tabbles you would combine the tabbles "photos" and "2009" and this would show you all the photos from 2009, regardless from where they are.
In Tabbles the path you can browse is built dynamically
This concepts may requires a little effort to understand... but we promise it will be worth it.
In the previous example, The position of the folder c:\photos\2009\holidays is fixed, therefore the path to get to it is fixed too. Tabbles does things differently: it builds a path (a browsing tree) dynamically, depending on how things are related.
So: if you're in the tag "photos" and the tag "photos" has some file in common with the tag "2009", then tag will give you the chance to go into the tag "2009"... when you double into "photos" you'll be in the combination "photos" + "2009"
Once you're into "photos" + "2009", Tabbles will show you all the tabbles that have files in common both "photos" and "2009"
The "+" next to a tabbles: means that the tag is combinable. As your tabbles will grow, you will start putting tabbles into each-other: at that point the "+" becomes handy - it will help you understand if the tabbles you're looking at are "brothers" (they're inside the same tag) or if they really have some files in common with the open tabbles.
The power of the tree
The tree on left side of the screen is providing you with useful information about what makes sense to combine and what doesn't: if Tabbles understands that the tag you have opened have some files in common with any of the tabbles in the tree, the tabbles will be displayed with a circle around them. You can also right click on a tag in the tree and combine it from there.
The concept of "combinable" - the true power of Tabbles'
What Tabbles is doing when deciding what tag it should display in the main window (and put a "+" next to it and in the tree) is checking which tag has some files/folders/url in common with the one already open and filtering out all the rest. The ratio behind this choice is that what you probably want is to start from a tag and advance performing progressive "logical ANDs" with other tabbles only when the operation would give you a non-empty list. Example: In this picture, after opening the tag Business cards I can see that the tabbles Andrea and Maurizio are circled - Tabbles is telling me "there are Business cards for Andrea and Maurizio but not for any other people in the list". All the tabbles in the main body of the application are also combinable, meaning that you can "go into them" and you will find something...
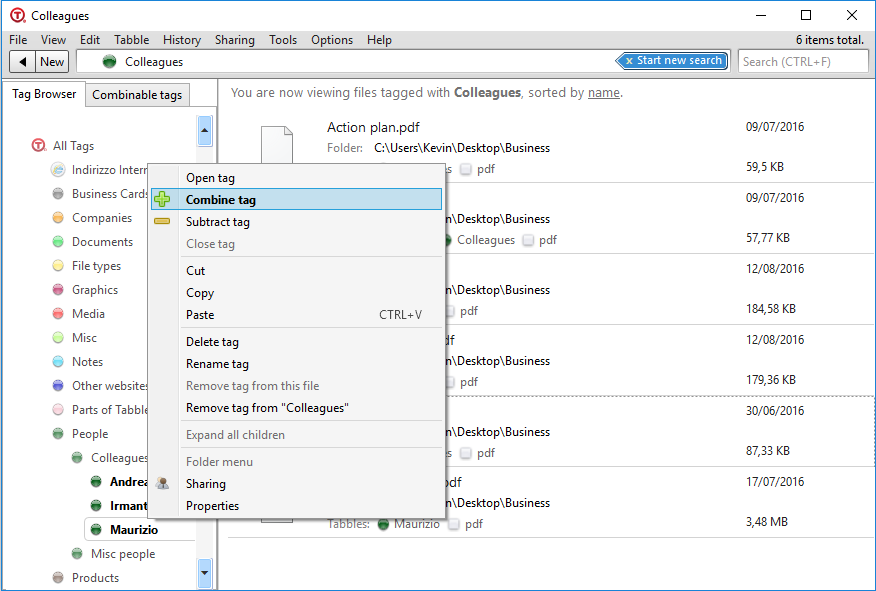
"Excuse me but I'm dumb, can you please explain me how it works?"
Hehe, of course :-D
Each time you open a tag, the program checks the whole database and picks all the tabbles that have some file in common with the tag you opened - and marks them with a "+".
"Ok, but what' the whole point of that?"
The purpose of Tabbles is helping you sorting and finding files based on what they're related to or what you remember of that, right?
The typical workflow in this case is that you'll start looking the files related to an "idea" (a tag) and thenrefine your search by adding another "idea" to the previous one. The combinable tabbles push your search one step further to finding: if they're not combinable it means that you won't find what you're looking for given your starting point.
Example: let's say you're looking for the "pics" of that "mountain" in "the Alps": you'll probably start opening the tag "pics". Now, if there is any file/url related to file "pics" and "mountain" or "Alps", the software will put a "+" next to each of the tag, and show the tag in the main body. If the tabbles "mountain" or "Alps" are showed in the main body, this will mean that there is no "pic" related to "Mountain" and "the Alps".
We know that this sounds hard to understand at first... practice a bit and you'll find it out yourself! This is by the way the very core of the "Combine" function, if you understand this, than you can use Tabbles as its best! :-D
The Subtract function: filtering out files from a combination
If you want to visualize, for example, the files linked to the “Project Homepage” but excluding the files linked to the “User John” or the files “.jpg”, then the Subtract function is what you need.
The Subtract function is accessible from the right-click menu of the tabbles in the File window.
Use the Subtract to filter out tagged files from a folder
You can combine and subtract also when browsing a folder. If you are for example in your Download folder and want to see all the files that are not tagged, you can subtract the tag tagged, like this:
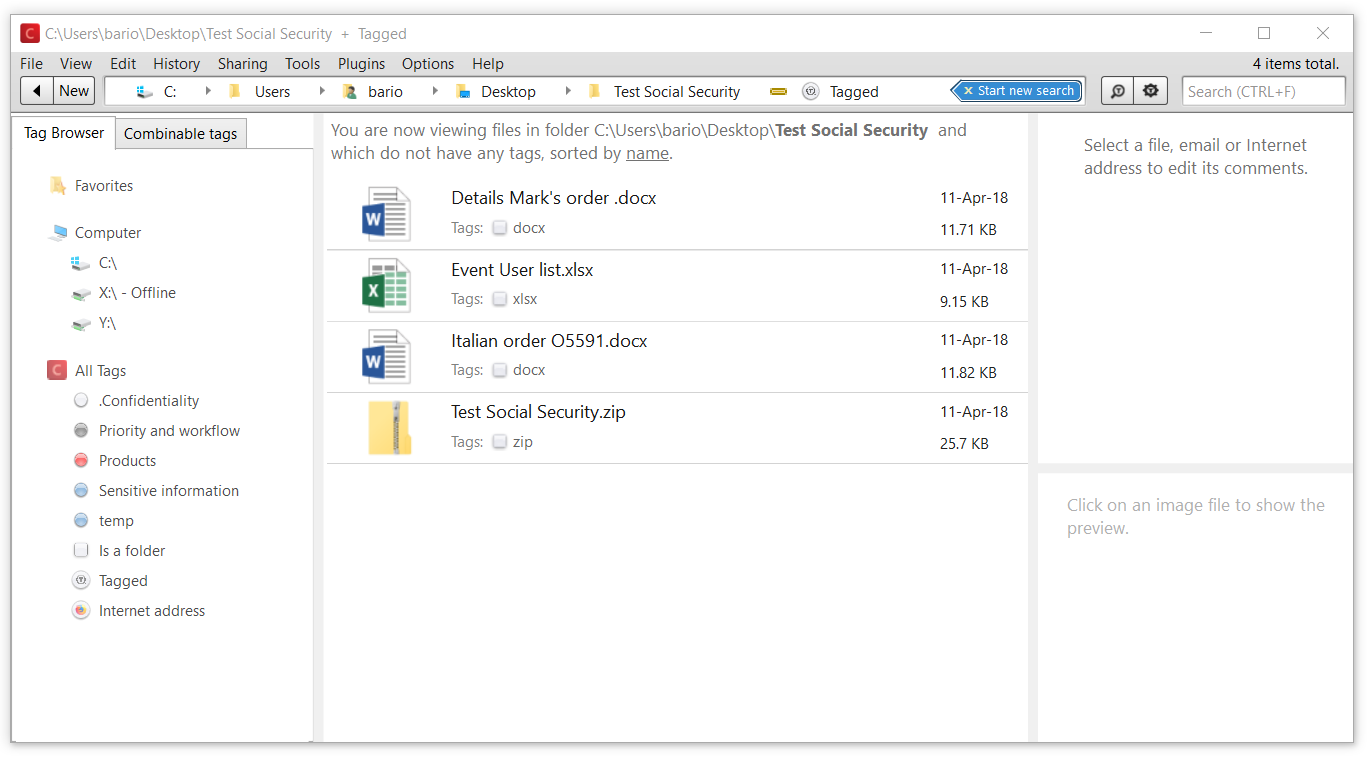
Father and children tabbles: nesting tabbles
A tag can be placed into one (or more other) tag, as you do with folders. There are anyway several differences between nesting of folders and nesting of tabbles:
1) A tag can be put into several other tabbles at the same time, without copying it.
2) Placing the tag "Child" into the tag "Father" will cause the files tagged with the "child" to also be tagged with the "father", but in a one-way process (read below).
3) Because of the point 2), tag "child" will become combineable with the tag "father" and viceversa.
Visualization: the side-tree vs the main body
- The left side tree, you will see only the static hierarchy of the tabbles, meaning you'll see only the tabbles in the way you organized them yourself.
- In the main body, you will see the dynamic hierarchy meaning that you'll see the tabbles you manually nested, blended with the combineable tabbles.
In the shot below, you can see the difference between the content of the tag "Documents" in the side-tree and in the main body of the app.
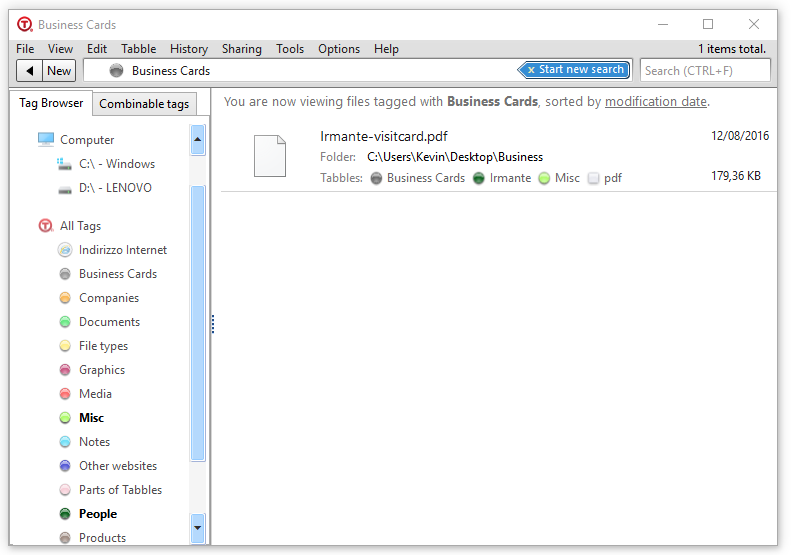
One way inheritance: the tag father contains the files, but not viceversa
When the tag "child" is put inside the tag "father", the "father" will receive the files tagged with "child". For this reason, the files will appear when browsing the "father", but the tag "father" will not appear in the file properties: check image below:
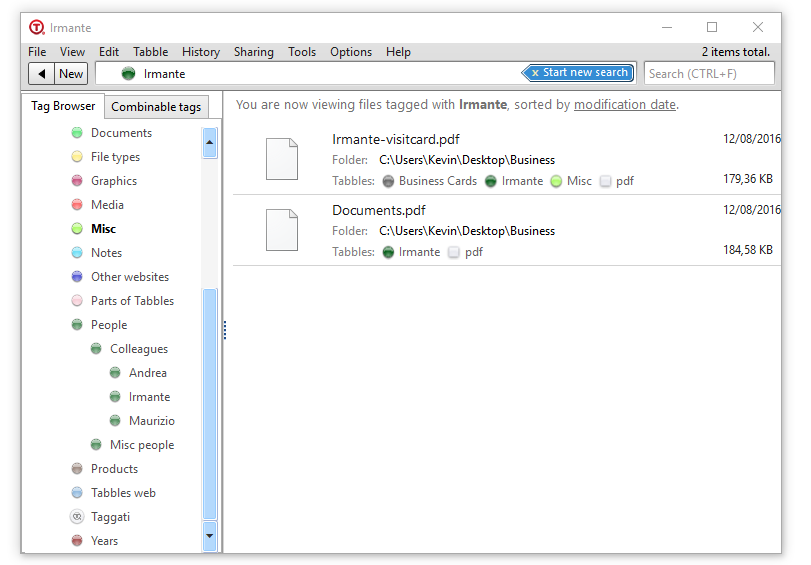
The tag "EULA" is nested inside the tag "Documents": the files contained in "EULA" are (apparently) not tagged with the tag "Documents". But if you browse the tag "Documents" you'll also see the files contained in "EULA".
This is due to a design choice: the goal is to keep the view as clean as possible.
How to link files, folders and URLs to several tabbles at the same time (this time from the File window).
The tabbles behave the same everywhere: now you are on the File window. Here you can view and interact with group of tabbles as well as with the files they’re linked to. You can interact with the single tabbles in the same way you do in the Main window. Furthermore, you can use the functions of the Active tag panel: from there you can perform operations on all the tabbles inside it.
Basic operations IV: file management
Tabbles allows the user to perform the most common file management operations, like copy/cut/paste/move/rename/delete.
Moving files within Tabbles
Since the version 3, Tabbles tracks file movements done in Windows Explorer (or File Manager). More precisely, it tracks: - File/Folder movement - File/Folder rename - File/Folder delete - File/Folder cut&paste
Shadow files
A shadow file (or folder) is a file that has been moved or deleted without Tabbles knowing it. You can recognize it as it is marked with a ["no entry" road sign]:
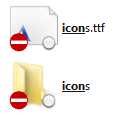
If you double click on a shadow file, Tabbles will show a window that will help you to specify the current location of the file and also of the other files that has been moved together with it (if any). Note: you can do copy/cut and paste of files from Windows Explorer to Tabbles, but not the other way around.
When do Shadow files occur?
Shadow files, can typically occur in two situations: - In a Windows network where some machines have Tabbles installed, and some other don't, if user on a machine without Tabbles, moves a file/folder that was previously tagged. - If a user moves a file using a file manager that is not Windows Explorer ("File Manager" in Windows 10) or Tabbles and does it without using the Explorer Context menu, when available.
Use the Shadow File tool
If you want to find all the Shadow Files in a certain folder you can use this feature:

Afterwards, you are propmted with a window that allows you delete the Shadow Files you just found:
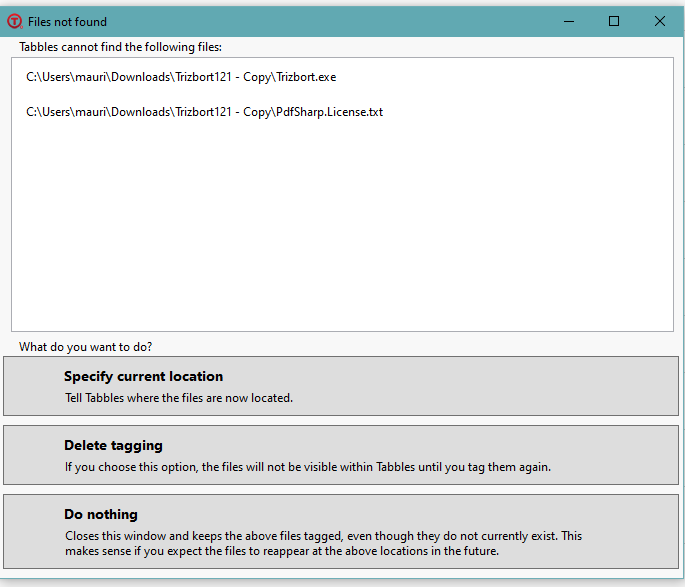
Removing Shadow files/folders using the Database Edit Wizard
If you untag a shadow file, Tabbles will still hold a record of the file in its database. You can also use the Database Edit Wizard (see below) to remove shadow files from the database.
Remove the selected shadow files/folders via untagging
Alternatively, in order to remove Shadow files/folders, you can also untag them. You'll need to select the file(s)/folder(s) you want to remove, then Right click > More > Untag completely (ALT + F).
Get a complete list of the Shadow Files in your database
If you want to know how many shadow files you have in your database a pretty simple way to do that is to pull a list of all the files from your database and then use a .bat file to check if each of them exists and write into a .txt file those who don't.
Step 1: extract a list of all your files from your database
This procedure is explained in detail in the chapter Get a list of all the files in the database.
Once your have the list, put it into a file named filelist.txt. The file should contain a flat list of the files, including their full path, without commas or separators, like this:
C:\Users\Andrea\Desktop\Test Social Security\CheckFilesExits.bat
C:\Users\Andrea\Desktop\Test Social Security\Details Mark's order .docx
C:\Users\Andrea\Desktop\Test Social Security\doesntexist1.txt
C:\Users\Andrea\Desktop\Test Social Security\Event User list.xlsx
C:\Users\Andrea\Desktop\Test Social Security\filelist.txt
C:\Users\Andrea\Desktop\Test Social Security\Italian order AZ-IT5591.docx
C:\Users\Andrea\Desktop\Test Social Security\puccio.txt
C:\Users\Andrea\Desktop\Test Social Security\JD To do quickly .txt
C:\Users\Andrea\Desktop\Test Social Security\Schiller Address.txt
C:\Users\Andrea\Desktop\Test Social Security\UK Address.txt
Step 2: use a .bat file to compare the list the list with what's on your drives
Next to filelist.txt, create a file called testExistance.bat, paste this line in it and then save it:
FOR /F "usebackqdelims=" %%f IN ("filelist.txt") DO (IF EXIST "%%f" (ECHO %%f exists) ELSE (ECHO %%f doesn't exist >> doesntexist.txt ))
(A file .bat is a script that you can run by double clicking on it)
Step 3: see the results in the file doesntexist.txt
Now, grab a coffee or ten, doubl eclick on testExistance.bat and enjoy the ride. The .bat file will check if any of the files in the list exists, and if it doesn't it will write the file path\name inside the newly created file doesntexist.txt. Keep an eye on the command prompt and when it's finished, you should have the list of the non existing files inside doesntexist.txt.
File previews
Starting from Tabbles 5.2, Tabbles offers previews of several file graphical file types, along with thumbnails.
PDF File Preview
Starting from Tabbbles 5.2.34, Tabbles offers previews of PDF files thanks to the amazing PDFiumSharp library
Auto-tagging rules and the One-click tagging
Watch training videos 6, 9, 10
These set of features appears in the 1.3.0 release and is explained in this blog post. The idea behind those features is to minimize the workload required for a user to tag files (One-click tag) or to automatize it based on where the file is or on other user-defined rules (Auto-tagging rules).
Auto-tagging rules
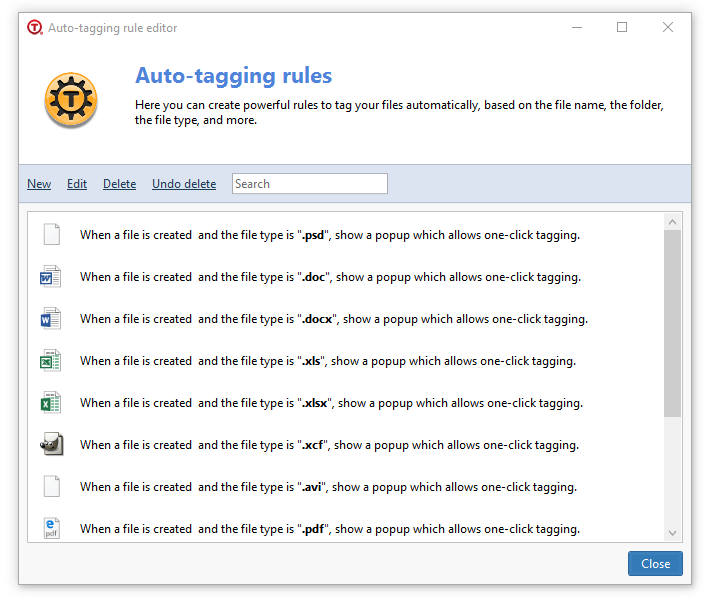
The background of the feature is explained in our blog post.
The idea is that users already have their files organized in a folder structure and the tagging should reflect this categorization and start from there.
Creating and editing a simple Auto-tagging rule for a folder
An Auto-tagging rule for a folder will tag all the files currently present in the folder and those that will be there in future, with the selected tabbles. Therefore, once the rule is created Tabbles starts "listening" to everything that happens in that folder, and (as long as Tabbles is running) whenever you can create/move/copy files in that folder, Tabbles will "see it" and tag the file consequently (and/or show a One-click tagging pop-up).
You can do it like this:
1) Right click on the folder and click on Tag folder
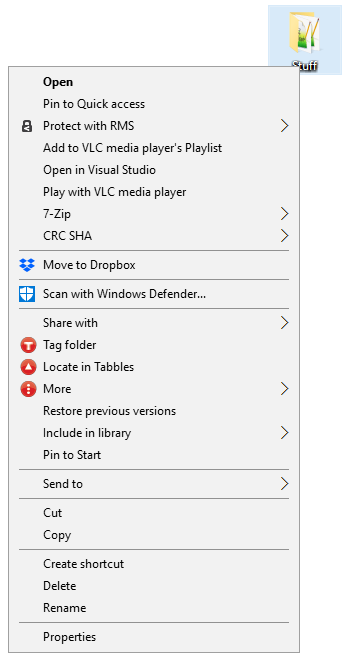
2) Click on a tag and click Add tags in the bottom, or create a new tag (in the screenshot)
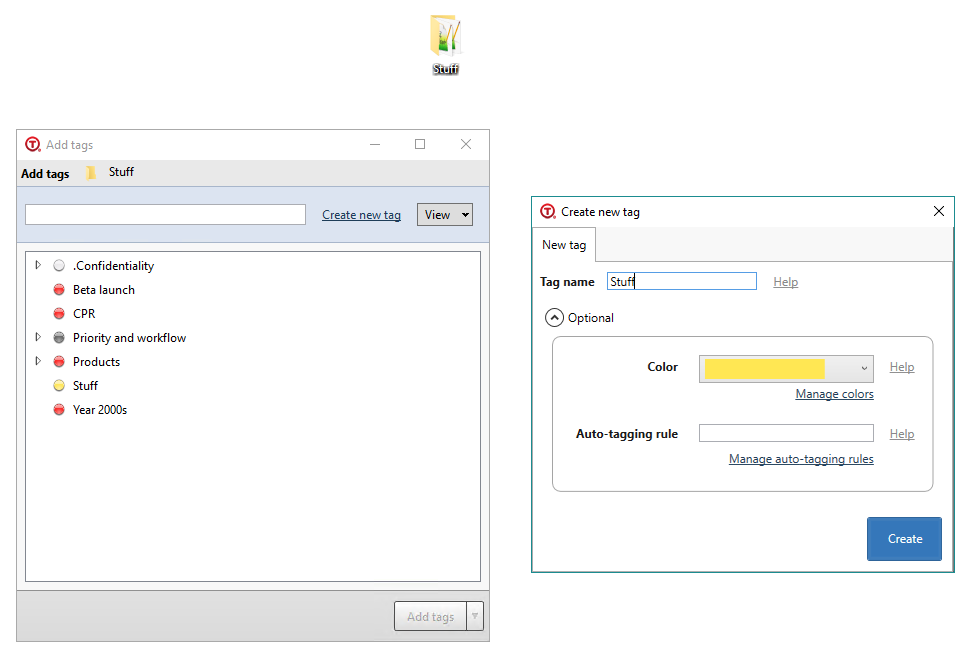
3) Check the boxes Tag the folder and all its files and Create auto-tagging rule and Also tag files in subfolders and click "Ok"
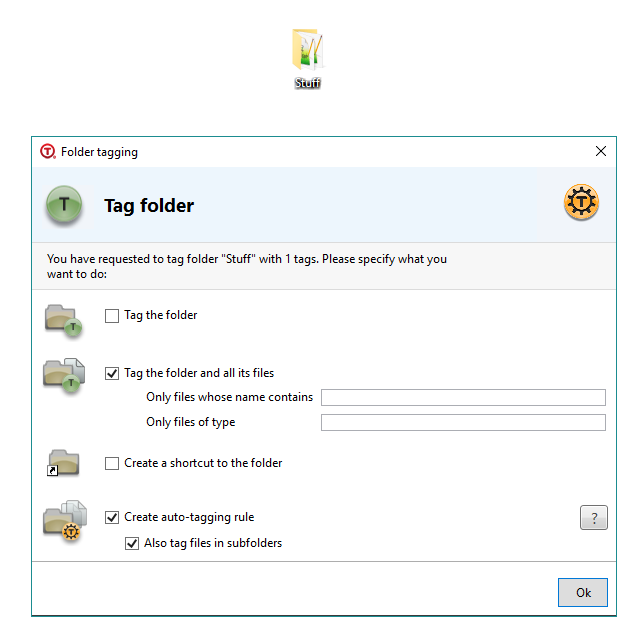
You can create Auto-tagging rules in different ways.
- The easiest way is by using the dialog box that appears whenever you tag a folder (check the chapter: #Tagging_folders_.28putting_folders_into_tabbles.29).
- Or you can create a rule using the Tools > Auto-tagging rules > New - the "Edit rule" Window will appear:
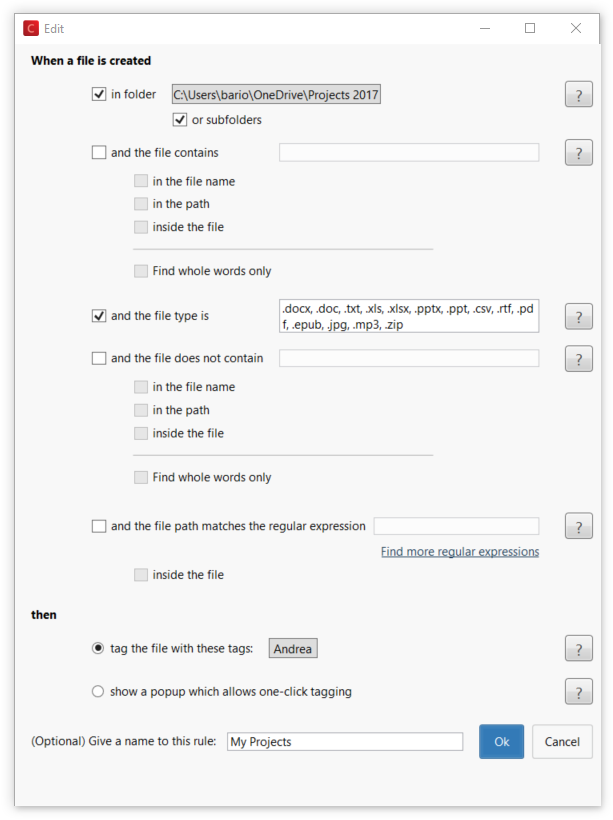
| Function + explanation | Better explanation |
| When a file is created | * Each time a file is created |
| In folder: use this option to monitor a particular folder (e.g.: c:\projects\2009) | This is optional! You can create a rule that works for all your disks. Tabbles is constantly monitoring to all the files created into your disk, this doesn’t slow down your system: Windows does it already, Tabbles is just listening to it… |
| And the file name contains: use this to filter in files | Using this you can filter all the files with a certain name (in a certain folder or within all the disks). E.g.: file_germany_something.doc |
| And the file type is: use this to filter file types | You can create rules that affect certain file types both inside selected folders or in all your disks. |
| Then | * This is what happens. Whenever one of the above conditions is met, one of the following applies: |
| Show a pop-up which allows one-click tagging | The one-click tagging is explained in the chapter 5.3 |
| Put the file in tabbles: pick the tabbles that will be attached to the files mathing the rule | Keep in mind that:
|
Create an auto-tagging rule to match a word in files
Since version 5, Tabbles can search into files and tag them if a certain word or string is matched. You can combine tagging parameter, to have a complex rule like this:
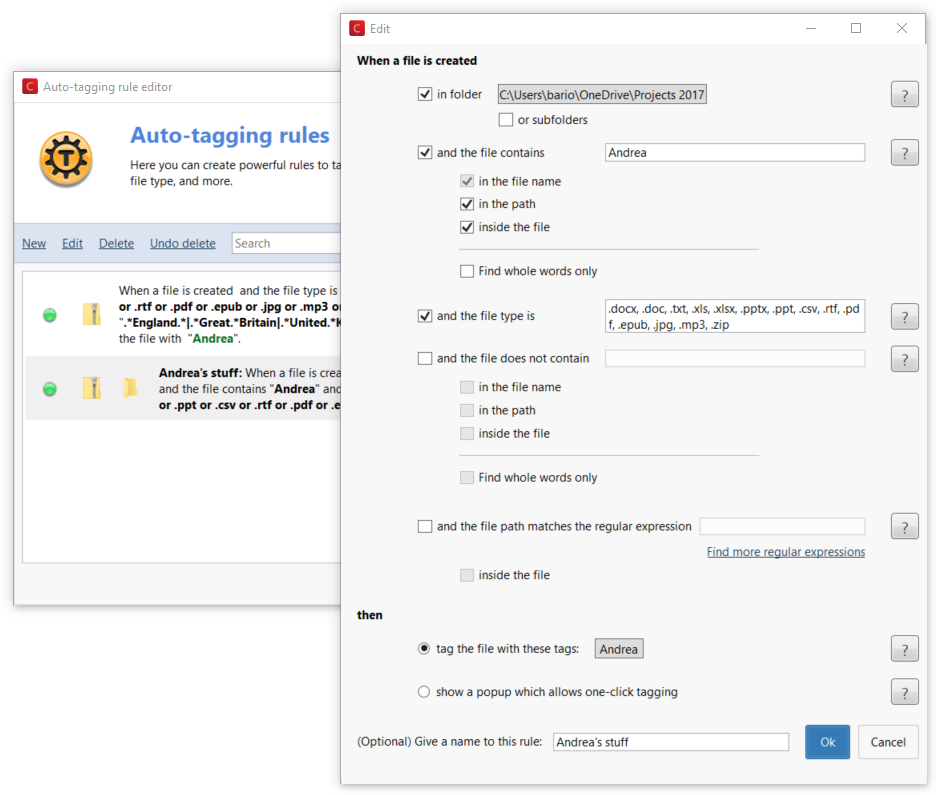
Auto-tagging rule for file creation date
Tabbles can also check the file creation date and perform auto-tagging based on a combination of parameters, for example:
- To tag all the files created in 2018, type “2018” in both the “year” fields
- To tag all the files created in Q1, select “1” from the dropdown on the starting month and “3” from the dropdown of the ending month
- To tag all the files created in the first half of each month, select “1” from the dropdown on the starting day and “15” from the dropdown of the ending day
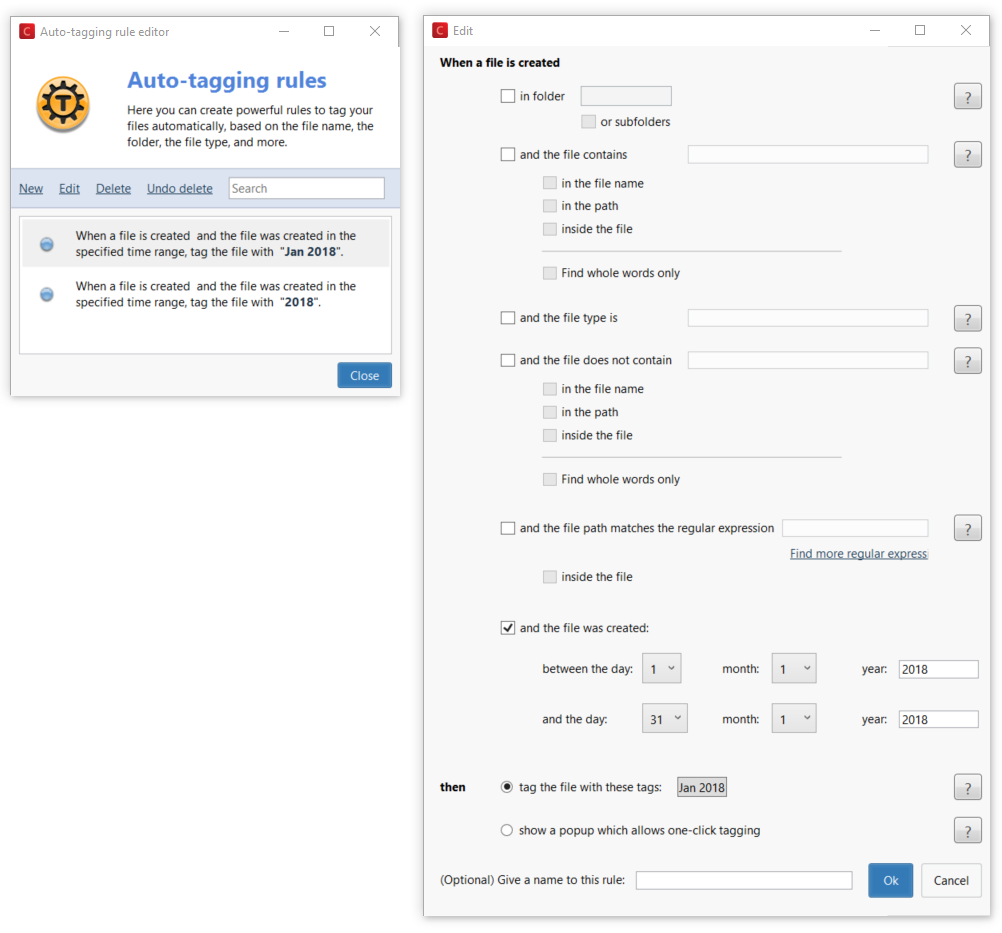
Data-mining: create an auto-tagging rule to match a pattern in a files
Since version 5.2.31, Tabbles can search into files and tag them if a pattern or list is matched, achieved using regular expressions. This gives a new depth to the auto-tagging capabilities, as you can for example auto-tag all the files containing any credit card number, any social security number, any email address etc. We dedicated an article about Regular expressions.
This is what such an auto-tagging rule would look like:
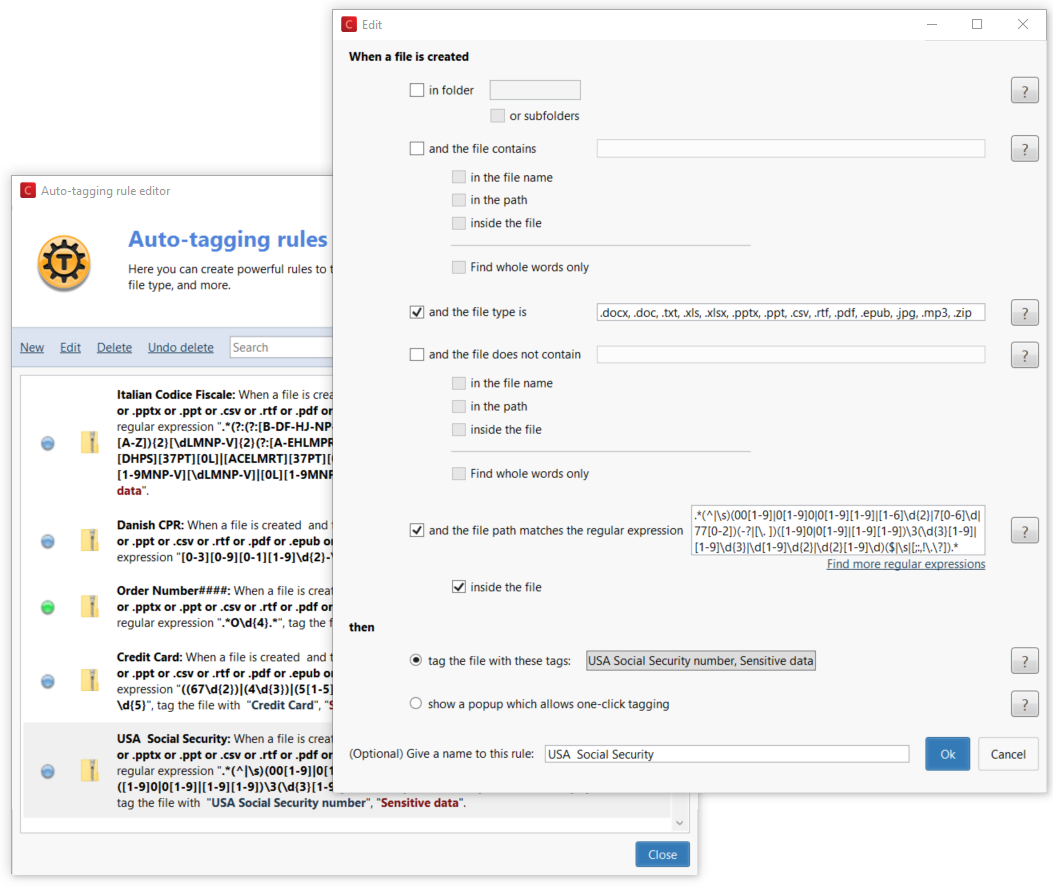
Use auto-tagging rules to automatically categorize your existent files and folder structure
Select a folder or a disk in Tabbles and look for the Apply auto-tagging rules menu entry, that will appear when you right click on a folder in Tabbles. If you right-click on a disk, you have to do a step more, it will look like this:
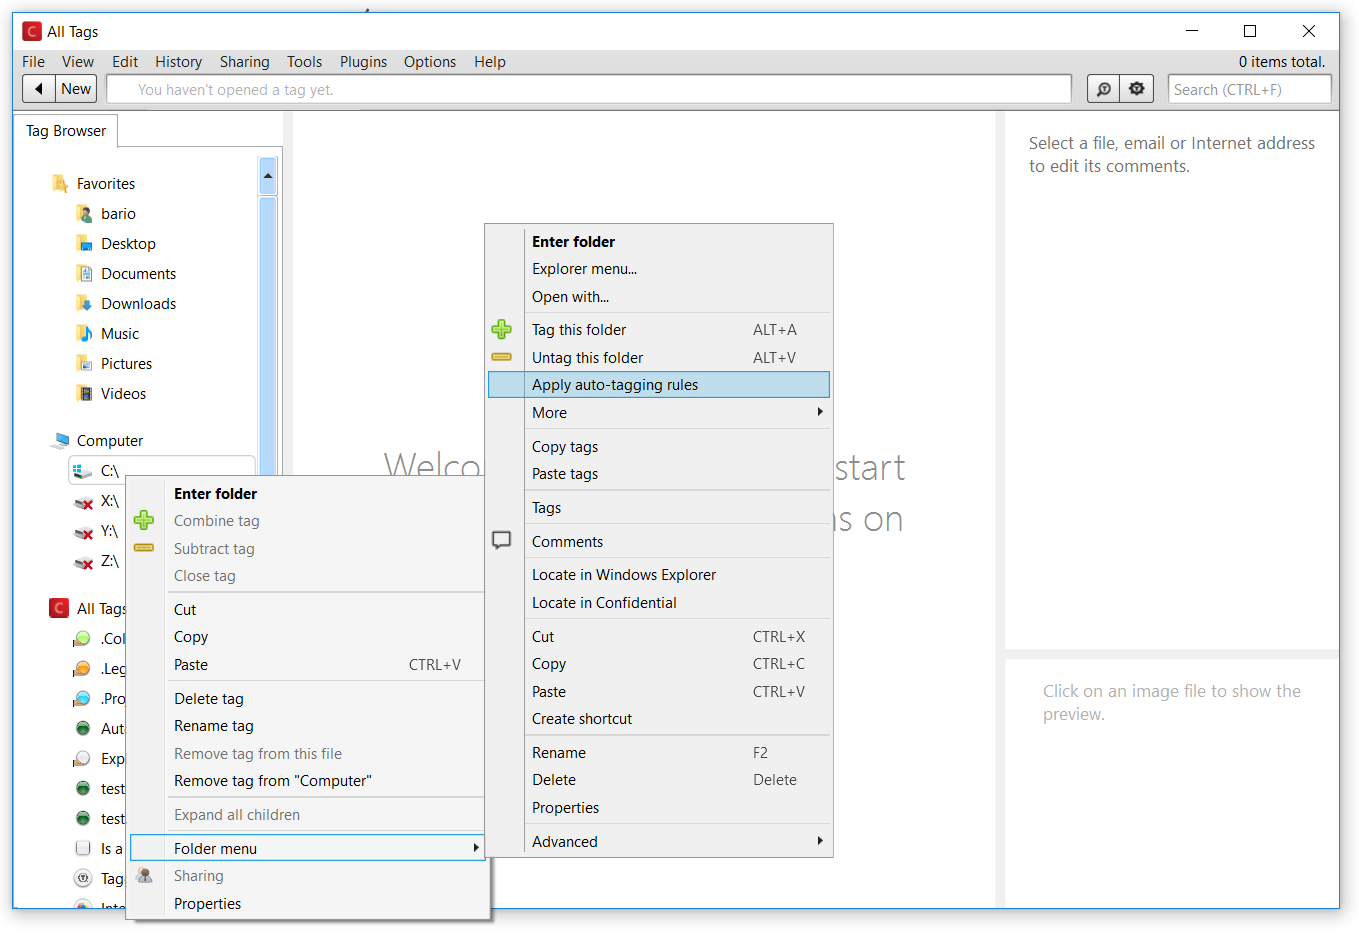
What if I mess up? Any hint on how to do this properly?
When triggered, an auto-tagging rule will tag a file: technically it’s writing some lines into a database... so ideally you would prevent messing up with it :)
Therefore, if you’re new on this, you’re not sure what you’re doing, or you’re testing a complex RegEx, you’d better take precautions when testing auto-tagging rules:
- Always use a test tag. If the rule worked, you can re-route it to the real tag(s) in a few clicks. If it didn’t work, you can delete the tag and try again.
- Always use one tag: don’t succumb to the temptation of tagging everything at once! Eventually you’ll get there, but don’t rush 🙂
- Start easy and do not mix things: keep the rules minimal and avoid combining too many things (e.g. a word in the content along with a RegEx on the path). Better split the auto-tagging in two or more rules, as it will be easier to work on later on.
Undo auto-tagging: the auto-tagging history
But if you couldn't help messing up with it anyway, since we kinda knew this was gonna happen, we developed the Auto-tagging history for you to undo it:
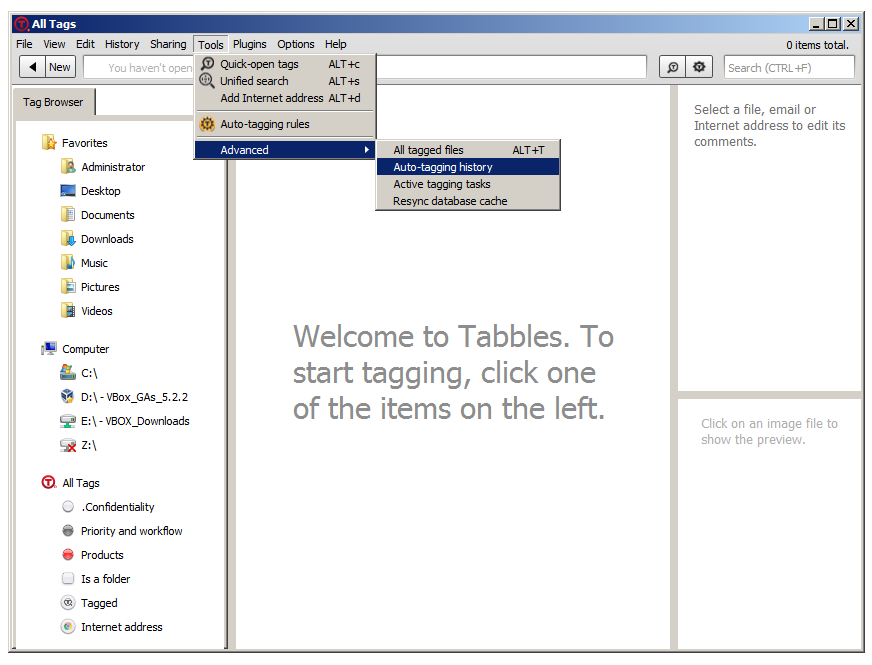
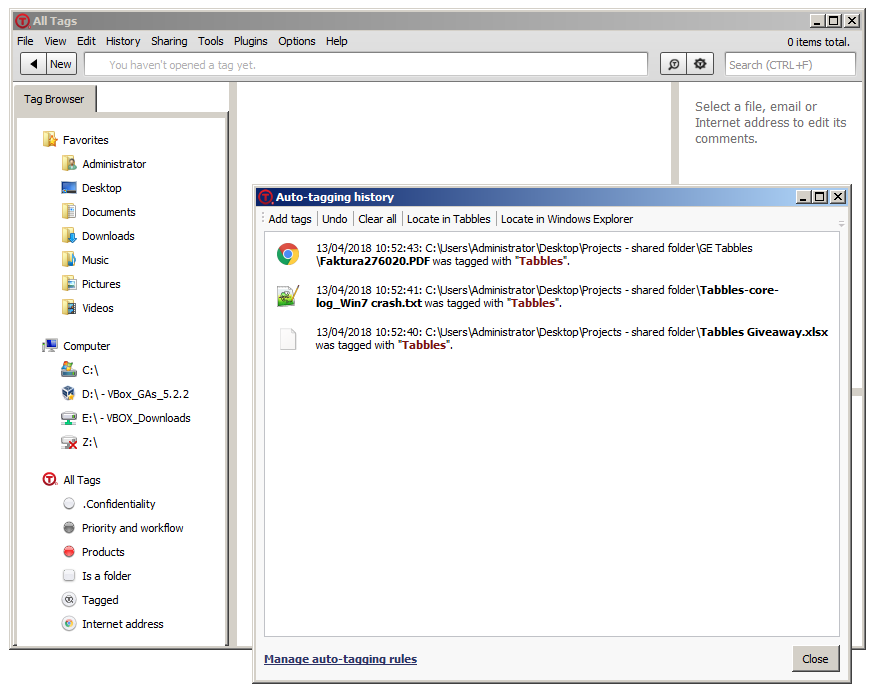
One-click tagging
The one-click tagging feature is meant to minimize the amount of work needed for a user to tag his files. The idea behind it is that the user will create sensible auto-tagging rules, and when a file is created matching those rules, than Tabbles will show a pop-up allowing the user to tag the file without the need to find it on the hard-drive. The pop-up will appear on the bottom-right corner of the screen looking like this:
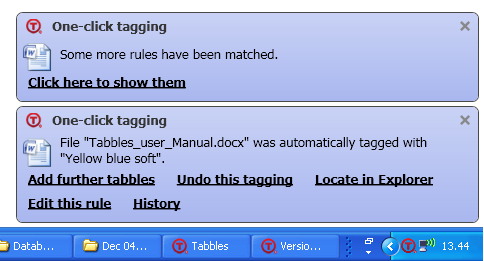
It will stay visible for a few seconds. Upon clicking “Add further tabbles” the Tag window will appear allowing the user to attach more tabbles to the file.
Regular expressions
You can use regular expressions to auto-tag files. A common usage is to match two file extensions with a single rule. See the dedicated wiki page Regular expressions or jump to the Regular expressions cookbox
Tag Synchronization
Let's say that you have a desktop, a laptop and a Windows-tablet, and you'd like to tag stuff once and use your tagging from your 3 devices... than the Tag Synchronization feature is what you're looking for.
Tag Synchronization setup
The principle behind Tag Synchronization, is that you will have multiple devices, connecting to the same database as the same user. For this reason, the same database has to be accessible from all the devices... therefore the Tabbles Local setup (the one you probably are using now, won't work) - but don't worry, we'll get you there in a minute!
Tabbles Clous vs LAN for home/single users using Tag Synchronization
Since Tabbles Local won't work, you will have to use the Tabbles Cloud or use Tabbles LAN and setup your own MSSQL Server (there is a guide in this manual to do that).
If you choose to setup your own MSSQL server, you should keep in mind where, or better from where you will be connecting to the database.
For example, if you have your MSSQL server installed on a machine physically located at home (or in your office) and you want to connect to it from your laptop while you're sitting in the train, you'll need to make sure that the MSSQL Server will be accessible over the internet. This will add one more layer of complexity: it's not impossible to do, but it's something you need to keep in mind when you plan your setup.
Therefore, the easiest solution is typically to use the Tabbles Cloud.
Setup Tabbles Cloud for Tag Synchronization
If you choose to go with Tabbles Cloud, you'll just need to create a Tabbles Cloud account (search this manual for create Tabbles Cloud account), but before that you should export your database to XML (search this manual for Moving from Tabbles Local to Cloud).
Once you have setup your Tabbles Cloud account, if you have a Tabbles Pro license you will be able to use your account to login Tabbles Cloud from 3 different machines. If you have a Tabbles Corporate license this is also true, but you will need to have the same Windows User name on all the three devices.
Tag Synchronization & File Synchronization: setup for DropBox/OneDrive/YourFavouriteFileSyncTool users
If you're interested in using your tagging on multiple devices, you are probably using a File synchronization service or tool.
Note that, while this chapter has helped you to synchronize your tags among several devices, if you're using a File synchronization tool, you will still need to tell Tabbles this folder on this PC is synchronized with that folder on that computer. You can find out how to do this in the Folder Synchronization chapter.
Folder Synchronization (File Synchronization)
Since Tabbles 4 we added a popularly demanded feature: support for Dropbox, OneDrive, Google Drive, Copy, and every other software or service where files are synchronized from a folder to another (or to more than one).
If you use Dropbox you will have several folders on several PCs that are exact clones of each other: when you tag files in one Dropbox folder, the tagging will be transferred to all the other Dropbox folders.
How? Basically you only need to tell Tabbles that two (or more) folders are clones of each other. You do this by creating a so-called "Synchronization Rule", and putting Both folders in the group.
IMPORTANT: THIS ONLY WORKS IN "LAN" AND "CLOUD" MODE
Since you will need several PCs to read/write tags from the same database, the "Local" mode wont' work (as it saves your tagging on your local PC only). Since "Local" is the default mode to choose at the setup, chances are you are using "Local" now.
So first check what database and mode you are using: do File > Show current server and user, if the result is like in the screenshot, than you are in "Local" and need to switch to "LAN" or "Cloud":

(If you are in Local Mode, find in this manual "LAN" or "Cloud" to see how to set it up. You will first need to Log out, by doing File > Log out (you can log back in anytime by pressing "GO" in the Local tab of the login window. )
How to setup Tabbles' Folder Synchronization
Follow step by step, first someone has to create a "Rule" (only once). Then on each PC where Tabbles is used, the user must tell Tabbles where the local Dropbox folder is, by adding the folder to the rule (once per user).
Create a new rule for your Dropbox's folder
1) Click on New rule and add a rule name (for example My Dropbox)
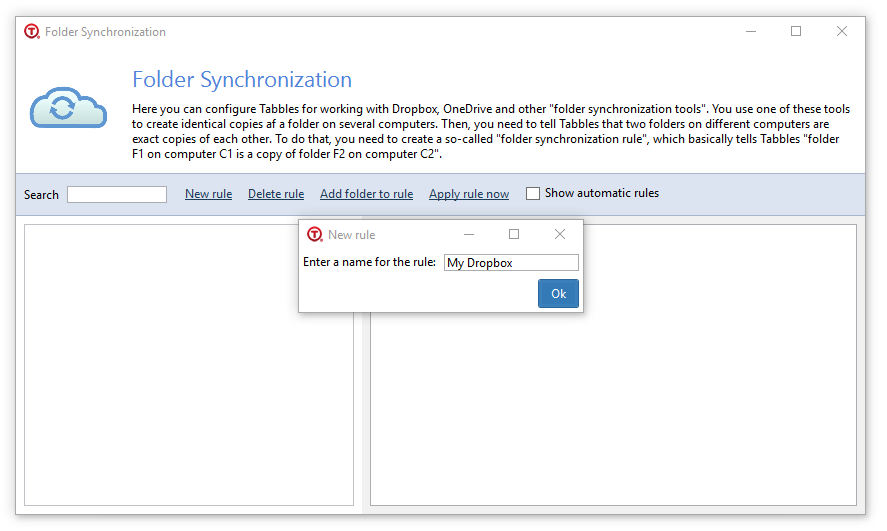
Add a folder to the rule My Dropbox
2) Select the rule
3) Click Add folder to rule.
4) Click on Choose a folder and select your Dropbox's folder
5) Make sure that the "Computer name" is the name of the computer you are working on
5) Repeat for any PC you have Tabbles and the synchronization working on
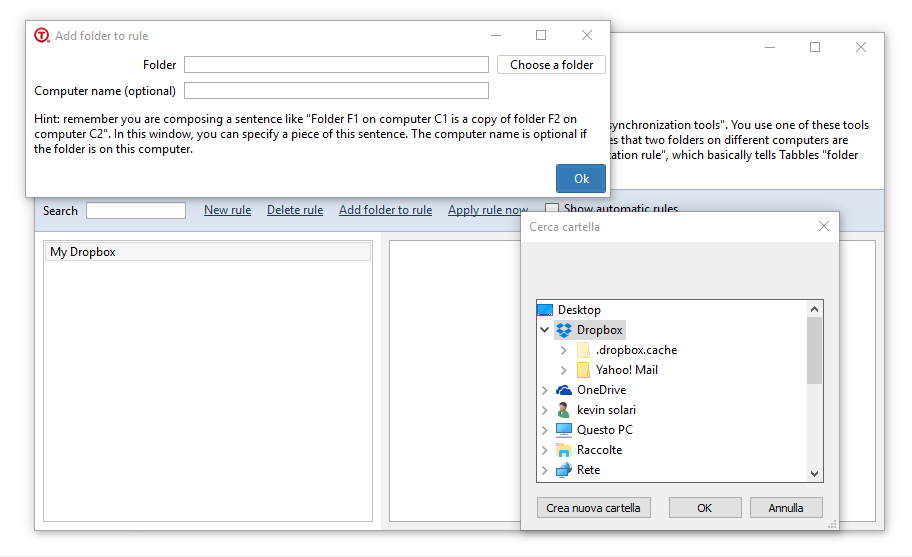
And this is what a properly setup rule between two computers should look like:
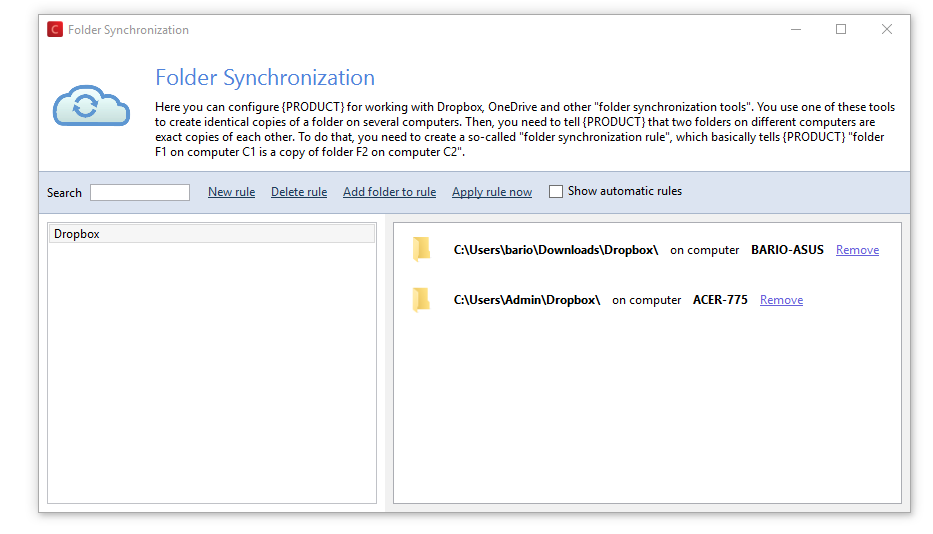
Tag sharing
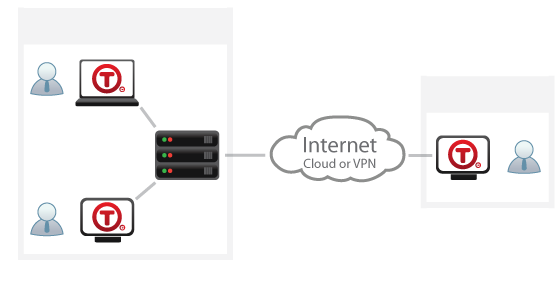
"Tag sharing" is a feature allowing users to share their tagging with each other. For example: I tag a file, you see my tagging, you tag it a bit more, and I can see your tagging too. Or instead, one person (or one machine) tags and 100+ users will just browse the tagging coming from this user.
With Tabbles, sharing your tagging is very natural and does not require long explanations: tags can be shared with one or groups, individually or all tags at once. Creating and managing user groups is easy and intuitive.
IMPORTANT: THIS ONLY WORKS IN "LAN" AND "CLOUD" MODE
Since you will need several PCs to read/write tags from the same database, the "Local" mode wont' work. Since "Local" is the default mode to choose at the setup, chances are you are using "Local" now.
To see what database and mode you are using, go to File > Show current server and user, if the result is like in the screenshot, than you are in "Local" and need to switch to "LAN" or "Cloud":

Find in this manual "LAN" or "Cloud" to see how to set it up. You will first need to Log out, by doing File > Log out (you can log back in anytime by pressing "GO" in the Local tab of the login window.
Granular permissions
In corporate scenarios, the Tabbles administrator (called "Superuser") can also define a set of shared tags to be used by the employees, thus sparing employees the burden of creating and sharing tags, and preventing tag naming inconsistencies. The superuser can blacklist/whitelist drives that can be tagged and also prevent users from performing a variety of actions, from the user control panel (available only to Superusers).

Setup Tag Sharing
1) Add users
First of all you (the Superuser) need to add one or more users to the database, to do so open the Users Control Center by clicking on: Sharing > Users Control Center, the window in the screenshot below will open.
Then, click on Create new user and fill in the fields Email and Password. This window allows you to set specific permissions for each users.
Users can also be imported in bulk from Active Directory (search Import Users from Active Directory in this manual)
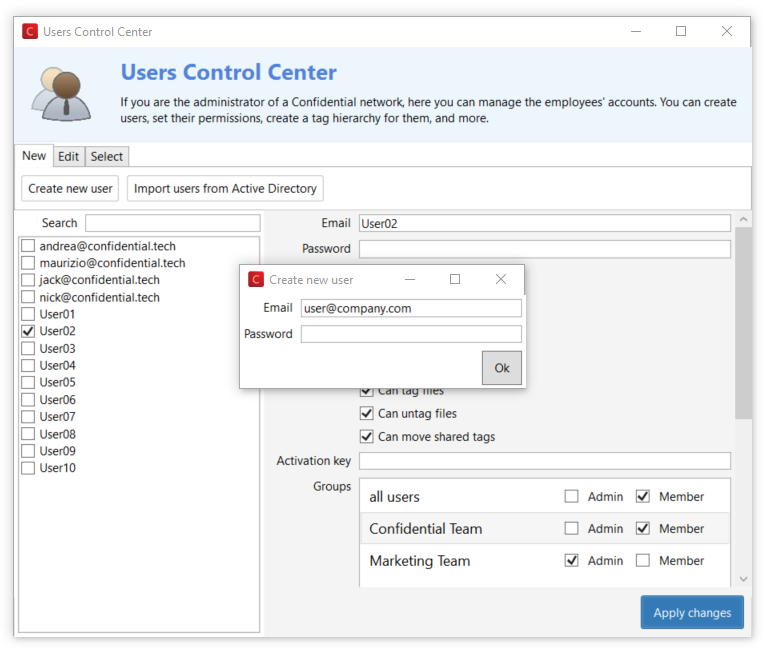
2) Create a Group
The second step is to create a group of users. You can assign users to a group and set their role (Admin/Member). The group's creator becomes also the group's admin: only admins can assign users to a group, or delete a group.
To create a group click on: Sharing > Manage user groups. Then click on the button New Group, fill in the field Group name and select the users you want to add to the group, and when done click on Ok.
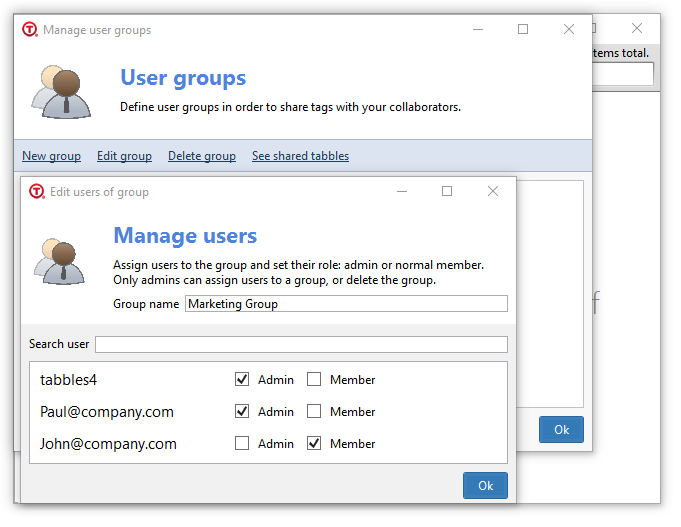
Right click the tag you want to share, from the context menu click on Sharing. A new window will be opened and you can select the group you want to share the tag with.
You are also able to allow the users in the group to only open the content of the tag as well as to tag or untag files with it. You can do this by checking the checkboxes Open or Tag.
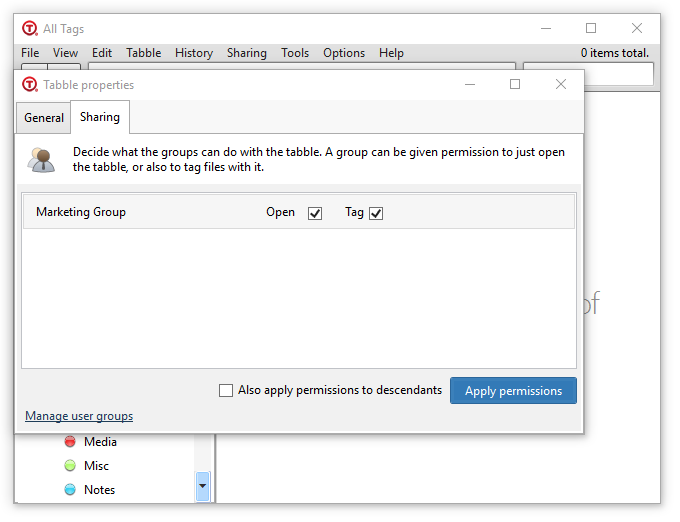
You may as well want to share all your existing tags at once, to do so click on Sharing > Share all tags
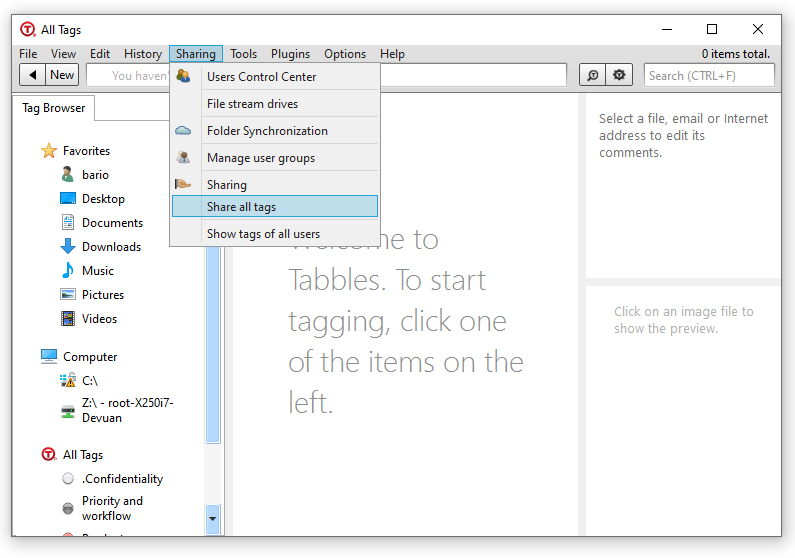
Google file stream (and more) support
In Tabbles 5.7.1 we added another highly requested feature the tagging of “file stream” drives for teams.
Tabbles now supports tagging on “Google file stream” and similar technologies, so basically it works any software that mounts a cloud drive locally, without synchronizing the files (there are many solutions that do that (Expandrive, Mountain Duck, odrive…). You can now tell Tabbles that “G:\” is a shared drive, and tag files on it along with your team.
Open the Sharing > Files stream drives window
You can set it up under Sharing > Files stream drives:
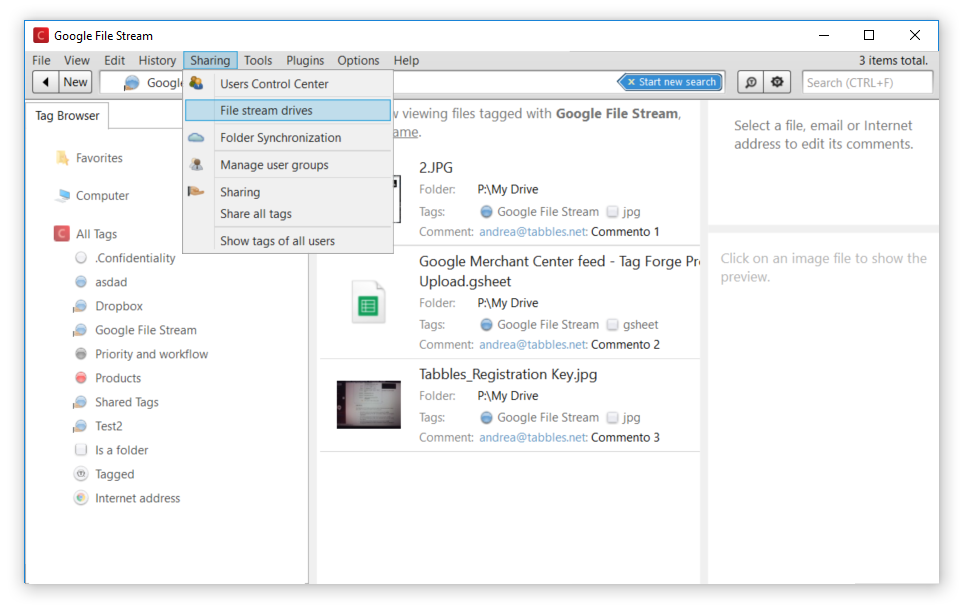
Set the letter of your team's file stream drive
Then you need to add the letter of your “file stream drive” (that is typically G: if you’re using Google file stream), the result would look like this:
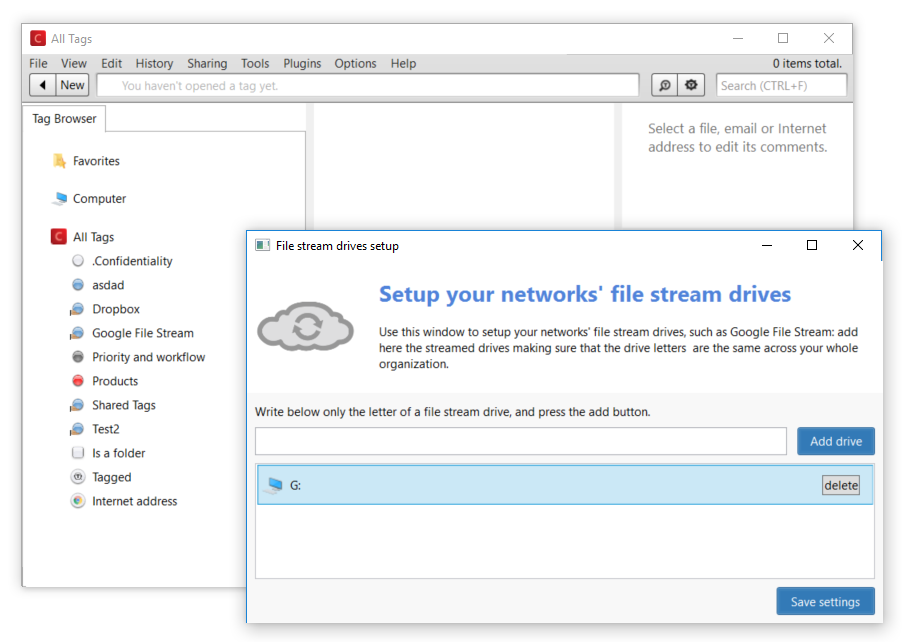
From now, everyone in your organization who uses Tabbles and has a file stream drive mapped on the same letter, can share tagging with you. Remember of course to setup and activate the tag sharing (search this manual for instructions).
Advanced functions
Short (but growing) list of features that you will likely need after you start using Tabbles for real.
The auto-tagging rules "Whitelist" and "Blacklist"
In Tabbles we implemented a Blacklist/Whitelist mechanism to help you decide what disk should trigger the Auto-tagging rules. Please not that paths that start with \\ like \\machine-name\folder-name won't work, every path should start with a Disk letter.
You can access these options using the menu Options > Auto-tagging rules >
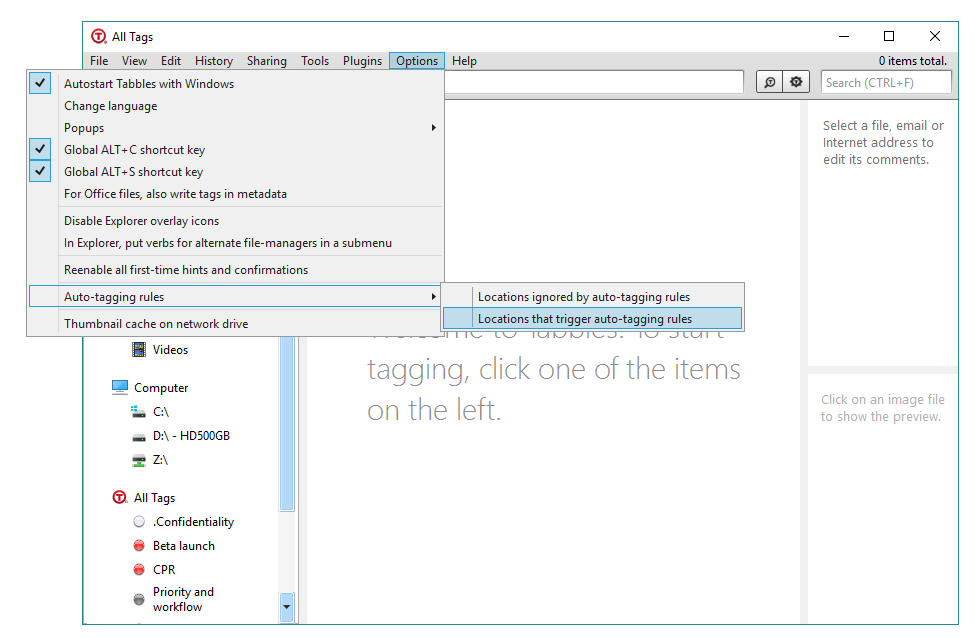
"locations ignored by auto-tagging rules" dialog (Blacklist)
This dialog is used to define a list of network folders/disks where the auto-tagging rules will not work. Keep in mind that this list will be overridden by the "Whitelist" (explained in the next paragraph).
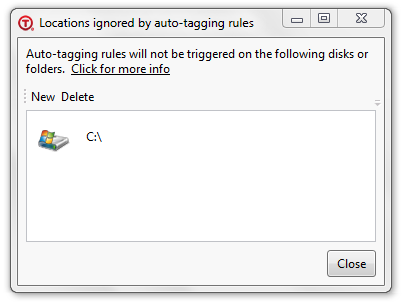
Starting from the version 1.5.11rev3, you can now disable rules on paths of the kind \\share\folder\foo\bar. (removed in version 1.5.36 - you can now use the "Whitelist" instead, explained in the next paragraph).
How it works:
- In the menu, click options > set ignored locations.
- In the dialog, click "new". Navigate to "Computer", and click a network drive.
- Press ok.
- You will not see one-click-tagging popups when you create a file in that drive anymore.
"locations that trigger auto-tagging rules" dialog (Whitelist)
This dialog is used to define which network folders/disks will trigger the auto-tagging rules.
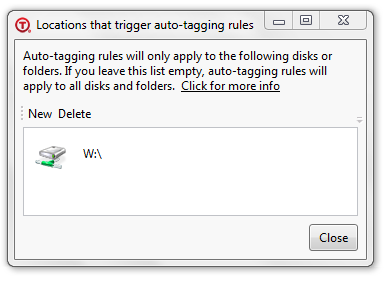
The window works like the one of the "Blacklist" but the result is quite different
- If the list is empty, all the network disks (excluding those which are in the "Blacklist") will trigger the auto-tagging rules.
- If one or more network disks are in the list, all the others will be excluded (they won't trigger the auto-tagging rules).
An Example: one drive in both the lists
In the screenshot below you can see the result of setting up the "Blacklist" and "Whitelist" as showed above (drive C:\ in the "Blacklist" and drive W: in the "Whitelist")
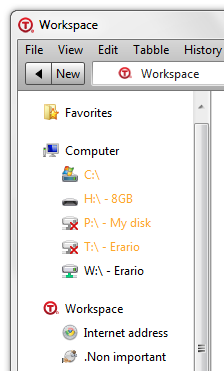
All the drives apart from W: are excluded (including only one drive in the "Whitelist" makes the "Blacklist" redundant).
Confidential Only: the Explorer Tags
Tabbles sister product fro DLP and compliance is Confidential.
Confidential offers the Explorer Tags, right from Explorer you can:
- Right-click on one or more files, and tag the file directly
- Use the auto-tagging rules to auto-tag with with an Explorer Tag
- However you tag a file, the tag will be visible for you in Windows Explorer. If the file is on a shared drive, your team will be able to see it too
This how the Explorer Tags look:
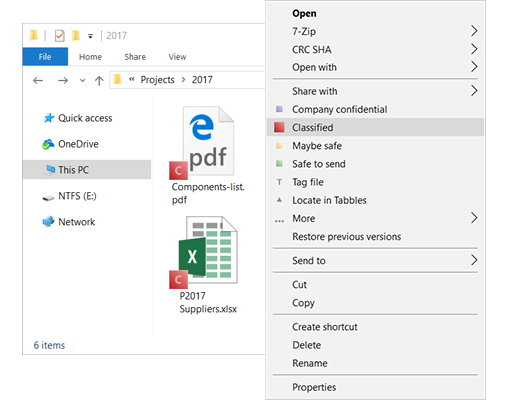
the Quick-open tags window
Use the Quick-tags window to perform a number of tasks, including:
- Search interactively tags by part of their name
- Delete tags
- Share tags or manage their properties
You can open it from the main menu, click on Tools > Quick-open tags or pressing ALT + c, this is what it looks like:
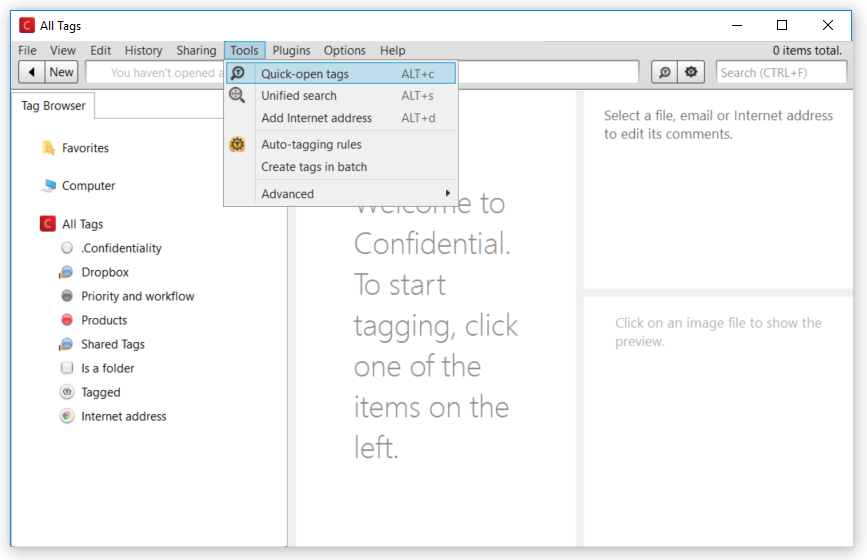
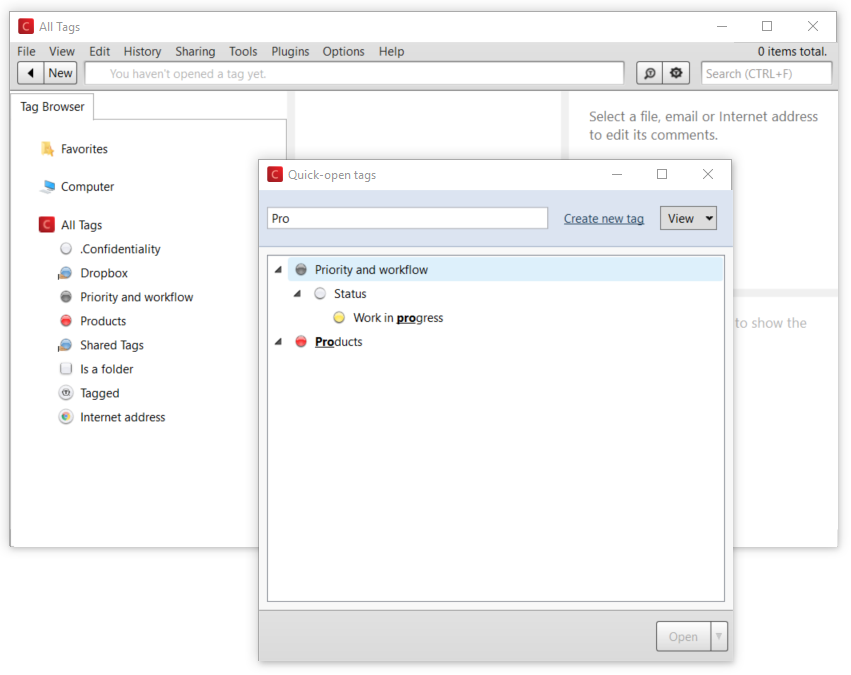
Delete tags in bulk
Do you want to delete a bunch of tags all at once? You can use the Quick-open tags window:
- In the main menu, click on Tools > Quick-open tags or press ALT + c
- Click on the tags you want to delete to select them
- Click the triangle button on the right side of the "Open" button, in the bottom of the window and then click Delete (N) tags.
The result should look like this:
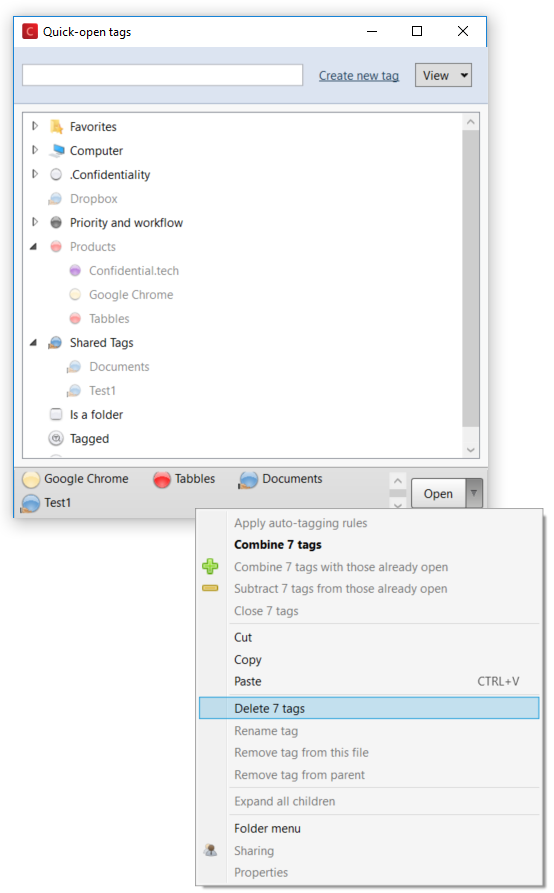
How to tag from command line
You can tag files by invoke Tabbles from command line, in the following fashion:
Tagger.exe tag_files_pre -f "C:\Directory\File1.doc" -f "P:\Shared Directory\File2.txt" -t MyTag1 -t MyCoolStuff
And you can also tag URLs in the same way:
tagger.exe tag_url_pre https://tabbles.net "My fav URL" -t MyTag1 -t CoolUrls
Using the same technique as the Bookmarklet, you can use this to programmatically tag bookmarks, something like this:
javascript:void(location.href='tabbles:tag_url_pre'+';'+encodeURIComponent(document.title)+';'+encodeURIComponent(window.location.href)+';'+'-t'+';'+'InsertTag1'+';'+'-t'+';'+' InsertTag1')
where the URL and site tile could also be inserted via code.
The Outlook plugin
The Outlook plugin for Tabbles is included in the regular installer. Outlook occasionally disables plugins automatically, so you may need to re-enable it again. The source code of the plugin is on Github
Manually enable the plugin
Follow the instruction on this link: add-in-on-for-outlook-for-windows
The Tabbles database: tips, tricks and maintenance
Most of the information relative to graphics present in Tabbles are contained in the file db.xml, located in the folder My Documents\Tabbles\Config. Everything that you can do by modifying the db.xml, you can also do using the Tabbles’ user interface.
The way Tabbles uses the db.xml allows you to create a database structure (meaning tabbles and Color groups) that would fit your office, colleagues or friends needs, and sharing it with them. If you are a distributor or an OEM partner, you can create your unique setup and have it distributed with Tabbles.
Limits of Tabbles: how many files and tags should I have?
Often we get asked how many files/tags can Tabbles support. As a rule of thumb, if you're using Tabbles Local, you should not notice any important slow-down or SQL timeout with:
- 500.000 files: you should in fact be able to go up to 1 milion without problems. We have several corporate customers having 2-3M files on their databases, and the software runs smooth
- 500 tags: we empirically found that, until 300-400 tags you will hardly notice any slowdown. Between 500 and 600 you will start seeing slowdowns and timeouts. If you pass 1000 tags, the software will cry and yell for help, and will become unusable.
- 1000 files per tags: this is more a best practice than a rule. The software will probably still run ok if you have tags with 3-4000 files in it, but having a tag with 4000 files defeats the purpose of the software: try and create children-tags and tag your files accordingly.
Limits on LAN (using MSSQL running on a server)
If you're using a MSSQL server, the performances will depend on the version of MSSQL you have, as well as the hardware you're using. So far we found that a MSSQL Express 2017 (the free version) running on a dedicated mid-power server, can accomodate some 150 users.
Database Edit wizard
You'll need this operation when you'r moving (or have moved) all your tagged files/folders to a different drive: please keep in mind that an easy and viable alternative is to simply move all your files using Tabbles(using the cut&paste functions). Open the window here:
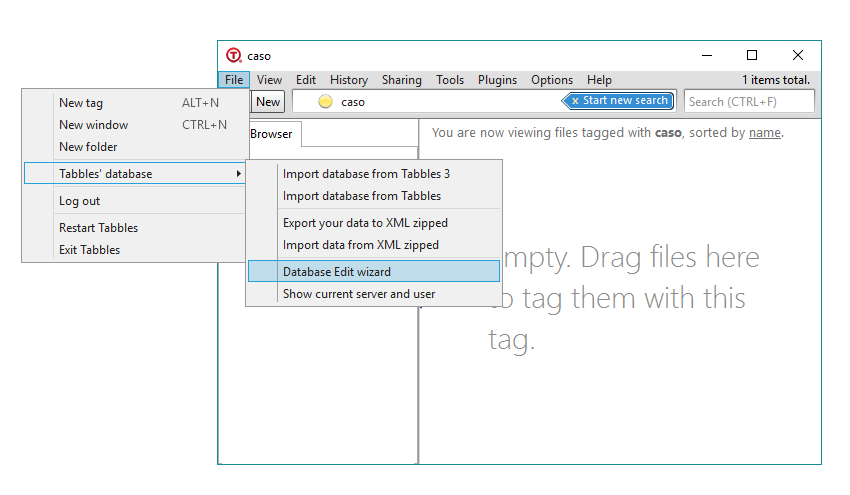
This function will perform a simple text-replacement of all the database paths, whenever appliable. This is anyway an extremely delicate operation that can potentially destroy your database if you're not performing it correctly.
Keep in mind that replacing C:\ with D:\ will also cause all your auto-tagging rules to be modified consequently.
This is the window:
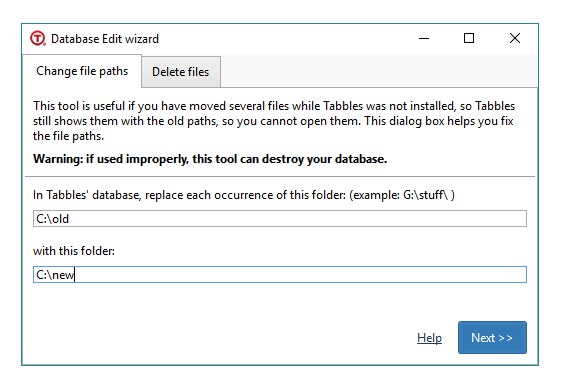
The rules:
1) use capital letters for the drive letters (C: and D:)
2) if the first path ends with a "\" then also the second must end with a "\"
How to do it (examples):
- Replace C:\ with D:\
Resulting in:
C:\Users\Andrea\Downloads\CentOS-5.5-i386-netinstall.iso
---> D:\Users\Andrea\Downloads\CentOS-5.5-i386-netinstall.iso
- Replace C: with D:
Resulting in:
C:\Users\Andrea\Downloads\CentOS-5.5-i386-netinstall.iso
---> D:\Users\Andrea\Downloads\CentOS-5.5-i386-netinstall.iso
- Replace C:\ with D:\Data\
Resulting in:
C:\Users\Andrea\Downloads\CentOS-5.5-i386-netinstall.iso
---> D:\Data\Users\Andrea\Downloads\CentOS-5.5-i386-netinstall.iso
How NOT TO DO IT (examples):
- Replace c:\ with d:\
(you'll get an error message here)
- Replace C:\ with D:
Resulting in:
C:\Users\Andrea\Downloads\CentOS-5.5-i386-netinstall.iso
---> D:Users\Andrea\Downloads\CentOS-5.5-i386-netinstall.iso
- Replace C:\ with D:\Data
Resulting in:
C:\Users\Andrea\Downloads\CentOS-5.5-i386-netinstall.iso
---> D:\DataUsers\Andrea\Downloads\CentOS-5.5-i386-netinstall.iso
Delete files or shadow files (delete tagging from the database)
If you tagged some files on a drive or a folder and suddenly regret having done so, you can use this feature to delete, at once, all the tagging that happened on a certain path. Needless to say, this will NOT delete the files on drives, but only the entries in the Tabbles database. The Wizard will look like this:
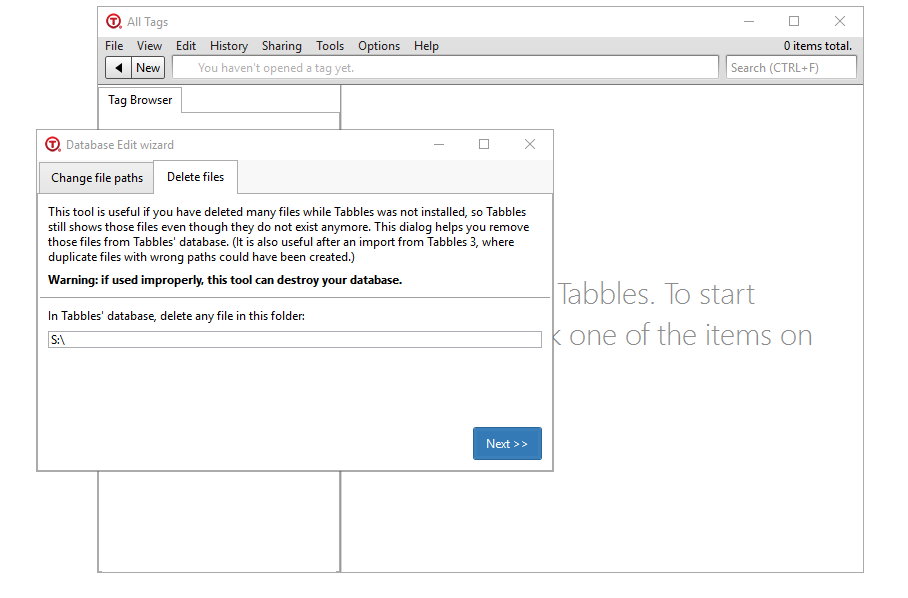
Change machine name in the database
For each tagged file, our software saves the machine name were the file is tagged. If you change the name of your machine (or move all your files to a new machine), the machine name needs to be updated in the database. Use this tool if you have changed computer or changed machine name and you can see all your tags are empty. Write your old machine name in the first line and the new machine name in the second like, and press next. You'll have a preview of the effected files before going forward.
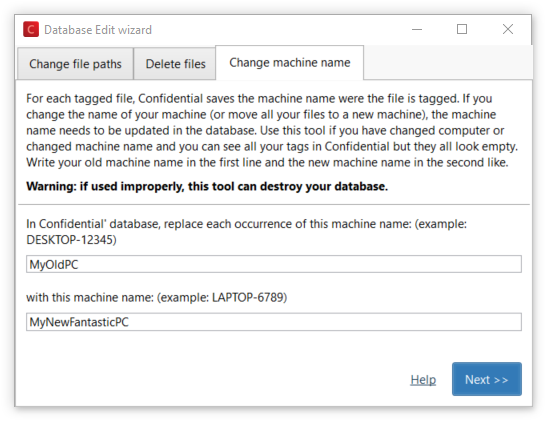
SQL Scripts for SysAdmins
How to use the scripts
Here a collection of SQL scripts you may want to use if you're SysAdmin and have Tabbles running in your network. You will need Microsoft SQL Server Management studio, you get it for free on Microsoft website: https://docs.microsoft.com/en-us/sql/ssms/download-sql-server-management-studio-ssms
Alternatively, you may want to use the Microsoft Command Line Utilities 14.0 for SQL Server a.k.a sqlcmd.exe that you can download from: https://www.microsoft.com/en-us/download/details.aspx?id=53591
Blacklist a drive, to disallow (restrict) users to tag files on it
We implemented this feature to fix the following problem: you have the deployed Tabbles in your network and you have users who have mapped the same letter (e.g.: S:\) on different drives. If that's the case, the best solution is to prevent them from tagging on that drive.
- You'll first need to find out what the 'idOrg' of your organization is, so run with this query:
select o.id
from organization o
the result will typically be '1' (don't mind that it's '1030' in our case).
- you will need to edit the table 'preventTaggingFromLocation' manually:
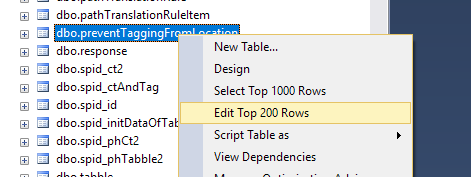
and under 'prefixToPrevent' you can put the letter(s) of the drive(s) to be excluded:

- When tagging on a blacklisted drive, your users will see something like this:
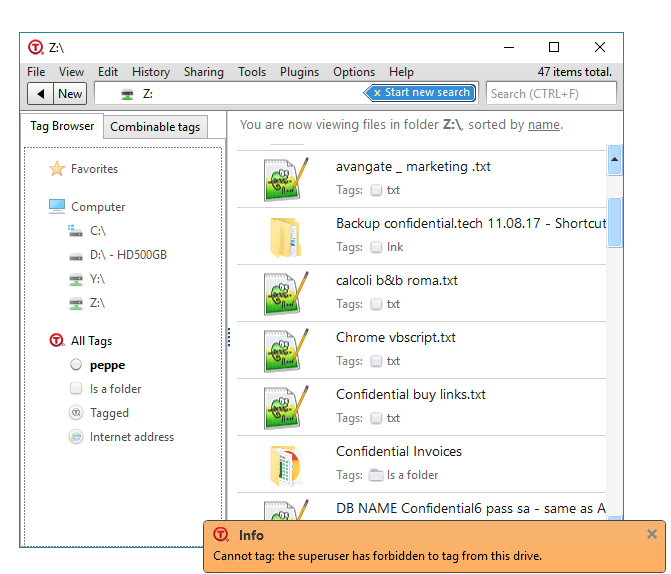
"Revert to free" a user in the database
If you have assigned licenses to a batch of users and want to delete the users or assign those licenses to someone else, you can do it easily in SQL. Note: if the license has been activated already, we'll need to remove the license from our activation table, so drop us line if it's the case.
- use the script:
update user2
set activation_key = null
where name = 'user-you-want-to-revert-to-free'
- or set to 'null' the column 'activation_key' on the table 'user2' for the user:
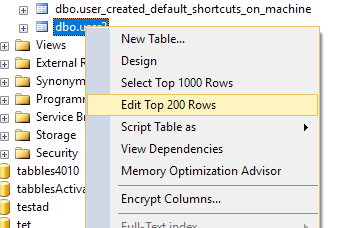
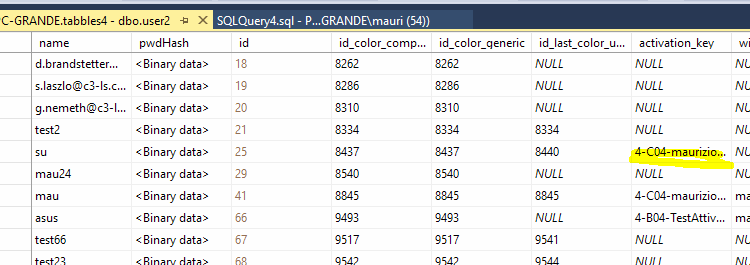
- If you want to revert all the users at once, run this query:
update user2
set activation_key = null
Get a list of all the files in the database
If you want to pull a list of all the files in the database, you'll have to use the query below. In case you're looking at the table dbo.vTagsOfFile, be aware that this contains an "exploded" view of the database, so you'll have the impressions that files are duplicated while this isn't the case. This is the query you need:
select f.path as [filePath], f.machineName, t.name as tag, t.id_user_owner as tagOwnerId from file2 f
join taggable_has_tag tt on f.idTaggable = tt.id_taggable
join tag t on t.id = tt.id_tag
It should look something like this:
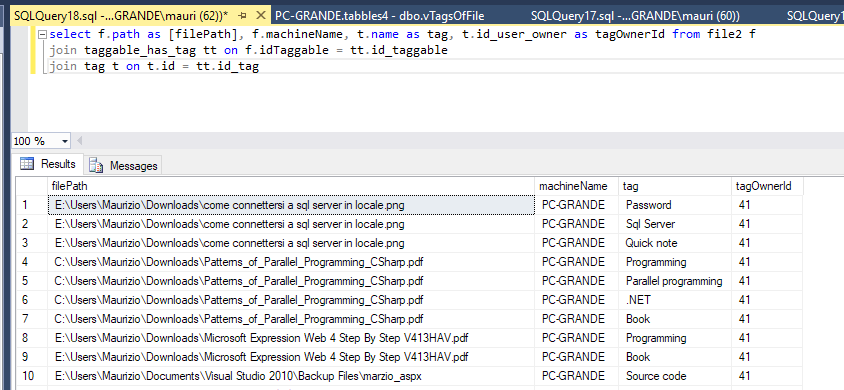
Convert tags to comments
One of our oldest user, had grown his database to 1400 tags: at that point Tabbles was hardly usable. He had then the brilliant idea to convert some tags to comments: comments are managed differently from files and while are still searchable, they weight much less on the MSSQL database server.
This is how this can be done:
Step 1 BACKUP YOUR ENTIRE DATABASE
but before you go any further, BACKUP YOUR ENTIRE DATABASE as this procedure can destroy it (you've been warned!).
Step 2 create comments from tags
Our user needed to: convert some tags to comments : the tags that I don't really need to find in the tabbles tree. They start with "PIECE …" or "ECRITURE …"
This is the SQL Query to create comments from tags:
INSERT INTO dbo.comments (commentText, idUserAuthor, dateCreated, dateModified, idTaggable) SELECT (tag.name, tag.id_user_owner, GETDATE(), GETDATE(), taggable_has_tag.id_taggable) FROM dbo.tag INNER JOIN dbo.taggable_has_tag ON taggable_has_tag.id_tag = tag.id WHERE tag.name LIKE 'ÉCRITURE %' OR tag.name LIKE 'ECRITURE %' OR tag.name LIKE 'PIECE %';Step 3 check the comments that were created
Have a good look at the comments created before you delete anything
Step 4 delete the tags
Once you're sure the operation worked as needed, go on to delete your tags, with two queries:
1st:
DELETE dbo.taggable_has_tag FROM dbo.taggable_has_tag INNER JOIN dbo.tag ON taggable_has_tag.id_tag = tag.id WHERE tag.name LIKE 'ÉCRITURE %' OR tag.name LIKE 'ECRITURE %' OR tag.name LIKE 'PIECE %';2nd:
DELETE FROM dbo.tag WHERE tag.name LIKE 'ÉCRITURE %' OR tag.name LIKE 'ECRITURE %' OR tag.name LIKE 'PIECE %';
Get a list of all tags, highlighting a what tag contains more files tagged with a specific tag
We had this request from a user that uses our tool for project management, and wants to know what customer has the most files marked as Work in progress, where for each customer there is a corresponding tag (all the customers' files are tagged with each customer's tag) and Work in progress is a tag itself.
You'll need this script:
select t.id, t.name,

        ( select count(*)
        from taggable_has_tag tt
        where tt.id_tag = t.id
        and  exists (select * from taggable_has_tag tt2
                        join tag specialTag on specialTag.id = tt2.id_tag
                        where tt2.id_taggable = tt.id_taggable
                        and specialTag.name = 'Work in progress'

                    )
          ) as countFiles

        from tag t
        order by t.name asc
You will need to change the 'Work in progress' text with the name of the tag you want to use for the matching. The tag name (inside the quotation marks) can contain spaces and is not case sensitive.
You can alternatively sort the output by number of file, replacing the last line with:
order by countFiles descThe output should look like in the screenshot below, where the tag chosen to match is names Free, you can copy & paste it to an Excel file for further sorting and manipulation:

Export all comments
If you need to export every comment in your database, along with the file the comments were attached to, you can use this script:
-- get all file comments ordered by date, annotated with the file path , comment author and creation date, for the database "tabbles5"

use tabbles5;

select u.name as 'username', c.commentText, c.idUserAuthor, c.dateCreated, f.path as 'file path'
from comment c
join taggable tgb ON tgb.id = c.idTaggable
join file2 f on f.idTaggable = tgb.id
join user2 u on u.id = c.idUserAuthor
order by c.dateCreated asc
The result should look like this:

In order to save it to a csv, you can click on the top left of the output, right-click and click on "Save Results As...":
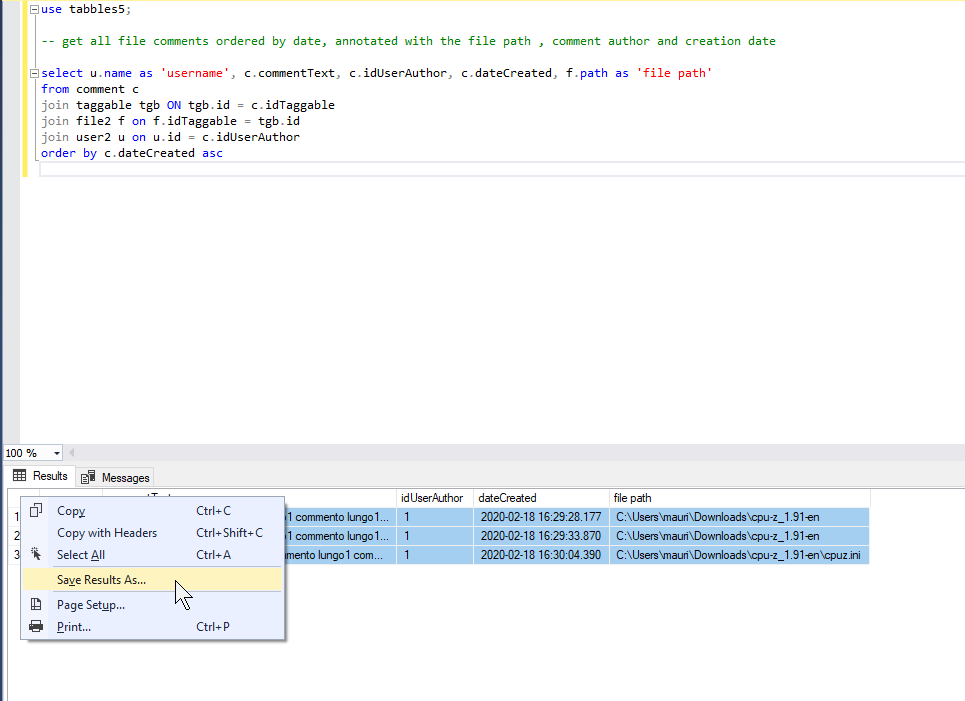
Delete files from the database manually
Let's see if you have a list of files (with their path) that you want to delete, maybe because they are Shadow Files (search this manual for Shadow Files).
You'll need this script:
delete from taggable
where id in (select fi.idTaggable from file2 fi
join taggable tgb on fi.idTaggable = tgb.id
where fi.path = 'T:\My Stuff\My Doc.docx')
Here you will have to change the path of the file, for each file that you want to remove.
IMPORTANT: this script won't work properly if you have the feature "Folder Synchronization" enabled.
Change the machine name of the files tagged in your database
For each file in the Tabbles databases, the software save the machine name where the file was when it was tagged. So if you are on a PC called "MyComputer" and tag the file "C:\Documents\MyDoc.docx", the machine name will be bound to the file name.
If you tag some stuff and later change the name of the machine, or your move (or copy) your whole hard drive with to a new PC, the database will be stuck to "old" machine name, as a result you will see all your tags but the tags will be empty. The easiest solution would be to change the machine name bound to every file.
update file2
set machineName = 'MyNewComputer'
IMPORTANT: this script changes the machine name for every single file of the database, so if you are on a multiuser environment, you don't want to use this script as it will destroy your database.
Produce a list of workspace tags in a hierarchy
This script can be used to produce a list of workspace tags in a hierarchy. The start point is @sourceid INT = 21 where:
- 21 is the tag id the workspace of a Tabbles user in your database
- MyTabblesDatabase is the name of your Tabbles' database
You probably want to replace both.
DECLARE @sourceid INT = 21;
WITH cte ([id_tag_child], [id_tag_parent], [tag_name], level, path) AS (
    SELECT [id_tag_child], [id_tag_parent], [tag_name],
           0 AS level, CAST([tag_name] AS VARCHAR(1000)) AS path
    FROM [MyTabblesDatabase].[dbo].[view_tag_has_child_for_user]
    WHERE [id_tag_parent] = @sourceid
    UNION ALL
    SELECT t.[id_tag_child], t.[id_tag_parent], t.[tag_name],
           cte.level + 1 AS level,
           CAST((cte.path + '/' +  t.[tag_name]) AS VARCHAR(1000)) AS path
    FROM [MyTabblesDatabase].[dbo].[view_tag_has_child_for_user] t
    INNER JOIN cte ON cte.[id_tag_child] = t.[id_tag_parent]
)
SELECT [id_tag_child], [id_tag_parent], [tag_name], level, path
FROM cte
WHERE path IS NOT NULL AND path NOT LIKE '!_%' ESCAPE '!'
ORDER BY path ASC
Thanks Brian for this! :-)
Problem: "We are finding staff are tagging files through different drive mappings...and we need to figure out who and what is doing it"
Script:
 SELECT *
  FROM pathTranslationRule r
  join pathTranslationRuleItem i on i.idRule = r.id
You should see something like the screenshot below:
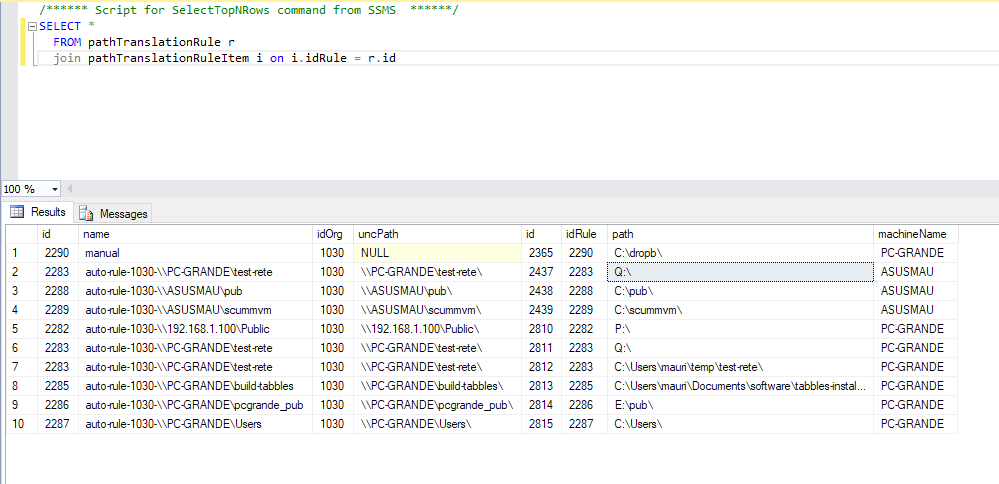
This query outputs all the mapped letters on all the machines where Tabbles it running (it doesn't output the user name, but the machine name).
Here you have 2 possible problems:
- A user mapped a letter that is unused by anybody else: if this is the case, sort the output by path and find the intruder
- A user mapped a letter on a different shared drive/folder than anybody else: in this case, sort the output by uncPath and find on what machine that drive is mapped with a funny letter
Move your tagging to a new computer
Read this if you have been using Tabbles for a a while and you change PC (or change the machine name of your PC)
When Tabbles tags a file, it saves its path along its machine name. If you start using a new PC and copy all your tagged files in exactly the same folder(s) as they used to be, you will not be able to see any of those files in Tabbles, as Tabbles still "thinks" those files are on your old machine.
Therefore, in order to fix this, you'll have to change the machine name using the Database Edit Wizard (search it in this document), you'll need to do this after you have moved your database from a PC to the next one.
Copy your database to a new PC
If you want to move the LocalDb database, you need to do the following:
- from your old PC you need to backup all the files in the current database folder %localappdata%\Tabbles\LocalDb\ probably tabbles4.mdf and tabbles4_log.ldf.
- On your new PC, you'll need to copy the database files tabbles4.mdf and tabbles4_log.ldf into the folder %localappdata%\Tabbles\LocalDb\ (if the folder doesn't exist, just create it, and afterwards Launch Tabbles, press "GO" and enjoy :)
If you have already installed and run Tabbles on the new PC, when try to copy the files into the folder of the new PC, you'll receive an error and won't be allowed to do so... so read on.
Stop and restart SQLLocalDB
- In Tabbles log out: File > Log out and after close Tabbles (close the window)
- Open a command prompt (cmd.exe) and execute the two following command lines, the result should be as in the screenshot below:
"C:\Program Files\Microsoft SQL Server\120\Tools\Binn\SqlLocalDB.exe" stop TabblesLocalDb4
"C:\Program Files\Microsoft SQL Server\120\Tools\Binn\SqlLocalDB.exe" delete TabblesLocalDb4

Now, copy the database files tabbles4.mdf and tabbles4_log.ldf into the folder %localappdata%\Tabbles\LocalDb\ you should now be able to.
- Launch Tabbles, press "GO" and enjoy :)
Change the machine name in your database
When you move your database to a new pc, each file tagged will still refer to your old machine. In order to fix this, you need to change the machine name in the database, you can do this using the Database Edit Wizard (search it in this document).
Reset Tabbles LocalDb Database
Read this if you want to reset your LocalDb database and start from scratch with a new database:
Copy paste this into a command prompt, or save it into a ResetTabblesLocalDb.bat if you want to do several experiments:
REM: those lines stop the MSSQL Local and delete the instance. If those two commands don't work, you won't be able to rename or delete the databases
"C:\Program Files\Microsoft SQL Server\120\Tools\Binn\SqlLocalDB.exe" stop TabblesLocalDb4
"C:\Program Files\Microsoft SQL Server\120\Tools\Binn\SqlLocalDB.exe" delete TabblesLocalDb4
REM: the following two lines rename the database (and its log file). You can rename them back anytime.
ren %localappdata%\Tabbles\LocalDb\tabbles4.mdf tabbles4.mdf.backup
ren %localappdata%\Tabbles\LocalDb\tabbles4_log.ldf tabbles4_log.ldf.backup
REM: this line renames the config file.
ren %appdata%\Tabbles\Config\config.xml config.xml.backup
ECHO DONE!
After you did this, if everything worked properly, when you start Tabbles again you'll be asked what mode you want to use, and if you choose "Local", Tabbles will create a new empty database.
Shrink your database to improve performances of several queries
We found that several storedProcedures speed up considerably after shrinking the database. This is how you do it:
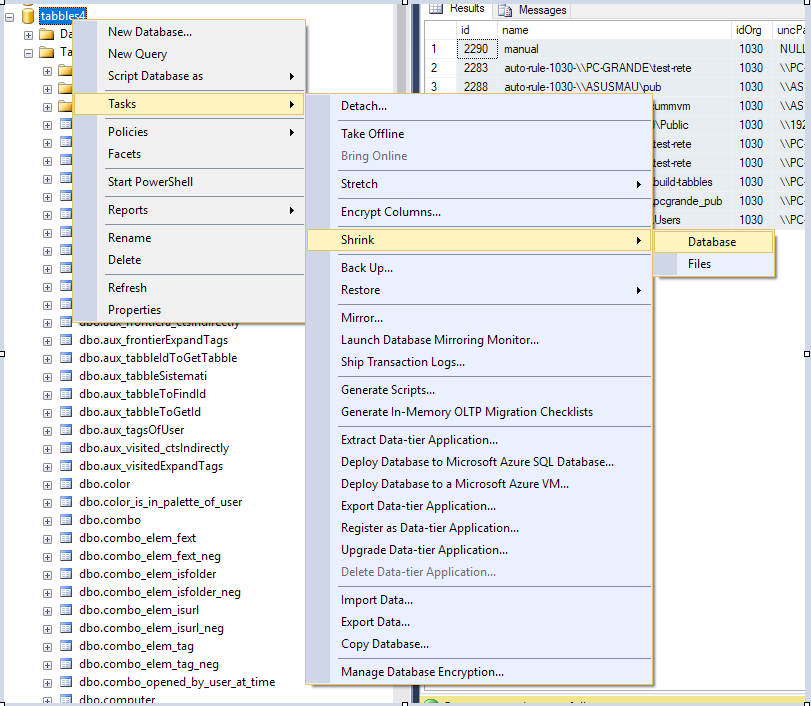
Misc howto's
See here.
Tabbles Web
Launched on August 1st 2019
Intro
We made a blog post with some info about what it does and how it works here and check the demo at http://srv.tag-forge.com/TabblesWebBeta/ (user: demo, pass: demo)
Tabbles Web 0.2.0 does the first few things that we have been asked to develop, that is it allows you to:
1) open tags and do a "Combine"
2) to copy file paths from Mac, Android and iOS (it performs a path conversion, for example from G:\Stuff to /system/disk/stuff or to smb://Shared/stuff)
3) download files (if the web server can access the files, to do this you need to have the server in your network, at least for now)
4) read the last comments
Install locally
You can download TabblesWeb (fixed download link!) and install it on your IIS instance: we believe it works also on Kestrel, we'll do some test asap and report here. Tabble Web is compatible with the current version of Tabbles 5.7.x (and Confidential 1.7.x).
The Web.config
In order to use it, you'll first need to configure the file Web.config in the root of the site, and particularly you have the setup the database info:
data source=127.0.0.1,1453; <-- write here your MSSQL address and port
initial catalog=TabblesDB; <-- write here your Tabbles database name
user id=TabblesUser; <-- write here your Tabbles database username
password=TabblesPass; <-- write here your Tabbles database password
The Contro Panel (in the Web app)
Then you'll also need to configure, in the Control Panel:
- Machine name to impersonate: write here the machine where most of the tagging was made from, Tabbles Web uses this to understand how disks have to be mapped, see below:

- Drive letter infos use this to configure the disks path conversion, so that for examples a shared drive like P:\SharedStuff will be converted to smb://NetworkServer/SharedStuff (the software will convert all the "\" into "/") and check (or not) the "Allow download" box (this will only work if the machine running IIS is able access the actual files and folder), see here:
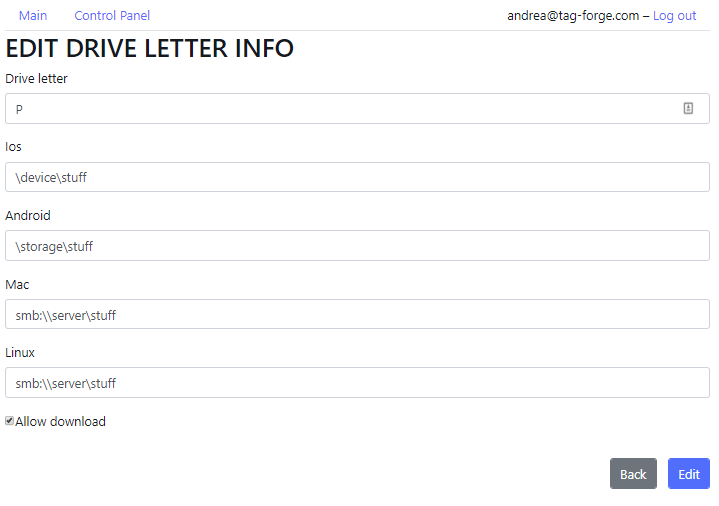
Tabbles Web should now act as any other Tabbles client and serve you the tags that the user in Web.config can see and let you download the files on the drives that the ISS machine and user can see.